Free Shipping on Domestic Orders $75+

Discipline 65 Keyboard Switch Replacement

What you need

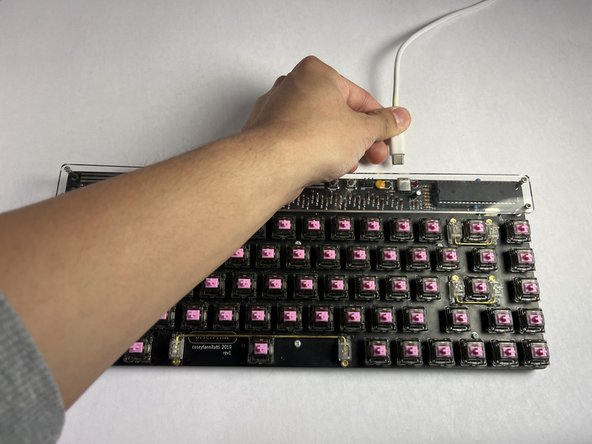
    1. Discipline 65 Keyboard Switch Replacement, Keyboard Switch: step 1, image 1 of 3 Discipline 65 Keyboard Switch Replacement, Keyboard Switch: step 1, image 2 of 3 Discipline 65 Keyboard Switch Replacement, Keyboard Switch: step 1, image 3 of 3
      • Plug the keyboard into the computer.

      Ask FixBot

      Add Comment

    2. Discipline 65 Keyboard Switch Replacement: step 2, image 1 of 3 Discipline 65 Keyboard Switch Replacement: step 2, image 2 of 3 Discipline 65 Keyboard Switch Replacement: step 2, image 3 of 3
      • Locate the faulty key or keys by pressing on them. Use an online keyboard tester to determine if the switch is working.

      • If keypress is not registered when a key is pressed, that switch needs to be replaced.

      • Keep note of where the faulty key or keys are.

      Ask FixBot

      Add Comment

    3. Discipline 65 Keyboard Switch Replacement: step 3, image 1 of 3 Discipline 65 Keyboard Switch Replacement: step 3, image 2 of 3 Discipline 65 Keyboard Switch Replacement: step 3, image 3 of 3
      • Pull each key off of the keyboard using your fingers or a key cap puller and place in a safe spot.

      • There shouldn't be a key left on the keyboard before moving forward.

      • Taking a picture of the keyboard before removal could be helpful for when reapplying the keys later.

      Ask FixBot

      Add Comment

    4. Discipline 65 Keyboard Switch Replacement: step 4, image 1 of 2 Discipline 65 Keyboard Switch Replacement: step 4, image 2 of 2
      • Unplug the keyboard from the computer.

      Ask FixBot

      Add Comment

    5. Discipline 65 Keyboard Switch Replacement: step 5, image 1 of 2 Discipline 65 Keyboard Switch Replacement: step 5, image 2 of 2
      • Flip over the keyboard so the front is face down.

      Ask FixBot

      Add Comment

    6. Discipline 65 Keyboard Switch Replacement: step 6, image 1 of 3 Discipline 65 Keyboard Switch Replacement: step 6, image 2 of 3 Discipline 65 Keyboard Switch Replacement: step 6, image 3 of 3
      • Remove ten 4 mm Phillips #0 screws using the Phillips #0 screwdriver.

      • All these screws are the same type and size. There is no need to track where you unscrewed each specific screw from.

      Ask FixBot

      Add Comment

    7. Discipline 65 Keyboard Switch Replacement: step 7, image 1 of 3 Discipline 65 Keyboard Switch Replacement: step 7, image 2 of 3 Discipline 65 Keyboard Switch Replacement: step 7, image 3 of 3
      • Remove the lid and set to the side.

      Ask FixBot

      Add Comment

    8. Discipline 65 Keyboard Switch Replacement: step 8, image 1 of 3 Discipline 65 Keyboard Switch Replacement: step 8, image 2 of 3 Discipline 65 Keyboard Switch Replacement: step 8, image 3 of 3
      • Use the soldering iron and desoldering pump to desolder the two pins corresponding to the faulty switch.

      • Work in a well-ventilated place, soldering fumes are toxic.

      • Ensure that you are comfortable with soldering before beginning. Improper technique can permanently damage the keyboard.

      Ask FixBot

      Add Comment

    9. Discipline 65 Keyboard Switch Replacement: step 9, image 1 of 2 Discipline 65 Keyboard Switch Replacement: step 9, image 2 of 2
      • Flip the keyboard back over so the front is face up.

      Ask FixBot

      Add Comment

    10. Discipline 65 Keyboard Switch Replacement: step 10, image 1 of 3 Discipline 65 Keyboard Switch Replacement: step 10, image 2 of 3 Discipline 65 Keyboard Switch Replacement: step 10, image 3 of 3
      • Pull off the faulty switch or switches by pulling firmly straight up.

      Ask FixBot

      Add Comment

    11. Discipline 65 Keyboard Switch Replacement: step 11, image 1 of 3 Discipline 65 Keyboard Switch Replacement: step 11, image 2 of 3 Discipline 65 Keyboard Switch Replacement: step 11, image 3 of 3
      • Reinsert the new switch or switches, by lining up the switch pins with the holes in the keyboard and pushing straight down.

      • Ensure that the pins of the switch line up with the holes in the keyboard. Improper insertion can bend and damage the switch pins.

      • Make sure that the switch is vertical and push straight down. Not doing this may damage the switch pins.

      Ask FixBot

      Add Comment

    12. Discipline 65 Keyboard Switch Replacement: step 12, image 1 of 2 Discipline 65 Keyboard Switch Replacement: step 12, image 2 of 2
      • Flip over the keyboard so it is face down.

      Ask FixBot

      Add Comment

    13. Discipline 65 Keyboard Switch Replacement: step 13, image 1 of 3 Discipline 65 Keyboard Switch Replacement: step 13, image 2 of 3 Discipline 65 Keyboard Switch Replacement: step 13, image 3 of 3
      • Solder newly inserted switches to the PCB, using the soldering iron and solder.

      Ask FixBot

      Add Comment

    14. Discipline 65 Keyboard Switch Replacement: step 14, image 1 of 2 Discipline 65 Keyboard Switch Replacement: step 14, image 2 of 2
      • Place the lid to the back of the keyboard back to its original position.

      Ask FixBot

      Add Comment

    15. Discipline 65 Keyboard Switch Replacement: step 15, image 1 of 3 Discipline 65 Keyboard Switch Replacement: step 15, image 2 of 3 Discipline 65 Keyboard Switch Replacement: step 15, image 3 of 3
      • Screw in all ten 4 mm Phillips #0 screws.

      Ask FixBot

      Add Comment

    16. Discipline 65 Keyboard Switch Replacement: step 16, image 1 of 2 Discipline 65 Keyboard Switch Replacement: step 16, image 2 of 2
      • Flip the keyboard back over so the front is face up.

      Ask FixBot

      Add Comment

    17. Discipline 65 Keyboard Switch Replacement: step 17, image 1 of 3 Discipline 65 Keyboard Switch Replacement: step 17, image 2 of 3 Discipline 65 Keyboard Switch Replacement: step 17, image 3 of 3
      • Reinsert each key to its original position.

      Ask FixBot

      Add Comment

    18. Discipline 65 Keyboard Switch Replacement: step 18, image 1 of 1
      • Test to make sure the faulty key of keys work again.

      • The keyboard should be ready to use again.

      Ask FixBot

      Add Comment

Conclusion

Enjoy your typing!

Cancel: I did not complete this guide.

Andrew Lam

Member since: 04/15/24

277 Reputation

1 Guide authored

Team

UC Davis, Team 1-7, Morris Spring 2024 Member of UC Davis, Team 1-7, Morris Spring 2024

UCD-MORRIS-S24S1G7

3 Members

12 Guides authored

0 Guide Comments

Add Comment

View Statistics:

Past 24 Hours: 1

Past 7 Days: 9

Past 30 Days: 49

All Time: 268