
Free Shipping on Domestic Orders $75+

Disassembling the Livebox Router

  1. Disassembling the Livebox Router, Livebox Router: step 1, image 1 of 1
    • This is the Livebox router we will dismantle.

  2. Disassembling the Livebox Router: step 2, image 1 of 2 Disassembling the Livebox Router: step 2, image 2 of 2
    • First we use an appropriate Phillips screwdriver to remove the four screws on the bottom and open the case.

  3. Disassembling the Livebox Router: step 3, image 1 of 3 Disassembling the Livebox Router: step 3, image 2 of 3 Disassembling the Livebox Router: step 3, image 3 of 3
    • In the photos we can see switches, push-buttons and various connecting points. They are used to provide access or block it; to power on or off and to reset the Wi-Fi.

  4. Disassembling the Livebox Router: step 4, image 1 of 3 Disassembling the Livebox Router: step 4, image 2 of 3 Disassembling the Livebox Router: step 4, image 3 of 3
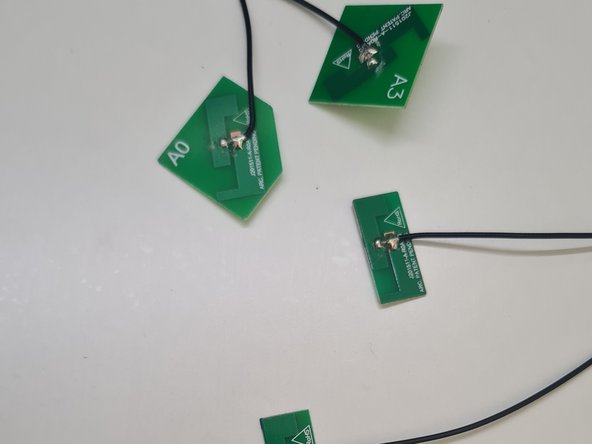
    • Inside the Router you can see some green PCBs, some are soldered while others are held in place by sockets.

    • The small socketed PCBs are antennas, they allow the transfer speed to be increased by allowing the data transfer in parallel. These antennas make it unnecessary to install external antennas as on other routers, which benefits users when installing the device on a table or shelf.

    • To extract them, we can remove the ones in sockets, if we want to remove the cable also we unplug them from the main PCB.

  5. Disassembling the Livebox Router: step 5, image 1 of 1
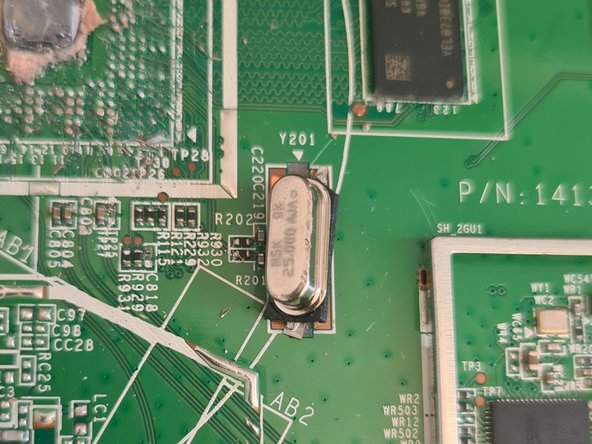
    • In the center we can see a small black "card" connected by metal projections that are soldered to the board. I do not recommend extracting it because it is very difficult to do without damage so unless you are skilled and have good reason, such as salvaging for re-use, is pointless.

    • It is a read-only-memory (ROM) chip that stores instructions and data permanently. It contains the router's firmware.

  6. Disassembling the Livebox Router: step 6, image 1 of 2 Disassembling the Livebox Router: step 6, image 2 of 2
    • Next to the chip that we have just analyzed is the processor or CPU of the router. It is a Broadcom brand processor.

    • It is responsible for managing the work of the device and is key to maintaining good performance in intensive tasks that use a lot of bandwidth.

  7. Disassembling the Livebox Router: step 7, image 1 of 2 Disassembling the Livebox Router: step 7, image 2 of 2
    • On the other side of the chip that we analyzed previously is a metal plate that we can easily lift. It contains RAM and a WiFi chip.

    • RAM (Random Access Memory) memory temporarily stores information you use in applications open on the computer, but only while it is powered on.

  8. Disassembling the Livebox Router: step 8, image 1 of 3 Disassembling the Livebox Router: step 8, image 2 of 3 Disassembling the Livebox Router: step 8, image 3 of 3
    • Above what we just analyzed, there is an electrolytic capacitor that stands out around the rest of the components that make up the power supply.

    • This capacitor with polarity is responsible for storing electrical charge.

  9. Disassembling the Livebox Router: step 9, image 1 of 3 Disassembling the Livebox Router: step 9, image 2 of 3 Disassembling the Livebox Router: step 9, image 3 of 3
    • To the right of the power supply area are two transformer modules with a large number of pins.

    • These modules are responsible for optimizing the use of resources, avoiding possible breakdowns and scheduling the maintenance cycle, extending the life of the device.

  10. Disassembling the Livebox Router: step 10, image 1 of 2 Disassembling the Livebox Router: step 10, image 2 of 2
    • An oscillator is located near the processor.

    • Oscillators, from my point of view, are circuits that generate a periodic signal at the output without having any periodic input.

  11. Disassembling the Livebox Router: step 11, image 1 of 3 Disassembling the Livebox Router: step 11, image 2 of 3 Disassembling the Livebox Router: step 11, image 3 of 3
    • Finally, you can disassemble the rest of the Router's parts, such as the semiconductor located to the right of the processor, which in my opinion is related to the RAM memory and the processor.

    • The rest of the electrolytic capacitors, with a lower capacity than the one already analyzed, can also be dismantled.

    • The rest of the components can also be disassembled, although some smaller ones are complicated, such as some connectors, ports or chips, which serve for correct functioning of the device and the Wifi.

Conclusion

To reassemble your device, follow these instructions in reverse order.

Special thanks to these translators:

es en

100%

Juan Garcia is helping us fix the world! Want to contribute?
Start translating ›

Rodrigo Calvo

Member since: 04/07/23

193 Reputation

1 Guide authored

0 Guide Comments

Add Comment

View Statistics:

Past 24 Hours: 5

Past 7 Days: 20

Past 30 Days: 71

All Time: 1,668