
Disassembling the HP Pavilion tx2500 Bezel

What you need

  1. Disassembling the HP Pavilion tx2500 Bezel, Screen Rotator: step 1, image 1 of 1
    • Completely turn off and unplug device. Lay the device bottom side up on a soft surface.

  2. Disassembling the HP Pavilion tx2500 Bezel: step 2, image 1 of 2 Disassembling the HP Pavilion tx2500 Bezel: step 2, image 2 of 2
    • Squeeze the latches on the battery until you hear a click. Slide out the battery.

  3. Disassembling the HP Pavilion tx2500 Bezel: step 3, image 1 of 1
    • Using the Phillips #0 screwdriver, remove the 4.5 mm screw from the WLAN model screen.

    • Once unscrewed, lift the right side of the WLAN module compartment cover and swing it to the left.

  4. Disassembling the HP Pavilion tx2500 Bezel: step 4, image 1 of 1
    • Using the plastic opening tool, disconnect the WLAN antenna cables from the WLAN module.

  5. Disassembling the HP Pavilion tx2500 Bezel: step 5, image 1 of 1
    • Using the Phillips #0 screwdriver, unscrew the 4.5 mm screw from the middle section in the battery compartment.

  6. Disassembling the HP Pavilion tx2500 Bezel: step 6, image 1 of 1
    • Use the plastic opening tool to disconnect the wires in the upper corners.

  7. Disassembling the HP Pavilion tx2500 Bezel: step 7, image 1 of 1
    • Flip the laptop front side up and then use your fingers to lift up the keyboard.

  8. Disassembling the HP Pavilion tx2500 Bezel: step 8, image 1 of 1
    • Lift up the black latch that connects the film strip to the base of the computer.

    • Use the plastic opening tool to disconnect the film strip from the base of the computer.

  9. Disassembling the HP Pavilion tx2500 Bezel: step 9, image 1 of 2 Disassembling the HP Pavilion tx2500 Bezel: step 9, image 2 of 2
    • Rotate the screen 90 degrees and remove the base under the screen.

  10. Disassembling the HP Pavilion tx2500 Bezel: step 10, image 1 of 1
    • Rotate the screen back towards you.

    • Lift up the convertible hinge to unclip it from the base of the computer.

  11. Disassembling the HP Pavilion tx2500 Bezel: step 11, image 1 of 2 Disassembling the HP Pavilion tx2500 Bezel: step 11, image 2 of 2
    • Using the Phillips #0 screwdriver, remove both of the 5.0 mm screws on the base of the rotator.

  12. Disassembling the HP Pavilion tx2500 Bezel: step 12, image 1 of 1
    • Gently lift up and remove the screen.

  13. Disassembling the HP Pavilion tx2500 Bezel, Bezel: step 13, image 1 of 3 Disassembling the HP Pavilion tx2500 Bezel, Bezel: step 13, image 2 of 3 Disassembling the HP Pavilion tx2500 Bezel, Bezel: step 13, image 3 of 3
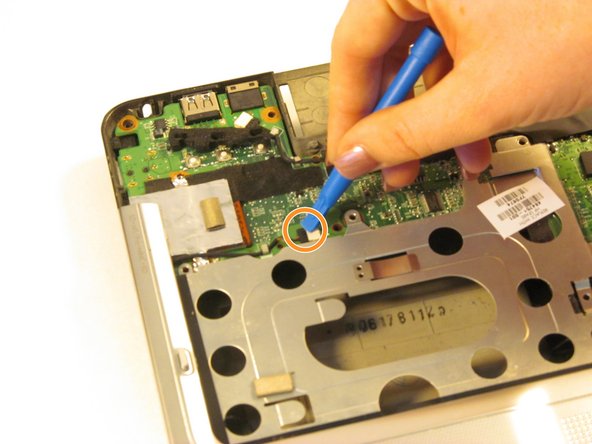
    • Disconnect the wire from the system board using the plastic opening tool.

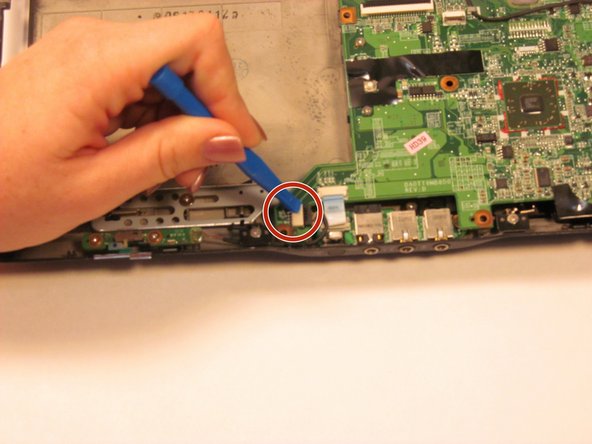
    • Disconnect the wire from the optical drive using the plastic opening tool.

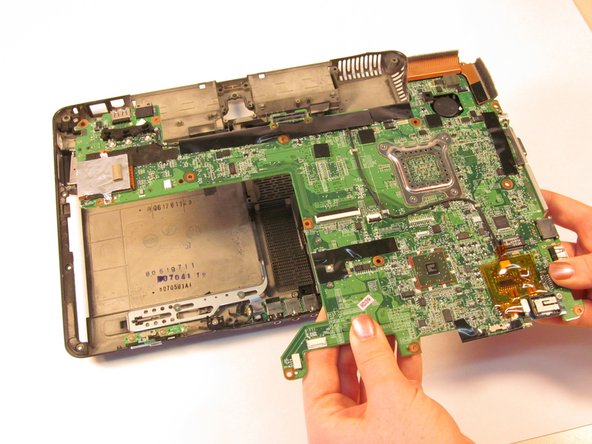
    • Gently lift the top cover from the tablet.

  14. Disassembling the HP Pavilion tx2500 Bezel: step 14, image 1 of 2 Disassembling the HP Pavilion tx2500 Bezel: step 14, image 2 of 2
    • Using the plastic opening tool, disconnect the plastic blue film from the tablet.

    • Disconnect the wire using the plastic opening tool.

  15. Disassembling the HP Pavilion tx2500 Bezel: step 15, image 1 of 2 Disassembling the HP Pavilion tx2500 Bezel: step 15, image 2 of 2
    • Lift the system board from the tablet.

    • Turn the system board over and lay it flat on a soft surface.

  16. Disassembling the HP Pavilion tx2500 Bezel: step 16, image 1 of 1
    • Gently remove the bezel from the system board.

Conclusion

To reassemble your device, follow these instructions in reverse order.

Sarah Naiser

Member since: 10/13/15

324 Reputation

2 Guides authored

0 Comments

Add Comment

View Statistics:

Past 24 Hours: 0

Past 7 Days: 2

Past 30 Days: 5

All Time: 733