
Disassembling iRobot Roomba 551 Bottom Plate

What you need

  1. Disassembling iRobot Roomba 551 Bottom Plate, Side Brush: step 1, image 1 of 1
    • Place your Roomba upside-down on a hard surface.

  2. Disassembling iRobot Roomba 551 Bottom Plate: step 2, image 1 of 1
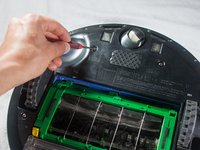
    • While holding the side brush in place, use a Phillips #1 screwdriver to remove the 4.5mm screw from the center of the brush.

  3. Disassembling iRobot Roomba 551 Bottom Plate: step 3, image 1 of 1
    • Gently pull upwards on the brush to remove it.

  4. Disassembling iRobot Roomba 551 Bottom Plate, Bottom Plate: step 4, image 1 of 1
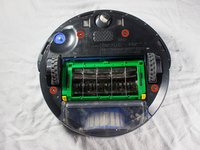
    • Rotate the Roomba upside-down so the bottom is facing towards you.

  5. Disassembling iRobot Roomba 551 Bottom Plate: step 5, image 1 of 2 Disassembling iRobot Roomba 551 Bottom Plate: step 5, image 2 of 2
    • Using a Phillips #2 screwdriver, remove the captive screws that hold the bottom plate in place.

  6. Disassembling iRobot Roomba 551 Bottom Plate: step 6, image 1 of 1
    • Carefully lift the bottom plate.

    • The battery is only secured in place by the bottom plate, and may fall out once the bottom plate is removed.

Conclusion

To reassemble your device, follow these instructions in reverse order.

Deborah Newberry

Member since: 01/23/14

623 Reputation

4 Guides authored

Team

Cal Poly, Team 13-14, Regan Winter 2014 Member of Cal Poly, Team 13-14, Regan Winter 2014

CPSU-REGAN-W14S13G14

4 Members

19 Guides authored

0 Comments

Add Comment

View Statistics:

Past 24 Hours: 2

Past 7 Days: 8

Past 30 Days: 49

All Time: 2,257