Introduction
This guide explains how to remove the covers to access the mechanism.
You need (1) a cross head Philips no.2 screwdriver, (2) a short slotted head screwdriver for the needle plate screws, or you can use a suitable screwdriver bit with a spanner or pliers to turn it, and (3) a "spudger", a thin tool to unclip the front and back sections of the cover from each other. You can use a thin metal one, or a plastic one similar to a guitar pick.
The terms front, back, left, right, top and bottom mean, part of the machine as seen when facing it in the normal operating position.
Screw lengths are given in the guide. Check them when replacing!
What you need
-
-
-
Remove the two slotted screws holding the needle plate and remove it. If they're stiff you can use a ¼” (6.5mm) spanner to turn a suitable screwdriver bit.
 Ask FixBot
-
-
-
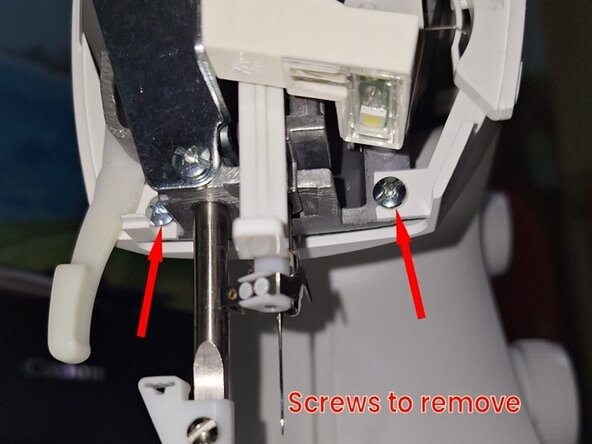
Remove the screw (10mm) holding the lamp cover and remove the lamp cover. (When you replace it, note that the bottom of the cover has a recess that must fit over the thread guide.)
-
-
-
Remove the bottom panel:
-
2 x 8mm screws, 1 x 10mm pan head screw that secures a foot, 1 x self tapping 12 mm screw, one much larger pan head screw.
-
Also unscrew the adjustable foot that has a coil spring beneath it.
-
-
-
Remove screw (10mm) on small bottom left panel with bobbin access door. This panel is held in place between the main front and back panels and can be removed later.
-
-
-
Remove 3 screws (8mm) on back of machine, holding the back cover.
-
-
-
-
Remove 2 screws (8mm) on the left hand side near the lamp, holding the edges of the back and front covers.
-
-
-
Pull off the knobs (might need to pull hard.) This is not essential unless you need to remove the front cover, but it makes the next step a little easier.
-
-
-
Using a thin “spudger,” unclip the back and front covers from each other. It is probably easier to start on the left hand side, and then the base next to the needle plate, and gradually work round. Use several spudgers if you have them, to hold the unclipped edges apart.
-
-
-
Pull the back cover off, bending it slightly to clear the power input and switch.
-
The panel with the bobbin access door can now be removed.
-
-
-
Only if you need to remove the front cover: first remove the internal screw (15mm self tapping) holding the front cover to the frame. This is accessed through a hole about a centimetre in diameter in the alloy frame, near where the lamp wire runs.
-
Remove the front cover, lifting it over the tension dial.
-
-
-
When putting it back together, note:
-
The knobs won't push fully home unless they're the right way round.
-
Check the screw lengths. Using a screw that's too long can cause damage.
-
Fit the panel that holds the bobbin access door before you fix the main front and back covers in place.
-
When you fit the back panel, hold the presser foot lever up.
-
-
-
Final step - screw the adjustable foot in or out until the machine sits on a flat surface without rocking.
-
-
See the re-assembly notes at the end of the guide.

