Free Shipping on Domestic Orders $75+

Disassembling Olympus TG-6

What you need

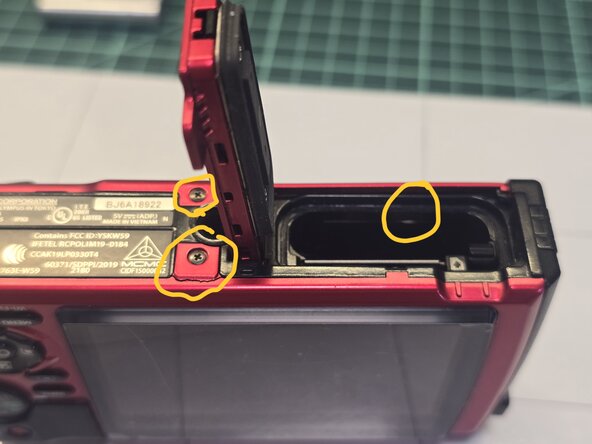
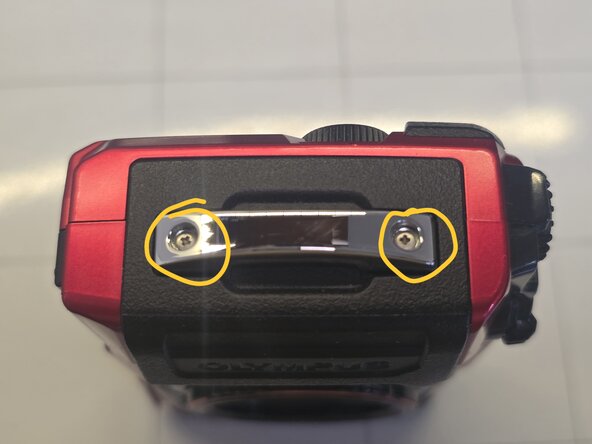
    1. Disassembling Olympus TG-6, Remove front cover: step 1, image 1 of 3 Disassembling Olympus TG-6, Remove front cover: step 1, image 2 of 3 Disassembling Olympus TG-6, Remove front cover: step 1, image 3 of 3
      • Remove the 5 screws on the outside, one screw in the battery compartment and one in the connector compartment

      • You can now remove the front cover

      Ask FixBot

      Add Comment

    2. Disassembling Olympus TG-6, Remove zoom lever: step 2, image 1 of 1
      • Remove both screws

      Ask FixBot

      Add Comment

    3. Disassembling Olympus TG-6, Remove top cover: step 3, image 1 of 1
      • Remove both screws

      Ask FixBot

      Add Comment

    4. Disassembling Olympus TG-6, Remove back cover screws: step 4, image 1 of 3 Disassembling Olympus TG-6, Remove back cover screws: step 4, image 2 of 3 Disassembling Olympus TG-6, Remove back cover screws: step 4, image 3 of 3
      • Remove the 3 screws in the front and one on top

      • After this you can unlatch it from the side and open the cover carefully for a little bit. The screen is still attached through 2 ribbon cables so don't open completely.

      Ask FixBot

      Add Comment

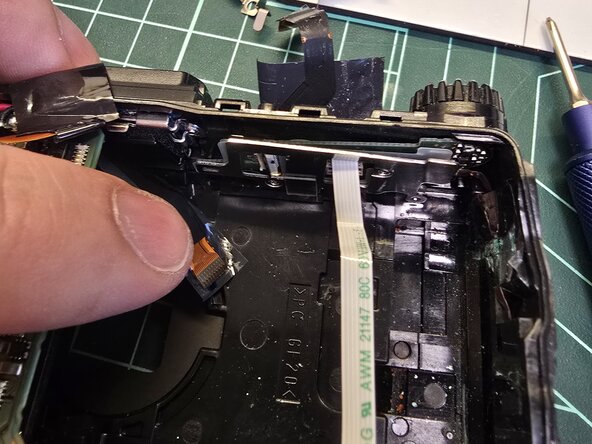
    5. Disassembling Olympus TG-6, Unlatched the small ribbon cable: step 5, image 1 of 2 Disassembling Olympus TG-6, Unlatched the small ribbon cable: step 5, image 2 of 2
      • Unlatched the small ribbon cable connecting the buttons pcb with the camera

      • After this you can open the camera carefully not to add strain to the still connected screen ribbon cable.

      Ask FixBot

      Add Comment

    6. Disassembling Olympus TG-6, Remove screen from back cover: step 6, image 1 of 2 Disassembling Olympus TG-6, Remove screen from back cover: step 6, image 2 of 2
      • At this point I saw a screw that was completely corroded on the bottom left

      • Remove all screws indicated in the picture

      Ask FixBot

      Add Comment

    7. Disassembling Olympus TG-6, Remove buttons from back cover: step 7, image 1 of 2 Disassembling Olympus TG-6, Remove buttons from back cover: step 7, image 2 of 2
      • Remove the screws

      Ask FixBot

      Add Comment

    8. Disassembling Olympus TG-6, Remove screen and other ribbon cables.: step 8, image 1 of 3 Disassembling Olympus TG-6, Remove screen and other ribbon cables.: step 8, image 2 of 3 Disassembling Olympus TG-6, Remove screen and other ribbon cables.: step 8, image 3 of 3
      • The flash capacitors are behind the copper plate in the bottom. MAKE SURE TO DISCHARGE THEM! Even with the battery disconnected, if they are charged they can shock, burn or even kill you.

      • I started realising how much damage there was and didnt think I would be able to repair it, but continued opening it in case somebody needs this

      Ask FixBot

      Add Comment

    9. Disassembling Olympus TG-6: step 9, image 1 of 3 Disassembling Olympus TG-6: step 9, image 2 of 3 Disassembling Olympus TG-6: step 9, image 3 of 3
      Ask FixBot

      Add Comment

    10. Disassembling Olympus TG-6, Microphone: step 10, image 1 of 2 Disassembling Olympus TG-6, Microphone: step 10, image 2 of 2
      Ask FixBot

      Add Comment

    11. Disassembling Olympus TG-6, Shutter controls: step 11, image 1 of 2 Disassembling Olympus TG-6, Shutter controls: step 11, image 2 of 2
      Ask FixBot

      Add Comment

    12. Disassembling Olympus TG-6, Speaker: step 12, image 1 of 1
      • Speaker, with little spring there

      Ask FixBot

      Add Comment

    13. Disassembling Olympus TG-6, Sensor module: step 13, image 1 of 1
      • I had corrosión on the sensor module screws so... not really worth cleaning afaik

      Ask FixBot

      Add Comment

    14. Disassembling Olympus TG-6, Flash capacitor: step 14, image 1 of 1
      • Rubicon 330v 36uF A1911 capacitor. If somebody can find a spare let me know.

      Ask FixBot

      Add Comment

Conclusion

To reassemble your device, follow these instructions in reverse order.

The corrosion damage was too bad in this camera to be repaired, even if I could power it on and the viewfinder worked. The flash capacitors need to be replaced, and they don't sell spare parts... I also had to destroy 3 corroded screws to remove them.

Cancel: I did not complete this guide.

nuage

Member since: 08/21/12

1 Reputation

1 Guide authored

0 Guide Comments

Add Comment

View Statistics:

Past 24 Hours: 2

Past 7 Days: 10

Past 30 Days: 55

All Time: 57