
Disassembling Nothing Headphone (1)

Last updated on Nov 13, 2026
Views: 90
View statistics:
- Past 24 Hours:
- 29
- Past 7 Days:
- 90
- Past 30 Days:
- 90
- All Time:
- 90
Comments: 0
No one has left comments on this guide. Will you be first?
Go to guide commentsCompleted: 0 1
No one has marked this guide "completed." Will you be the first?
1 person has marked this guide "completed." It's you — great job!
Favorites: 0 1
No one has favorited (and subscribed to) this guide. Will you be the first?
1 person has favorited (and subscribed to) this guide — and that's you!
Community-Contributed Guide
An awesome member of our community made this guide. It was not created by iFixit staff.
Introduction
Go to step 1 ↓The process outlined in this guide was used to fix water damage. The headband was not disassembled.
Battery Warning: Ideally, discharge the battery before disassembling. There's no good way to disconnect the batteries temporarily. Exercise extreme caution around the batteries and take care not to short them when the headphones are disassembled.
What you need
Tools


-
-
-
Note: It is very easy to break the clips that keep the cushions on. Study the photos of the cushions before proceeding, note where all the clips are.
-
Carefully squeeze, as shown in the photo, and pull it off from the top.
 Ask FixBot
-
-
-
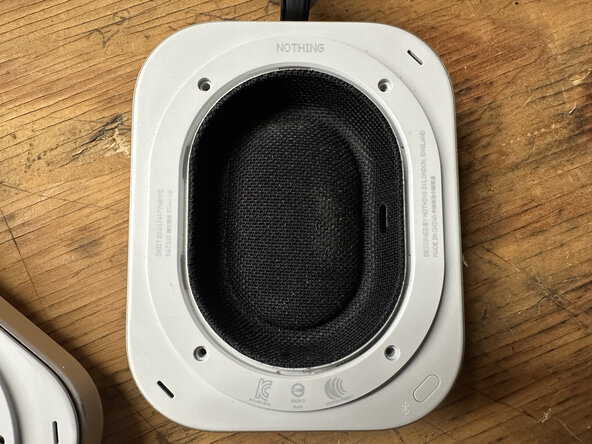
There are 4x identical T5 Torx screws in each headphone. Remove them.
-
They are identical, but it is a best practice to reassemble them in the same position, so ideally set them aside in a manner that shows where each went.
-
-
-
-
Warning: Utmost care must be taken during this step to not damage the plastic part of the speakers. Study all the photos and bullets in this step before proceeding.
-
The speaker components are connected in a similar manner as the cushions, with clips.
-
The best way I've found to detach them is sliding an injector razor exactly in the spot photographed, and rotating it forward when you're deep enough.
-
Be patient and exercise caution during this step to avoid damaging the plastic.
-
I've tried shims, plastic razors, and other non-marring tools; nothing else was thin enough to fit the clearance. Other types of razor blades or certain X-Acto knife blades should also work.
-
Do not attempt this from the bottom; ribbon cables for the speakers and mics are located there.
-
-
-
Before proceeding, you may want to work on a grounded ESD mat and ground yourself.
-
There are two ribbon cables for each speaker.
-
First, you'll have to remove the black silicone adhesive used as strain relief each of the four ribbon cables. I carefully used tweezers. A toothpick, flosser, or small plastic pick also works.
-
Second, you can flip up the latch on the ZIF connectors and pull the ribbons out. The flat end of a spudger is ideal for this, but optional.
-
With the speakers disconnected, here is where I repaired water damage by brushing away corrosion with 99% IPA. If you do this, be extremely careful cleaning the board while the batteries are still connected.
-
-
-
Getting the ribbon cables back in is difficult. Shrink the headband to its smallest size first to make it easier.
-
Kapton tape can be used for strain relief in place of the black silicone adhesive we removed.
-
When reinserting the speakers into the outer shell, take great care to not damage the ribbon cables. Insert bottom first, slowly push the rest down, and ensure all the clips fully seat.
-
(Optional Overkill): Reinstall the screws in their original positions. Thread them all in loosely, then tighten in a crisscross pattern.
-
When reattaching the cushions, ensure all the clips fully seat.
-
-




Note to anyone trying to replace the batteries: there are two in the left earcup. Approximate dimensions are 55mm length, 11mm width, 7mm height.

