
15% Off Selected iFixit Tools — Limited Time
Free Shipping on Domestic Orders $75+

Disassembling Canon PowerShot S50 Outer Casing

What you need

  1. Disassembling Canon PowerShot S50 Outer Casing, Battery: step 1, image 1 of 2 Disassembling Canon PowerShot S50 Outer Casing, Battery: step 1, image 2 of 2
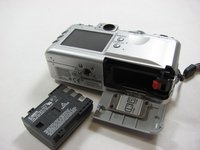
    • Place camera LCD side up and press up on the battery door.

    • Let it swing open until you can see the battery inside.

    Ask FixBot

    Add Comment

  2. Disassembling Canon PowerShot S50 Outer Casing: step 2, image 1 of 1
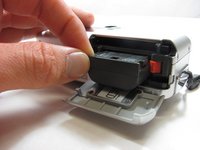
    • Press down on the orange plastic.

    • This will gently eject the battery from its compartment.

    Ask FixBot

    Add Comment

  3. Disassembling Canon PowerShot S50 Outer Casing: step 3, image 1 of 2 Disassembling Canon PowerShot S50 Outer Casing: step 3, image 2 of 2
    • Holding the edges, slide out the battery.

    Ask FixBot

    Add Comment

  4. Disassembling Canon PowerShot S50 Outer Casing, Front Panel/Battery Door: step 4, image 1 of 1
    • Look at the camera from the side with the lanyard and 4 screws.

    • Remove the two 3.4 mm screws on the metallic colored part.

    Ask FixBot

    Add Comment

  5. Disassembling Canon PowerShot S50 Outer Casing: step 5, image 1 of 1
    • Remove the 3mm screw on the top left.

    • NOTE: When reassembling, it is helpful to put the top screw back in before placing the front cover back on the camera.

    • Now remove the 5.3mm screw on the bottom.

    Ask FixBot

    Add Comment

  6. Disassembling Canon PowerShot S50 Outer Casing: step 6, image 1 of 1
    • Place the camera LCD side down.

    • Remove the two 5.3mm screws by the battery door.

    Ask FixBot

    Add Comment

  7. Disassembling Canon PowerShot S50 Outer Casing: step 7, image 1 of 1
    • Remove the four 3.4mm screws on the bottom of the camera around the tripod mount.

    • Make sure to keep these screws separate from the previous 5.3 mm screws.

    Ask FixBot

    Add Comment

  8. Disassembling Canon PowerShot S50 Outer Casing: step 8, image 1 of 1
    • Stand the camera back up.

    • Remove the two 3.6mm screws on the side with the A/V Out port.

    Ask FixBot

    Add Comment

  9. Disassembling Canon PowerShot S50 Outer Casing: step 9, image 1 of 1
    • Lift open the rubber flap covering the A/V Out port.

    • Remove the 3.4mm screw in the center.

    • During reassembly, put the A/V out rubber door on before replacing the front panel of the camera

    Ask FixBot

    Add Comment

  10. Disassembling Canon PowerShot S50 Outer Casing: step 10, image 1 of 1
    • Use a spudger and gently open up the front panel of the camera.

    • A thin plastic ribbon will stay connected by a brown piece to front panel of the camera.

    Ask FixBot

    Add Comment

  11. Disassembling Canon PowerShot S50 Outer Casing: step 11, image 1 of 1
    • There will be a brown plastic piece keeping the thin plastic ribbon in place.

    • Use the spudger to pull out the brown plastic piece attached to the orange plastic.

    Ask FixBot

    Add Comment

  12. Disassembling Canon PowerShot S50 Outer Casing: step 12, image 1 of 1
    Tool used on this step:
    Tweezers
    $4.99
    Buy
    • Use a pair of tweezers and remove the metal piece inside the camera.

    Ask FixBot

    Add Comment

  13. Disassembling Canon PowerShot S50 Outer Casing: step 13, image 1 of 1
    • Remove the battery door

    • NOTE: Putting this back on requires aligning the spring on the back of the door with the hole on the camera

    Ask FixBot

    Add Comment

  14. Disassembling Canon PowerShot S50 Outer Casing, Outer Casing: step 14, image 1 of 1
    • Using a spudger, gently separate the back panel from the rest of the camera and remove it.

    Ask FixBot

    Add Comment

Conclusion

To reassemble your device, follow these instructions in reverse order.

Cancel: I did not complete this guide.

One other person completed this guide.

Karim

Member since: 04/12/12

45 Reputation

3 Guides authored

Team

Cal Poly, Team 7-34, Maness Spring 2012 Member of Cal Poly, Team 7-34, Maness Spring 2012

CPSU-MANESS-S12S7G34

5 Members

6 Guides authored

1 Guide Comment

Hey, i have this camera, and i recently dropped it :( a big part of the buttons don’t work anymore. do you have any idea what i can do to fix it?

Luna Scholten - Reply Share

Add Comment

View Statistics:

Past 24 Hours: 1

Past 7 Days: 6

Past 30 Days: 26

All Time: 2,160