
DigiTech RP70 Input/Output ¼” Ports Replacement

What you need

  1. DigiTech RP70 Input/Output ¼” Ports  Replacement, Motherboard: step 1, image 1 of 2 DigiTech RP70 Input/Output ¼” Ports  Replacement, Motherboard: step 1, image 2 of 2
    • Unplug the device from its AC power adapter; unplug anything connected to the input/output jacks.

    • Remove the four 8mm Phillips #0 screws located on the back panel.

  2. DigiTech RP70 Input/Output ¼” Ports  Replacement: step 2, image 1 of 2 DigiTech RP70 Input/Output ¼” Ports  Replacement: step 2, image 2 of 2
    • Remove the back panel to expose the motherboard.

  3. DigiTech RP70 Input/Output ¼” Ports  Replacement: step 3, image 1 of 1
    • Remove the two 11mm #0 Phillips screws located at the bottom of the motherboard.

  4. DigiTech RP70 Input/Output ¼” Ports  Replacement: step 4, image 1 of 1
    • Lift the indented end of the motherboard opposite the input/output jacks. Then, pull away from the input/output jacks to slide the motherboard out of the casing.

  5. DigiTech RP70 Input/Output ¼” Ports  Replacement, Input/Output ¼” Ports: step 5, image 1 of 2 DigiTech RP70 Input/Output ¼” Ports  Replacement, Input/Output ¼” Ports: step 5, image 2 of 2
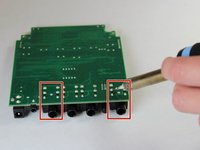
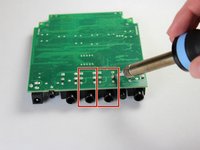
    • Desolder the back of the motherboard where the damaged input/output port is located.

Conclusion

To reassemble your device, follow these instructions in reverse order.

One other person completed this guide.

0 Comments

Add Comment

View Statistics:

Past 24 Hours: 0

Past 7 Days: 1

Past 30 Days: 1

All Time: 302