Introduction
If you are evaluating a SSD in use for years or in a used machine you just got, this guide will show you how to do basic tests to detect common problems. While these tests are not perfect, they will detect MOST issues.
Common drive problems include:
- High hours (Wear and tear, increased failure risk, SSDs with heavy use)
- Reallocated sectors (pending and fully reallocated)
- Hidden problems
Why should used SSDs be checked?
Most failures are sudden and without warning, if not known in advance due to lack of symptoms. If the machine has problems and the issue is caught early, it will give you time to move everything and replace the drive before it fails. While SMART can only do so much, it plays a significant role since the data can be used to catch a failure before it occurs.
Guide notes
- While Parted Magic is open-source (GPL) and can be legally redistributed, purchase it directly from the official Parted Magic website to guarantee authenticity:
- $17 single download (no updates)
- Subscription: $49 yearly/$13 quarterly
- Lifetime: $199 (only recommended for shops and regular users)
- Enterprise Compliance License: $600 (You probably don't need this)
- These tests are not 100% accurate. Some problems can (and do) slip past these tests.
USB Enclosures & Compatibility
If you are using a cheap USB enclosure and the drive does not show up, your enclosure is likely incompatible. Use a UASP-verified enclosure capable of passing commands through as-is, or connect the drive directly to a PC motherboard.
Sector remapping:
- While WD and Seagate offer diagnostic tools for HDDs, fewer tools exist like this for SSDs as many lean on standard commands - however, Samsung has Samsung Magician (Retail only, will not work on "PM" OEM drives) and Crucial (Micron) has Storage Executive, as well as WD/SanDisk. I will add tools like this here as I locate them, but outside of those, no other vendor offers a customer facing tool like this, they use SMART with customers. However, these tools DO NOT CORRECT MAJOR FAILURES; some minor errors can be fixed with a free space erase or secure erase, but major errors require a new drive.
- IMPORTANT: If you can do so before testing, back up your data. In some cases during testing, a drive that is on the way out may fail while being diagnosed.
- DO NOT FIX THE DRIVE IF THERE ARE EXCESSIVELY HIGH SMART ERRORS. Back up the data, transfer the data, wipe the old drive, and replace it!
What you need
-
-
They can be purchased here if you cannot salvage one: UGREEN USB to USB C Adapter & USB C to USB Adapter Combo 4-Pack.
 Ask FixBot
-
-
-
Connect the drive using a USB adapter, or plug it directly into a free internal slot (SATA or M.2) on your motherboard.
-
-
-
Start Ubuntu and run sudo apt-get install nvme-cli on the live image.
-
NOTE: The device dev ID can be found in Disks, each machine will be different. After installing nvme-cli, run the following command: sudo nvme smart-log -H /dev/nvmeX (change X for the SSD ID). External SSDs may use /dev/sdbX, but same rule for probing it in CLI applies - just double check with externals.
-
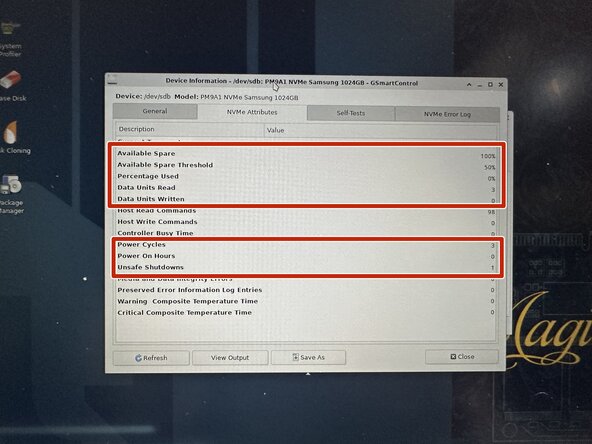
Check the following data first: Percentage used, Data Written, Power on hours, Unsafe shutdown (less critical, but check!), Media errors.
-
-
-
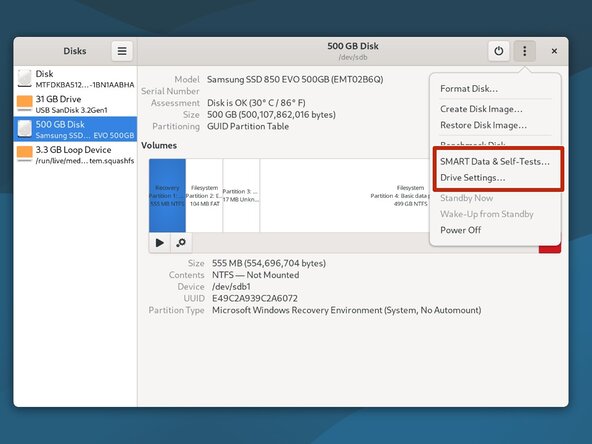
Boot your system into a live Linux session. Locate the Disks application and select the SSD you want to test.
-
From the drop-down menu, select SMART Data and Self Tests. This will pull up the SMART data.
-
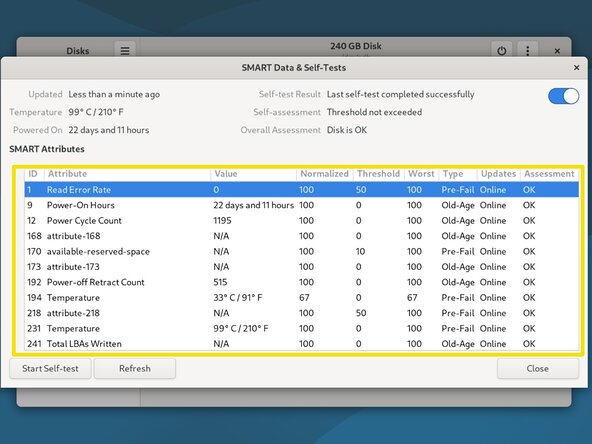
Locate the following SMART attributes: Power On Hours, Power Cycle Count, Reallocated sector count and wear leveling count.
-
Example of a unnessacarily overencrypted SSD's SMART data.
-
-
-
-
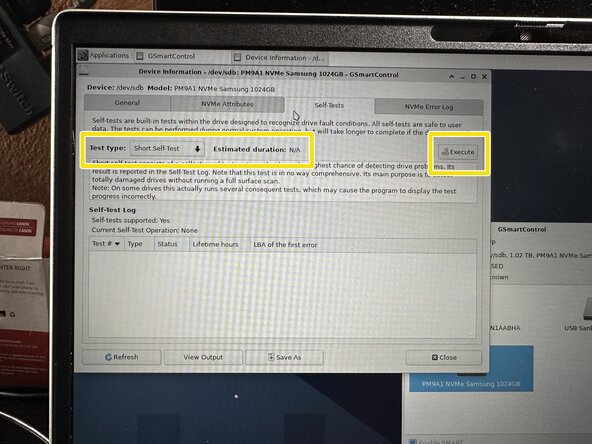
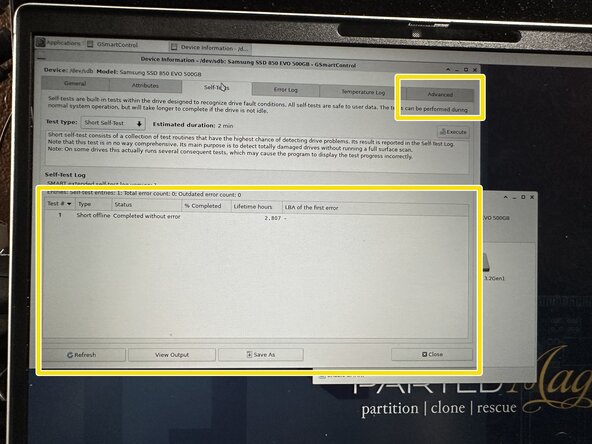
To run a SMART Extended Self-Test, left click Start Self-Test. Select Extended from the drop-down menu.
-
-
-
In the Attributes tab, locate the following SMART attributes: Available Spare (and Spare Threshold), Percentage used, Data Units (Written), Power Cycles, Power on hours, and Unsafe shutdown (less critical, but check!).
-
To access the NVMe logs, click on NVMe Errors.
-
To test the drive, select Perform Tests. Click Test type: and select Extended Self-Test.
-
-
-
In the event your drive adapter DOES NOT populate the data and shows this, you have to find a different adapter. However, the need for this can be verified in Terminal to make sure it is NOT a GUI issue with the following command: smartctl - H /dev/X (replace X with sdbX, X being the drive number if present).
-
If Terminal just says SMART Health Status: OK, the adapter you picked has issues in Parted Magic (likely due to a chipset blacklist). Pick another adapter as you're flying blind.
-
-
-
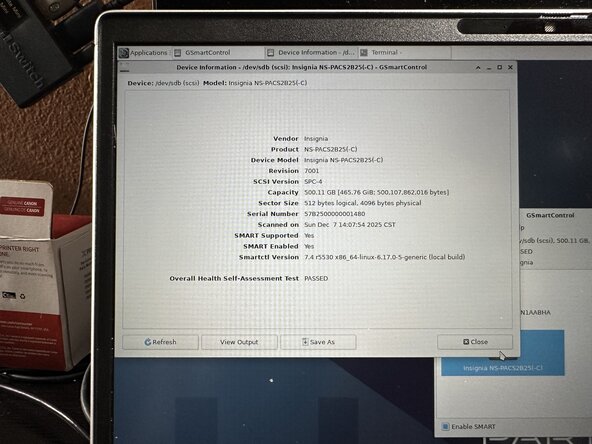
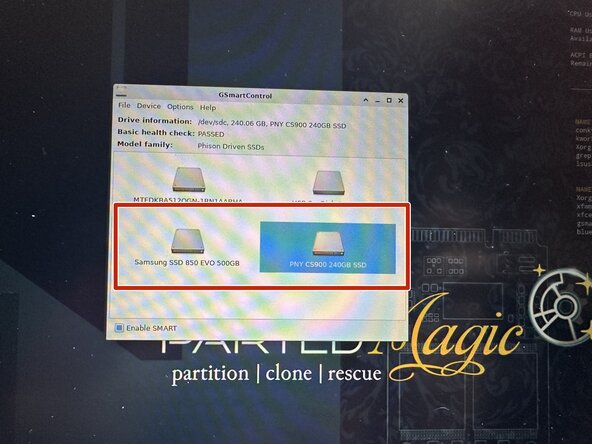
Select Disks from the desktop to open GSmartControl.
-
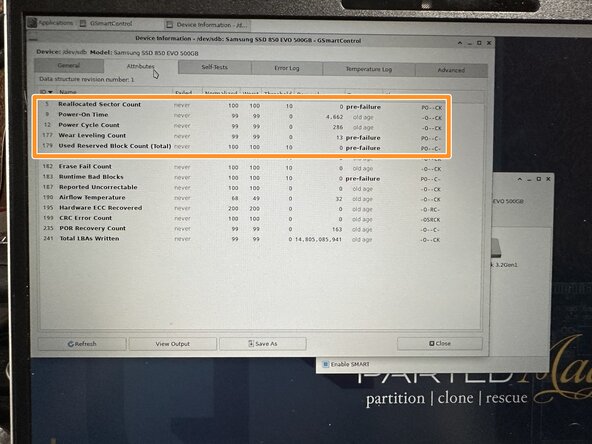
Select the hard disk you want to test. Click Attributes to read the SMART data.
-
Locate the following attributes: Reallocated Sector Count, Power On Time, Power Cycle Count and Wear Leveling Count.
-
In order to check the error logs, click Error Log. Any errors will be stored here. Some drives offer additional data, which can be accessed under Advanced.
-
-
-
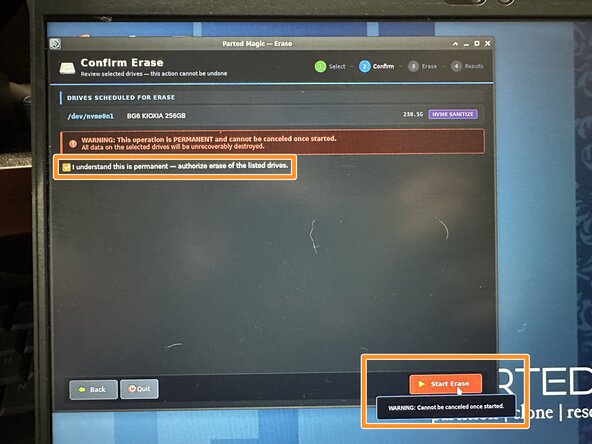
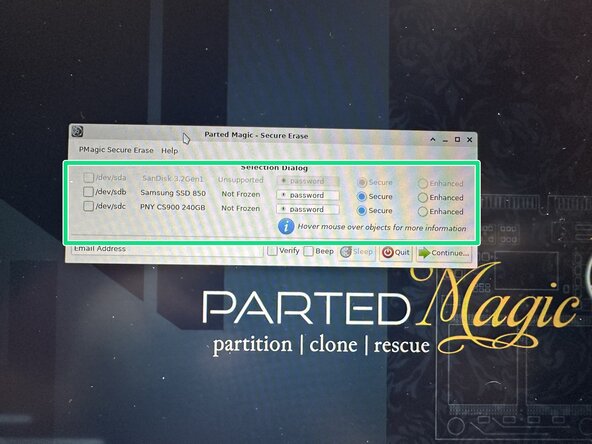
Select the SSD needing to be erased (Verification is optional but recommended) and click Continue.
-
Click Continue and then the "I understand this is permanent" box, then Continue again. The erase will proceed.
-
-
-
Before erasing the machine, you must fill this out in it's entirety:
-
-
-
Toggle NIST Purge ON (100% verification required for NIST certified erasures), select your SSD, and open Cert Info to ensure the form is complete. In the "asset tag" box, enter the drive S/N and client-assigned asset tag—or use the motherboard S/N and SSD S/N as a fallback if DMI auto-detection fails.
-
Once all certificate info is filled out, click Continue, check "I understand this is permanent", and hit Start Erase.
-
When finished, download and save the erase logs and compliance certificate—which serves as your client's official Certificate of Sanitization/Destruction—and ensure they read SUCCESS to be compliant. Print and deliver these to the client with your intake form, and store the wiped drive in a labeled, dated, and sealed ESD bag.
-
If the client demands destruction of the drive, you must generate a Certficate of Destruction (CoD). Only do this after erasing the drive. Process not shown due to iFixit platform photo limits.
-
-
-
AHCI drives (M.2 SATA/2.5" drives/3.5" drives) When possible for security (and in the case of SSDs, reduced or mitigated drive wear), try to use the ATA Secure Erase option when possible, unless the drive has known bugs (see warning above).
-
If you can tolerate a little less security, Disk and Shred are faster then Nwipe, but at the expense of wipe security being compromised. It is fine for personal reuse but should not be used on a drive you are disposing of.
-
NVMe SSD Recomendation: When possible, use NVMe secure erase. This is instant because it destroys the encryption key on these drives so the data can no longer be read and does not need to zero out the entire drive.
-
-
-
Open Erase Disk and select Block Wiping (called External on very old builds). Choose either Disk or Shred (both do the same thing).
-
Select all "mmcblk" drives.
-
Note: Drives that cannot be wiped will throw an access error and close—this is a harmless nuisance error expected on older builds attempting to write to hardware-locked boot partitions—dismiss the error and let the main eMMC partition format.
-
Start the erase. This typically takes 20 to 25 minutes, though slow eMMC controllers may take up to 40 minutes.
-


Cancel: I did not complete this guide.
One other person completed this guide.
