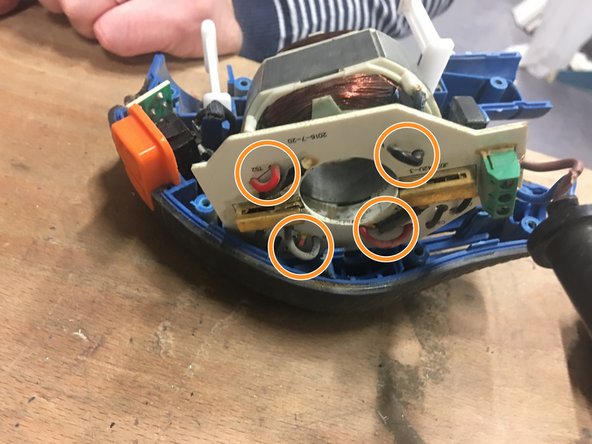
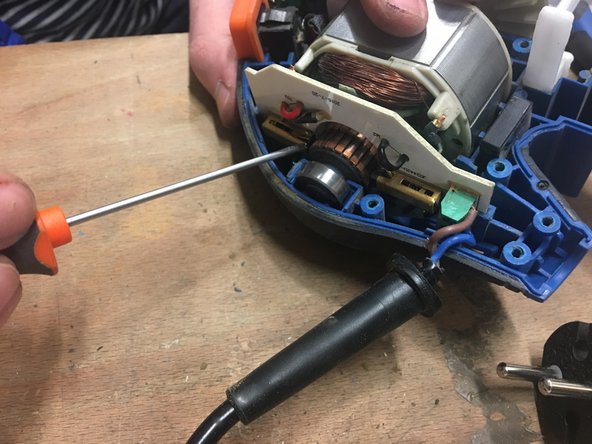
Dexter Wired Multifunction Sander 220W - 220MFS2.5 Engine Replacement

What you need

  1. Dexter Wired Multifunction Sander 220W - 220MFS2.5 Engine Replacement, Unplug: step 1, image 1 of 1
    • Before you start, remember to disconnect the outlet from the mains.

  2. Dexter Wired Multifunction Sander 220W - 220MFS2.5 Engine Replacement: step 2, image 1 of 1
    • Remove the seal on the back of the device.

  3. Dexter Wired Multifunction Sander 220W - 220MFS2.5 Engine Replacement: step 3, image 1 of 3 Dexter Wired Multifunction Sander 220W - 220MFS2.5 Engine Replacement: step 3, image 2 of 3 Dexter Wired Multifunction Sander 220W - 220MFS2.5 Engine Replacement: step 3, image 3 of 3
    • Unscrew the first screw of the pad.

    • Then unscrew the four remaining screws and pull up to remove it.

    • Finally, remove the screws located on the hull of the device.

    • This step is the same for both carbons.

    • Trap the two carbons to be able to take out the rotor. With a screwdriver to lift them up, then with another screwdriver press the tab.

    • Lift the carbons and with the other tip of the screwdriver, come twist the small paw.

    • Then remove the carbon.

    • Remove the rotor by lifting the frame to be able to retrieve it more easily.

  4. Dexter Wired Multifunction Sander 220W - 220MFS2.5 Engine Replacement: step 6, image 1 of 2 Dexter Wired Multifunction Sander 220W - 220MFS2.5 Engine Replacement: step 6, image 2 of 2
    • Use a soldering iron to weld the component's rotor.

    • De-solder at the location of the wires.

    • Then remove the wires one by one to remove the component.

  5. Dexter Wired Multifunction Sander 220W - 220MFS2.5 Engine Replacement: step 7, image 1 of 1
    • Return the new component to its location.

    • Then unfold the four threads in their place.

  6. Dexter Wired Multifunction Sander 220W - 220MFS2.5 Engine Replacement: step 8, image 1 of 3 Dexter Wired Multifunction Sander 220W - 220MFS2.5 Engine Replacement: step 8, image 2 of 3 Dexter Wired Multifunction Sander 220W - 220MFS2.5 Engine Replacement: step 8, image 3 of 3
    • Replace the rotor in its housing.

    • Unlock the carbons.

    • Replace the cable, the sheath must arrive between the two studs and the sleeve must be positioned in its housing.

  7. Dexter Wired Multifunction Sander 220W - 220MFS2.5 Engine Replacement: step 9, image 1 of 2 Dexter Wired Multifunction Sander 220W - 220MFS2.5 Engine Replacement: step 9, image 2 of 2
    • Replace the hull of the sander by being careful to properly position the stabilisers in their housing.

    • Finally, remove the screws located on the hull of the device.

  8. Dexter Wired Multifunction Sander 220W - 220MFS2.5 Engine Replacement: step 10, image 1 of 3 Dexter Wired Multifunction Sander 220W - 220MFS2.5 Engine Replacement: step 10, image 2 of 3 Dexter Wired Multifunction Sander 220W - 220MFS2.5 Engine Replacement: step 10, image 3 of 3
    • Replace the pad by positioning it perfectly in the tips.

    • Screw the four screws.

    • Then the last screw. Finally, put the joint back in its place.

Conclusion

To reassemble follow the steps in reverse.

Special thanks to these translators:

fr en

100%

HelloMacOS is helping us fix the world! Want to contribute?
Start translating ›

Céline Chemineau

Member since: 01/29/20

16,581 Reputation

95 Guides authored

Team

Leroy Merlin Member of Leroy Merlin

Community

36 Members

239 Guides authored

0 Comments

Add Comment

View Statistics:

Past 24 Hours: 0

Past 7 Days: 1

Past 30 Days: 5

All Time: 83