Introduction
This guide shows how to replace the SSD in the Dell XPS 13. If your old SSD still works, be sure to create a full backup or clone the drive before you begin. You can use this guide either to upgrade to a higher-capacity drive, or to replace a faulty drive. If you install a blank SSD, you’ll need to reinstall Windows (or the OS of your choice) when you’re done with the repair.
What you need
-
-
-
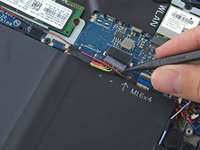
Use opening picks or a plastic pry tool to pry open the case clips, beginning from the back edge.
-
-
-
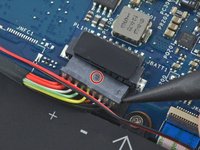
Pull the battery cable connector towards the battery to disconnect it from its socket.
-
If the connector is stubborn, push a little at one side, then the other, to "walk" it out of its socket.
-
If you have trouble walking the connector out of the socket, use the point of a spudger to gently push on the connector indent to slide the connector out.
-
Open the display and press the power button for five seconds to drain any remaining charge from the system.
-


To reassemble your device, follow these instructions in reverse order.
Cancel: I did not complete this guide.
28 other people completed this guide.
15 Guide Comments
You will have to reinstall unless you are buying a samsung m.2 which comes with a disk duplicator utility. The xps 13 cames with a samsung early life evo disk (128GB) and transferring from 1 evo to another is very easy with the app. I believe its the same with every disk though I havent tried the latter.
Dell has some nice recovery tools:
https://www.dell.com/support/kbdoc/en-us...
I downloaded a recovery image to use from a USB drive. I am using it to reinstall the Windows that came with the PC. You don't have to be the original owner but you do need to have the Dell asset number usually stored in the bios
https://www.laptopmag.com/articles/upgra...
helpful resource