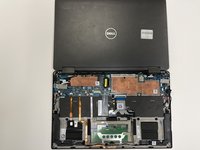
Dell XPS 13 9365 2-in-1 Display Assembly Replacement

What you need

  1. Dell XPS 13 9365 2-in-1 Display Assembly Replacement, Battery: step 1, image 1 of 1
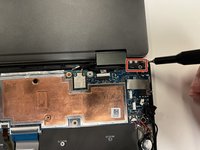
    • Use a Torx T4 screwdriver to remove the eight screws (M2x3) that secure the base cover to the palm-rest assembly.

  2. Dell XPS 13 9365 2-in-1 Display Assembly Replacement: step 2, image 1 of 1
    • Use your fingertips to lift the system badge open and reveal the single case screw.

    • Use a Phillips #000 screwdriver to remove the screw (M1.6x4) that secures the base cover to the palm-rest assembly.

  3. Dell XPS 13 9365 2-in-1 Display Assembly Replacement: step 3, image 1 of 1
    • Starting from the front corner of the computer, pry up the base cover using a spudger and lift the base cover off the palm-rest assembly.

  4. Dell XPS 13 9365 2-in-1 Display Assembly Replacement: step 4, image 1 of 1
    • Disconnect the battery cable from the system board.

  5. Dell XPS 13 9365 2-in-1 Display Assembly Replacement: step 5, image 1 of 1
    • Use a Phillips #000 screwdriver to remove the two screws (M1.6x4) that secure the battery to the palm-rest assembly.

  6. Dell XPS 13 9365 2-in-1 Display Assembly Replacement: step 6, image 1 of 1
    • Use a Phillips #000 screwdriver to remove the six screws (M2x3) that secure the battery to the palm-rest assembly.

  7. Dell XPS 13 9365 2-in-1 Display Assembly Replacement: step 7, image 1 of 1
    • Lift the battery off the palm-rest assembly.

  8. Dell XPS 13 9365 2-in-1 Display Assembly Replacement, Display Assembly: step 8, image 1 of 1
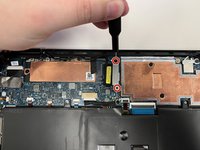
    • Use a Phillips #000 screwdriver to remove the screw (M1.6x2.5) that secures the wireless-card bracket to the motherboard.

  9. Dell XPS 13 9365 2-in-1 Display Assembly Replacement: step 9, image 1 of 1
    • Lift the wireless-card bracket off the wireless card.

  10. Dell XPS 13 9365 2-in-1 Display Assembly Replacement: step 10, image 1 of 1
    Tool used on this step:
    Tweezers
    $4.99
    Buy
    • Use a pair of nylon tipped tweezers to gently disconnect the antenna cables from the wireless card.

  11. Dell XPS 13 9365 2-in-1 Display Assembly Replacement: step 11, image 1 of 1
    • Peel off the tape that secures the display cable to the M.2 solid-state drive heatsink.

  12. Dell XPS 13 9365 2-in-1 Display Assembly Replacement: step 12, image 1 of 2 Dell XPS 13 9365 2-in-1 Display Assembly Replacement: step 12, image 2 of 2
    • Use a Phillips #000 screwdriver to remove the two screws (M1.6x2.5) that secure the display cable bracket to the motherboard.

    • Lift the display cable bracket off the display cable.

  13. Dell XPS 13 9365 2-in-1 Display Assembly Replacement: step 13, image 1 of 1
    • Use the pull tab to disconnect the display cable from the motherboard.

  14. Dell XPS 13 9365 2-in-1 Display Assembly Replacement: step 14, image 1 of 1
    • Disconnect the touch-screen cable from the system board (labeled "TS").

  15. Dell XPS 13 9365 2-in-1 Display Assembly Replacement: step 15, image 1 of 1
    • Disconnect the camera cable from the system board.

  16. Dell XPS 13 9365 2-in-1 Display Assembly Replacement: step 16, image 1 of 3 Dell XPS 13 9365 2-in-1 Display Assembly Replacement: step 16, image 2 of 3 Dell XPS 13 9365 2-in-1 Display Assembly Replacement: step 16, image 3 of 3
    • Open the palm-rest assembly fully and place the display assembly and palm-rest assembly face down.

    • Make sure that your surface is flat and free of objects when you lay the laptop face down.

    • Use a Phillips #000 screwdriver to remove the six screws (M2.5x3.5) that secure the display hinges to the palm-rest assembly. There are three on each side.

  17. Dell XPS 13 9365 2-in-1 Display Assembly Replacement: step 17, image 1 of 1
    • Lift the display assembly off the palm-rest assembly.

Conclusion

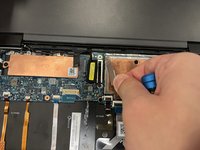
To reassemble your device, follow these instructions in reverse order.

One other person completed this guide.

0 Comments

Add Comment

View Statistics:

Past 24 Hours: 0

Past 7 Days: 1

Past 30 Days: 7

All Time: 752