Dell Vostro 3550 Display Assembly Replacement

What you need

  1. Dell Vostro 3550 Display Assembly Replacement, Display Assembly: step 1, image 1 of 2 Dell Vostro 3550 Display Assembly Replacement, Display Assembly: step 1, image 2 of 2
    • Grip the back trim of the laptop and pull upwards to remove it.

  2. Dell Vostro 3550 Display Assembly Replacement: step 2, image 1 of 3 Dell Vostro 3550 Display Assembly Replacement: step 2, image 2 of 3 Dell Vostro 3550 Display Assembly Replacement: step 2, image 3 of 3
    • Slide the plastic opening tool around the perimeter of the display bezel.

    • Carefully remove the bezel from the display.

  3. Dell Vostro 3550 Display Assembly Replacement: step 3, image 1 of 3 Dell Vostro 3550 Display Assembly Replacement: step 3, image 2 of 3 Dell Vostro 3550 Display Assembly Replacement: step 3, image 3 of 3
    • Remove the six 7 mm Phillips #0 screws attaching the display to the upper casing of the laptop.

    • When all six screws are removed, gently lower the display to reveal the camera cable.

  4. Dell Vostro 3550 Display Assembly Replacement: step 4, image 1 of 3 Dell Vostro 3550 Display Assembly Replacement: step 4, image 2 of 3 Dell Vostro 3550 Display Assembly Replacement: step 4, image 3 of 3
    • Disconnect the camera ribbon cable by gently pulling it away from its connector.

  5. Dell Vostro 3550 Display Assembly Replacement: step 5, image 1 of 2 Dell Vostro 3550 Display Assembly Replacement: step 5, image 2 of 2
    • Remove the four 5 mm Phillips #0 screws (two on either side) securing the display to the metal frame.

  6. Dell Vostro 3550 Display Assembly Replacement: step 6, image 1 of 3 Dell Vostro 3550 Display Assembly Replacement: step 6, image 2 of 3 Dell Vostro 3550 Display Assembly Replacement: step 6, image 3 of 3
    • Gently lower the display into a resting position.

  7. Dell Vostro 3550 Display Assembly Replacement: step 7, image 1 of 3 Dell Vostro 3550 Display Assembly Replacement: step 7, image 2 of 3 Dell Vostro 3550 Display Assembly Replacement: step 7, image 3 of 3
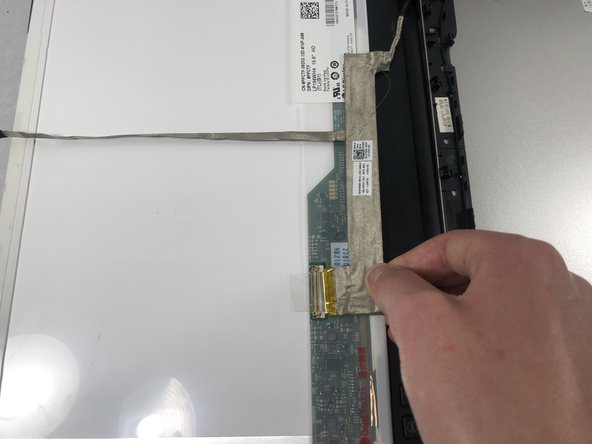
    • Loosen the clear tape fastening the ribbon cable to the display.

    • Carefully pull the ribbon cable away from the connector.

  8. Dell Vostro 3550 Display Assembly Replacement: step 8, image 1 of 3 Dell Vostro 3550 Display Assembly Replacement: step 8, image 2 of 3 Dell Vostro 3550 Display Assembly Replacement: step 8, image 3 of 3
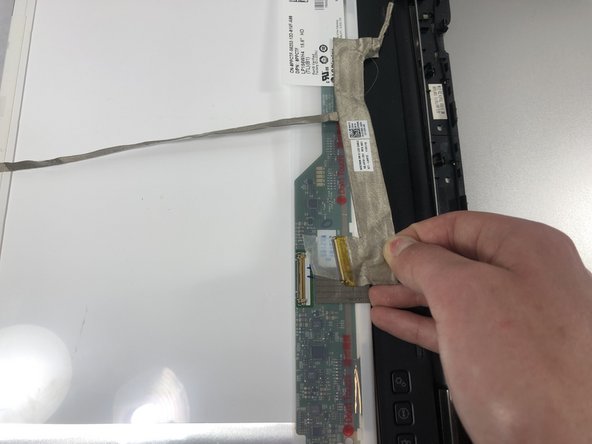
    • Peel the ribbon cable away from the display.

    • Remove the display from the laptop.

Conclusion

To reassemble your device, follow these instructions in reverse order.

Dylan J. Souza

Member since: 03/22/19

781 Reputation

5 Guides authored

Team

0 Comments

Add Comment

View Statistics:

Past 24 Hours: 1

Past 7 Days: 4

Past 30 Days: 14

All Time: 755