Introduction
This guide will show you how to remove or replace the hard drive (HDD) in a Dell Studio 1737.
The hard drive is where the data of the Dell Studio 1737 resides. You will want to replace the hard drive if it has fails, malfunctions, or if you are updating it for a model with more capacity and speed.
What you need
-
-
Slide the battery release slider all the way to the right and push the battery straight out of the back of the computer
-
-
-
-
Unscrew the 8 Phillips head screws marked in the photo.
-
Use a plastic opening tool to pry the panel away from the laptop body.
-
Lift the panel up and away.
-
-
-
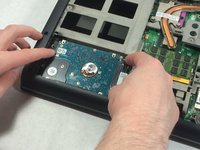
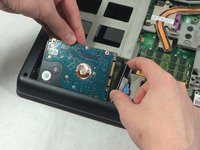
Detach Hard drive from SATA connector.
-
Pull hard drive up and out pulling connector out of the way.
-


To reassemble your device, follow these instructions in reverse order.
Cancel: I did not complete this guide.
3 other people completed this guide.
Team

UMass Dartmouth, Team S8-G4, Catania Spring 2017 Member of UMass Dartmouth, Team S8-G4, Catania Spring 2017
UMASSD-CATANIA-S17S8G4
3 Members
8 Guides authored