
Dell Latitude E7470 Motherboard Replacement

What you need

  1. Careful: step 1 is sourced from a guide that's marked as in-progress.

    Dell Latitude E7470 Motherboard Replacement, Back Cover: step 1, image 1 of 1
    • Remove the eight 4 mm screws on the back cover using a Phillips #0 screwdriver.

  2. Dell Latitude E7470 Motherboard Replacement, Battery: step 2, image 1 of 1
    • Use the pull tab on the battery connector to lift the connector straight up off its socket on the motherboard, disconnecting it.

  3. Dell Latitude E7470 Motherboard Replacement: step 3, image 1 of 2 Dell Latitude E7470 Motherboard Replacement: step 3, image 2 of 2
    • Remove the single 4 mm Phillips screw securing the bottom left corner of the battery.

    • If you are removing an extended capacity battery, remove the Phillips screw securing the bottom right corner of the battery.

  4. Dell Latitude E7470 Motherboard Replacement: step 4, image 1 of 1
    • Remove the battery from the laptop.

  5. Dell Latitude E7470 Motherboard Replacement, Speakers: step 5, image 1 of 2 Dell Latitude E7470 Motherboard Replacement, Speakers: step 5, image 2 of 2
    • Unplug the four pin speaker connector from the motherboard.

  6. Dell Latitude E7470 Motherboard Replacement: step 6, image 1 of 2 Dell Latitude E7470 Motherboard Replacement: step 6, image 2 of 2
    • De-route the speaker wire harness from the guide rails.

  7. Dell Latitude E7470 Motherboard Replacement: step 7, image 1 of 3 Dell Latitude E7470 Motherboard Replacement: step 7, image 2 of 3 Dell Latitude E7470 Motherboard Replacement: step 7, image 3 of 3
    • Use a Phillips #0 screwdriver to remove the left and right mouse button assembly screws.

    • This allows you to slightly lift the assembly and gain full access to the wire harness that links the left and right speaker units. You do not need to fully remove the button assembly.

  8. Dell Latitude E7470 Motherboard Replacement: step 8, image 1 of 3 Dell Latitude E7470 Motherboard Replacement: step 8, image 2 of 3 Dell Latitude E7470 Motherboard Replacement: step 8, image 3 of 3
    • Starting with the left speaker (your right), carefully lift the units away and de-route the wire harness linking them.

    • Take note of the soft boots that hold each speaker in place. They should lift freely away, but if needed you may wedge them loose by hand or with your spudger.

  9. Dell Latitude E7470 Motherboard Replacement, Network Card: step 9, image 1 of 2 Dell Latitude E7470 Motherboard Replacement, Network Card: step 9, image 2 of 2
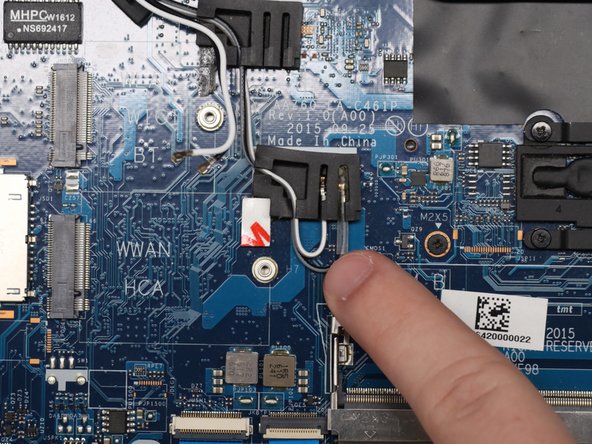
    • Use a halberd spudger and your fingers to detach two wires from the Wi-Fi card.

  10. Dell Latitude E7470 Motherboard Replacement: step 10, image 1 of 1
    • Remove the single screw from the Wi-Fi card using a Phillips #0 screwdriver.

  11. Dell Latitude E7470 Motherboard Replacement: step 11, image 1 of 1
    • Use an iFixit opening tool and your fingers to pull the Wi-Fi card out of its socket.

  12. Dell Latitude E7470 Motherboard Replacement, Motherboard: step 12, image 1 of 3 Dell Latitude E7470 Motherboard Replacement, Motherboard: step 12, image 2 of 3 Dell Latitude E7470 Motherboard Replacement, Motherboard: step 12, image 3 of 3
    • Remove the RAM sticks by pulling the holding clips in opposite directions, then pull the sticks straight out.

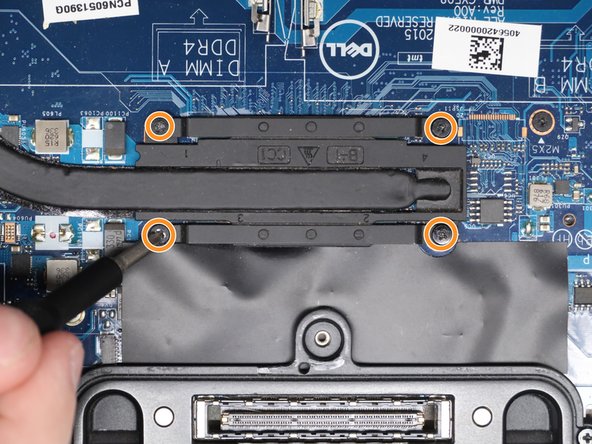
    • Remove the RAM housing by unscrewing the two 2 mm screws using a Phillips #0 screwdriver.

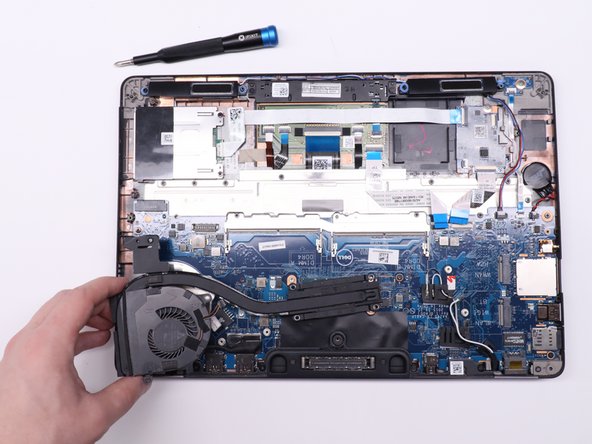
    • Lift the metal housing from the motherboard.

  13. Dell Latitude E7470 Motherboard Replacement: step 13, image 1 of 2 Dell Latitude E7470 Motherboard Replacement: step 13, image 2 of 2
    • Remove the two 2 mm screws using a Phillips #0 screwdriver.

    • Remove the metal bracket.

    • Use your fingers to pull the plastic tab on the LCD connector straight up.

    • Remove the charge port connector by pulling straight out from the connector housing.

  14. Dell Latitude E7470 Motherboard Replacement: step 14, image 1 of 3 Dell Latitude E7470 Motherboard Replacement: step 14, image 2 of 3 Dell Latitude E7470 Motherboard Replacement: step 14, image 3 of 3
    • Unplug the fan's power connector.

    • Remove the four 2 mm screws holding in the heat sink using a Phillips #0 screwdriver.

    • Carefully lift the entire laptop cooling assembly straight up from the motherboard.

  15. Dell Latitude E7470 Motherboard Replacement: step 15, image 1 of 3 Dell Latitude E7470 Motherboard Replacement: step 15, image 2 of 3 Dell Latitude E7470 Motherboard Replacement: step 15, image 3 of 3
    • Remove the antenna wires from the rubber housing.

    • Remove all wire connections on the motherboard.

    • The 'flat' wires have a different connector which will require you to flip a tab up that anchors the wire. Then you can pull the wire straight out parallel to the motherboard.

  16. Dell Latitude E7470 Motherboard Replacement: step 16, image 1 of 3 Dell Latitude E7470 Motherboard Replacement: step 16, image 2 of 3 Dell Latitude E7470 Motherboard Replacement: step 16, image 3 of 3
    • Remove all 2mm screws anchoring the motherboard to the laptop casing using a Phillips #0 screwdriver.

    • Remove the four 2 mm screws on the from back plate around the docking port using a Phillips #0 screwdriver.

    • Lift the metal bracket off of the laptop.

  17. Dell Latitude E7470 Motherboard Replacement: step 17, image 1 of 2 Dell Latitude E7470 Motherboard Replacement: step 17, image 2 of 2
    • Carefully lift the motherboard straight up from the laptop.

    • If you feel any resistance, check that there are not any screws or connections that you may have missed.

Conclusion

To reassemble your device, follow these instructions in reverse order.

One other person completed this guide.

0 Comments

Add Comment

View Statistics:

Past 24 Hours: 0

Past 7 Days: 9

Past 30 Days: 35

All Time: 1,145