Free Shipping on Domestic Orders $75+

Dell Latitude E5470 Screen Assembly Replacement

What you need

    1. Dell Latitude E5470 Screen Assembly  Replacement, Remove Bottom Cover: step 1, image 1 of 2 Dell Latitude E5470 Screen Assembly  Replacement, Remove Bottom Cover: step 1, image 2 of 2
      • Loosen the 8 Philips screws on the bottom of the laptop. They will not come all the way out but loosen till they spin freely.

      • Use a splurger to slowly pry the bottom cover off the laptop. Pull the bottom off in the direction of the arrow.

      • Important Be carefull to not break the snaps as they are delicate.

      Ask FixBot

      Add Comment

    2. Dell Latitude E5470 Screen Assembly  Replacement, Disconnect Battery: step 2, image 1 of 1
      • Important Disconnect the battery before any work is done. Failure to do so could result in electric shock and cause harm to you and the laptop.

      • Carefully use the plastic tab to remove the battery cable from the motherboard.

      Ask FixBot

      Add Comment

    3. Dell Latitude E5470 Screen Assembly  Replacement, Disconnect Wireless Card: step 3, image 1 of 2 Dell Latitude E5470 Screen Assembly  Replacement, Disconnect Wireless Card: step 3, image 2 of 2
      • Unscrew the screw holding the card in place.

      • Remove the metal guard holding the connections in place.

      • Use the splurger to gently lift the wires from the card.

      Ask FixBot

      Add Comment

    4. Dell Latitude E5470 Screen Assembly  Replacement, Disconnect Display: step 4, image 1 of 2 Dell Latitude E5470 Screen Assembly  Replacement, Disconnect Display: step 4, image 2 of 2
      • Remove screw holding the metal plate in place.

      • Remove metal plate

      • Carefully pull on the tab to disconnect the display cable from the motherboard.

      Ask FixBot

      Add Comment

    5. Dell Latitude E5470 Screen Assembly  Replacement, Free display cables: step 5, image 1 of 2 Dell Latitude E5470 Screen Assembly  Replacement, Free display cables: step 5, image 2 of 2
      • Remove both screws holding the plate in place.

      • Remove plate

      • Remove tape holding the display cable to the laptop.

      • Pull the cable free

      Ask FixBot

      Add Comment

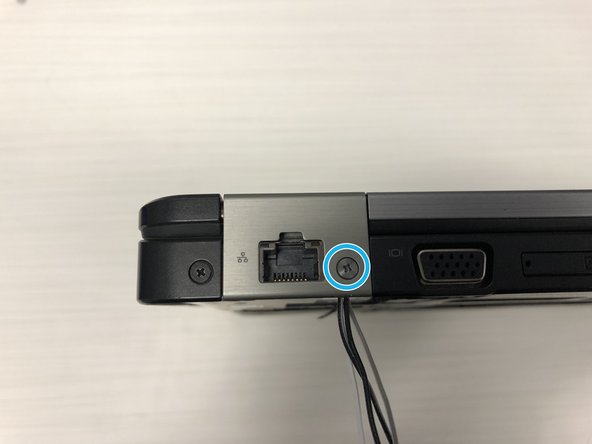
    6. Dell Latitude E5470 Screen Assembly  Replacement, Remove hinge covers: step 6, image 1 of 2 Dell Latitude E5470 Screen Assembly  Replacement, Remove hinge covers: step 6, image 2 of 2
      • Remove both the screws and hing covers on the back of the device.

      Ask FixBot

      Add Comment

    7. Dell Latitude E5470 Screen Assembly  Replacement, Remove display screws - Part 1: step 7, image 1 of 2 Dell Latitude E5470 Screen Assembly  Replacement, Remove display screws - Part 1: step 7, image 2 of 2
      • Remove two screws from the bottom of the device

      Ask FixBot

      Add Comment

    8. Dell Latitude E5470 Screen Assembly  Replacement, Remove display screws - Part 2: step 8, image 1 of 2 Dell Latitude E5470 Screen Assembly  Replacement, Remove display screws - Part 2: step 8, image 2 of 2
      • Remove screws underneath the hinge covers on the back of the device

      Ask FixBot

      Add Comment

    9. Dell Latitude E5470 Screen Assembly  Replacement, Remove display: step 9, image 1 of 1
      • Carefully remove the display from its slots.

      • Be mindful to feed the WiFi and Display cables through the holes.

      Ask FixBot

      Add Comment

    10. Dell Latitude E5470 Screen Assembly  Replacement, You are done!: step 10, image 1 of 1
      • The display is now disconnected from the laptop.

      Ask FixBot

      Add Comment

Conclusion

To reassemble your device, follow these instructions in reverse order.

Cancel: I did not complete this guide.

6 other people completed this guide.

Ethan Jones

Member since: 07/16/18

572 Reputation

2 Guides authored

0 Guide Comments

Add Comment

View Statistics:

Past 24 Hours: 0

Past 7 Days: 8

Past 30 Days: 29

All Time: 3,666