
Dell Latitude 7420 Keyboard Replacement

What you need

  1. Dell Latitude 7420 Keyboard Replacement, Back Case: step 1, image 1 of 3 Dell Latitude 7420 Keyboard Replacement, Back Case: step 1, image 2 of 3 Dell Latitude 7420 Keyboard Replacement, Back Case: step 1, image 3 of 3
    • Remove the eight, 7 mm screws from the back case using a Phillips #0 screwdriver.

    • Use an opening pick or opening tool and work your way around the periphery of the base cover to separate it from the chassis.

  2. Dell Latitude 7420 Keyboard Replacement, Battery: step 2, image 1 of 2 Dell Latitude 7420 Keyboard Replacement, Battery: step 2, image 2 of 2
    • Be sure to use an anti-static band or mat from this point onward.

    • Using the Phillips #1 screwdriver, remove the five 5 mm screws securing the battery to the motherboard.

  3. Dell Latitude 7420 Keyboard Replacement: step 3, image 1 of 2 Dell Latitude 7420 Keyboard Replacement: step 3, image 2 of 2
    • Use a spudger to pry up each side. Then, lift the connector straight up from its socket.

    • To reinstall, carefully position the connector, and then press it straight down until it snaps into its socket. Finger pressure is all that is required. If it won't snap home it'll be because it isn't correctly positioned. Sometimes it can take a little patience to find exactly the right position.

  4. Dell Latitude 7420 Keyboard Replacement: step 4, image 1 of 1
    • Gently remove the battery from its housing.

  5. Dell Latitude 7420 Keyboard Replacement, SSD: step 5, image 1 of 3 Dell Latitude 7420 Keyboard Replacement, SSD: step 5, image 2 of 3 Dell Latitude 7420 Keyboard Replacement, SSD: step 5, image 3 of 3
    • Use a Phillips #00 screwdriver to remove the two 2.0 mm screws holding down the SSD cover.

    • Remove the SSD cover.

    • Notice that the left screw is also pinning the SSD card in place.

  6. Dell Latitude 7420 Keyboard Replacement: step 6, image 1 of 1
    • Pull the SSD card by its left edge to slide it out of the socket.

  7. Dell Latitude 7420 Keyboard Replacement, Fan Assembly: step 7, image 1 of 2 Dell Latitude 7420 Keyboard Replacement, Fan Assembly: step 7, image 2 of 2
    Tool used on this step:
    Dust Blower
    $4.99
    Buy
    • Keeping the vents on the case of the laptop clean of dust or debris and clear of obstruction is important for the device to maintain its temperature.

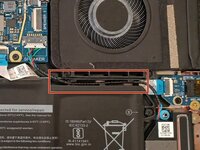
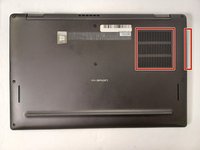
    • Use a cloth and dust blower to clean the vents.

    • It's best to clean the vent when the back case has been removed from the device.

  8. Dell Latitude 7420 Keyboard Replacement: step 8, image 1 of 3 Dell Latitude 7420 Keyboard Replacement: step 8, image 2 of 3 Dell Latitude 7420 Keyboard Replacement: step 8, image 3 of 3
    • If the fan is dusty, a soft cloth can be used to gently clean it.

    • Use a Phillips #00 screwdriver to remove the six 2.5 mm screws securing the fan assembly.

  9. Dell Latitude 7420 Keyboard Replacement: step 9, image 1 of 3 Dell Latitude 7420 Keyboard Replacement: step 9, image 2 of 3 Dell Latitude 7420 Keyboard Replacement: step 9, image 3 of 3
    • Use the pointed tip of a spudger to carefully push on each side of the connector and remove it from the socket.

    • Remove the fan assembly.

    • When replacing the fan assembly, make sure there is thermal paste under the heat sink. Follow this guide for more information.

  10. Dell Latitude 7420 Keyboard Replacement, Keyboard: step 10, image 1 of 3 Dell Latitude 7420 Keyboard Replacement, Keyboard: step 10, image 2 of 3 Dell Latitude 7420 Keyboard Replacement, Keyboard: step 10, image 3 of 3
    • Use a Phillips #00 screwdriver to remove the single 2.5 mm screw from the audio board.

    • Use a spudger or your fingernail to flip the black cover open.

    • Slide the ribbon cable out from the ZIF connector.

    • Remove the audio board.

  11. Dell Latitude 7420 Keyboard Replacement: step 11, image 1 of 3 Dell Latitude 7420 Keyboard Replacement: step 11, image 2 of 3 Dell Latitude 7420 Keyboard Replacement: step 11, image 3 of 3
    • Use a Phillips #00 screwdriver to remove the screws securing the motherboard to the device.

  12. Dell Latitude 7420 Keyboard Replacement: step 12, image 1 of 3 Dell Latitude 7420 Keyboard Replacement: step 12, image 2 of 3 Dell Latitude 7420 Keyboard Replacement: step 12, image 3 of 3
    Tool used on this step:
    Tweezers
    $4.99
    Buy
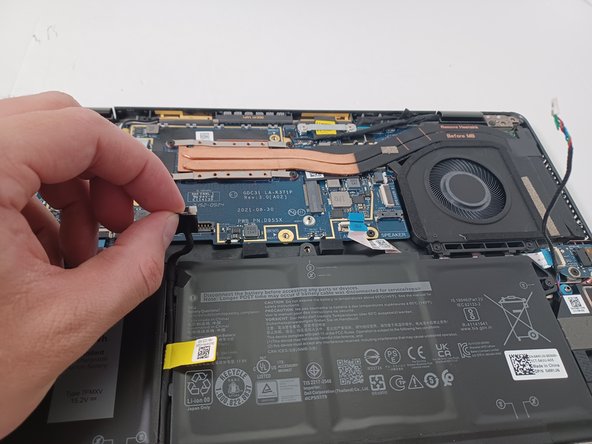
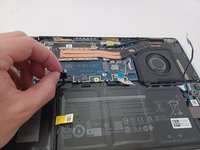
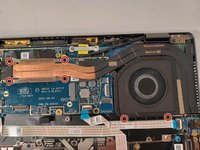
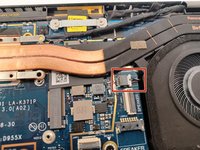
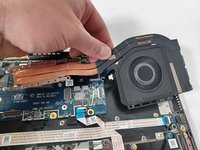
    • Remove the connectors to the system board.

    • Place the tip of your opening tool under the edge of the connector, and pry the connector straight up from its socket.

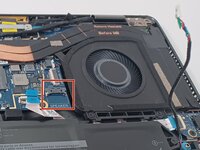
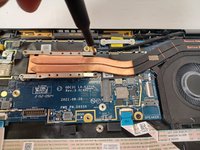
    • Use the tip of a spudger or your fingernail to flip up the small locking flaps from these ZIF connectors. Then, you can safely pull the cables out.

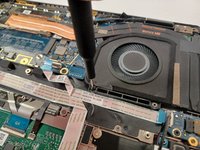
    • Slide a thin, ESD-safe pry tool or tweezers under the wire until it's snug against the connector, and pry straight up from the board to disconnect these coaxial cables.

    • To remove the blue connector, pull the cable away from the connector in the same direction that the individual wires are running.

    • Pull evenly on the full width of the cable so that no individual wires are overly strained.

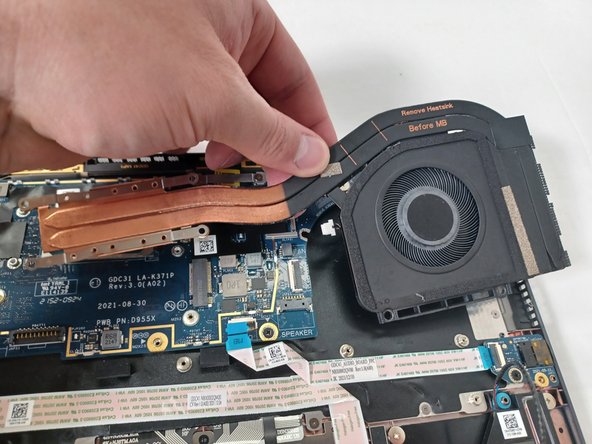
    • Lift the final connector up from the socket.

  13. Dell Latitude 7420 Keyboard Replacement: step 13, image 1 of 1
    • Remove the motherboard.

  14. Dell Latitude 7420 Keyboard Replacement: step 14, image 1 of 3 Dell Latitude 7420 Keyboard Replacement: step 14, image 2 of 3 Dell Latitude 7420 Keyboard Replacement: step 14, image 3 of 3
    • Use a Phillips #00 screwdriver to remove two 4.0 mm screws from the I/O board.

    • Remove the I/O board from the device.

  15. Dell Latitude 7420 Keyboard Replacement: step 15, image 1 of 3 Dell Latitude 7420 Keyboard Replacement: step 15, image 2 of 3 Dell Latitude 7420 Keyboard Replacement: step 15, image 3 of 3
    • Use a Phillips #00 screwdriver to remove the twenty 1.7 mm screws securing the keyboard.

  16. Dell Latitude 7420 Keyboard Replacement: step 16, image 1 of 3 Dell Latitude 7420 Keyboard Replacement: step 16, image 2 of 3 Dell Latitude 7420 Keyboard Replacement: step 16, image 3 of 3
    • Use the tip of a spudger or your fingernail to flip up the small locking flap on the remaining cables. Then, you can safely pull them out.

    • Pull the keyboard out from the chassis.

Conclusion

To reassemble your device, follow these instructions in reverse order.

One other person completed this guide.

Nick B.

Member since: 08/25/22

563 Reputation

4 Guides authored

Team

Gateway, Team 1-2, Pee Spring 2023 Member of Gateway, Team 1-2, Pee Spring 2023

GCC-PEE-S23S1G2

4 Members

6 Guides authored

0 Comments

Add Comment

View Statistics:

Past 24 Hours: 6

Past 7 Days: 15

Past 30 Days: 69

All Time: 832