
15% Off Selected iFixit Tools — Limited Time
Free Shipping on Domestic Orders $75+

Dell Inspiron M5010 Fan/Heatsink Replacement

What you need

  1. Dell Inspiron M5010 Fan/Heatsink Replacement, Remove keyboard retaining screw: step 1, image 1 of 1
    • Remove Keyboard retaining screw from bottom of laptop.

    Ask FixBot

    Add Comment

  2. Dell Inspiron M5010 Fan/Heatsink Replacement: step 2, image 1 of 3 Dell Inspiron M5010 Fan/Heatsink Replacement: step 2, image 2 of 3 Dell Inspiron M5010 Fan/Heatsink Replacement: step 2, image 3 of 3
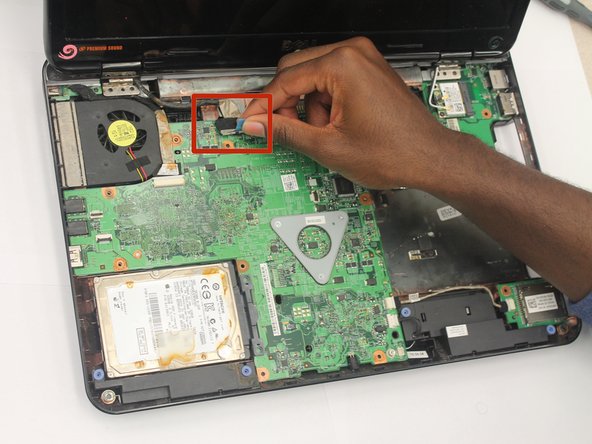
    • Insert the 6 inch metal ruler, or another flat object into the holes in the top left of the keyboard, the top middle of the keyboard, and the top right of the keyboard to release the keyboard from the computer.

    • There are a number of screws on the bottom that required to be removed prior to the keyboard being able to be lifted up.

    Ask FixBot

    Add Comment

  3. Dell Inspiron M5010 Fan/Heatsink Replacement: step 3, image 1 of 1
    • Lift the keyboard up slightly and push forward in order to release bottom tabs.

    Ask FixBot

    Add Comment

  4. Dell Inspiron M5010 Fan/Heatsink Replacement: step 4, image 1 of 1
    • Pull the black tab up and then pull left on keyboard plug to release keyboard.

    Ask FixBot

    Add Comment

  5. Dell Inspiron M5010 Fan/Heatsink Replacement, Palm Rest: step 5, image 1 of 1
    • Flip the laptop, so the bottom of the laptop is facing up.

    • Remove the seven 6.0mm Phillip #000 screws indicated using the Phillips #000 screwdriver.

    Ask FixBot

    Add Comment

  6. Dell Inspiron M5010 Fan/Heatsink Replacement: step 6, image 1 of 2 Dell Inspiron M5010 Fan/Heatsink Replacement: step 6, image 2 of 2
    • Flip the laptop back over, so that the top of the laptop is facing up.

    • Open the laptop.

    • Remove all of the indicated 6.0 mm screws with the Phillips #000 screwdriver.

    Ask FixBot

    Add Comment

  7. Dell Inspiron M5010 Fan/Heatsink Replacement: step 7, image 1 of 1
    • Unplug the palm rest cables by lifting the black tab up and then pulling on the blue tabs.

    Ask FixBot

    Add Comment

  8. Dell Inspiron M5010 Fan/Heatsink Replacement: step 8, image 1 of 3 Dell Inspiron M5010 Fan/Heatsink Replacement: step 8, image 2 of 3 Dell Inspiron M5010 Fan/Heatsink Replacement: step 8, image 3 of 3
    • Carefully unsnap and remove the palm rest.

    • Place your fingers inside the large circle in the lower right corner to get a good grip.

    Ask FixBot

    Add Comment

  9. Dell Inspiron M5010 Fan/Heatsink Replacement, Fan/Heatsink: step 9, image 1 of 1
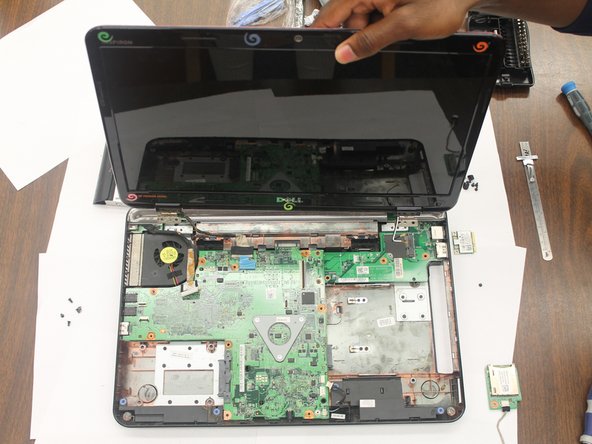
    • Flip the laptop over so the bottom is facing up.

    • Remove the indicated 17 6mm Phillips #000 screws on the back of the laptop using the Phillips #000 screwdriver.

    Ask FixBot

    Add Comment

  10. Dell Inspiron M5010 Fan/Heatsink Replacement: step 10, image 1 of 2 Dell Inspiron M5010 Fan/Heatsink Replacement: step 10, image 2 of 2
    • Pull the clear tab attached to the hard drive and gently lift up the hard drive to remove it.

    Ask FixBot

    Add Comment

  11. Dell Inspiron M5010 Fan/Heatsink Replacement: step 11, image 1 of 2 Dell Inspiron M5010 Fan/Heatsink Replacement: step 11, image 2 of 2
    • Flip the laptop back over and unplug the Speakers.

    Ask FixBot

    Add Comment

  12. Dell Inspiron M5010 Fan/Heatsink Replacement: step 12, image 1 of 2 Dell Inspiron M5010 Fan/Heatsink Replacement: step 12, image 2 of 2
    • Unplug the SD Card Slot.

    • You do not have to remove the SD Card Slot, just unplug it.

    Ask FixBot

    Add Comment

  13. Dell Inspiron M5010 Fan/Heatsink Replacement: step 13, image 1 of 1
    • Unplug the USB/VGA cable.

    Ask FixBot

    Add Comment

  14. Dell Inspiron M5010 Fan/Heatsink Replacement: step 14, image 1 of 1
    • Remove the 4 mm Phillips #000 motherboard screws using the Phillips #000 screwdriver.

    Ask FixBot

    Add Comment

  15. Dell Inspiron M5010 Fan/Heatsink Replacement: step 15, image 1 of 1
    • Remove the 4 indicated 6 mm Phillips #000 front hinge screws with the Phillips #000 screwdriver.

    Ask FixBot

    Add Comment

  16. Dell Inspiron M5010 Fan/Heatsink Replacement: step 16, image 1 of 2 Dell Inspiron M5010 Fan/Heatsink Replacement: step 16, image 2 of 2
    • Unplug the Wireless Antenna cables.

    Ask FixBot

    Add Comment

  17. Dell Inspiron M5010 Fan/Heatsink Replacement: step 17, image 1 of 3 Dell Inspiron M5010 Fan/Heatsink Replacement: step 17, image 2 of 3 Dell Inspiron M5010 Fan/Heatsink Replacement: step 17, image 3 of 3
    • Unplug the LCD cable.

    • Lift the screen from the computer.

    Ask FixBot

    Add Comment

  18. Dell Inspiron M5010 Fan/Heatsink Replacement: step 18, image 1 of 1
    • Remove the Middle Cover.

    Ask FixBot

    Add Comment

  19. Dell Inspiron M5010 Fan/Heatsink Replacement: step 19, image 1 of 1
    • Remove the Motherboard.

    Ask FixBot

    Add Comment

  20. Dell Inspiron M5010 Fan/Heatsink Replacement: step 20, image 1 of 2 Dell Inspiron M5010 Fan/Heatsink Replacement: step 20, image 2 of 2
    • Unplug the fan.

    Ask FixBot

    Add Comment

  21. Dell Inspiron M5010 Fan/Heatsink Replacement: step 21, image 1 of 2 Dell Inspiron M5010 Fan/Heatsink Replacement: step 21, image 2 of 2
    • Remove all 4 of the 6 mm Phillips #000 Heatsink screws with the Phillips #000 screwdriver.

    Ask FixBot

    Add Comment

  22. Dell Inspiron M5010 Fan/Heatsink Replacement: step 22, image 1 of 1
    • Lift the Heatsink from the Motherboard.

    Ask FixBot

    Add Comment

Conclusion

To reassemble your device, follow these instructions in reverse order.

Cancel: I did not complete this guide.

One other person completed this guide.

April Poucher

Member since: 10/13/14

1,164 Reputation

10 Guides authored

Team

Clemson, Team 1-5, Benson Fall 2014 Member of Clemson, Team 1-5, Benson Fall 2014

CLEM-BENSON-F14S1G5

4 Members

11 Guides authored

0 Guide Comments

Add Comment

View Statistics:

Past 24 Hours: 1

Past 7 Days: 4

Past 30 Days: 28

All Time: 1,214