What you need
-
-
Push the tab from the battery, downwards to unlock the battery.
-
The tab should be in the position next to the unlocked indicator.
-
-
-
Now, push the other tab (the one right under the battery) from right to left.
-
Now the battery will be loose; lift the battery up and out of the computer.
-
-
-
Remove the 8mm screw
-
Use the plastic opening tool to push out the disk drive.
-
Pull the disk drive out with the opposite hand.
-
-
-
This particular computer is missing its hard drive.
-
Remove the two screws.
-
Remove the plastic cover by lifting from the groove as indicated.
-
Remove the hard drive from the computer by lifting up and out.
-
-
-
Put down the computer and open up the screen.
-
There is a long piece of plastic underneath the screen that you will have to remove.
-
-
-
Insert the plastic opening tool into the little slot.
-
Lift up gently and remove the plastic cover.
-
-
-
Lift keyboard up slightly and you will see the keyboard connection.
-
This black tab has to be lifted up to remove the keyboard.
-
Put your finger underneath the tab and pull back gently as indicated.
-
You can now remove the keyboard.
-
-
-
This reveals two connections that must be removed.
-
Remove the one with the blue tape by lifting up on the tape gently.
-
-
-
Close the computer and flip it over so that the back is facing up.
-
Remove the two 6mm screws that are behind each of the screens pivot points.
-
Open up the screen and now it can be lifted up and off of the computer.
-
-
-
Use a flat head screwdriver to turn the screw one quarter turn into the unlock position.
-
Remove the CPU.
-
-
-
Remove the three 6mm screws.
-
Lift the plastic cover off to reveal the RAM and the Wireless.
-
-
-
To remove the RAM, push outward against the metal brackets.
-
The first RAM will pop up so you can just pull it right out.
-
Repeat the first step again to remove the second RAM chip.
-
Installation is the reverse of removal.
-
-
-
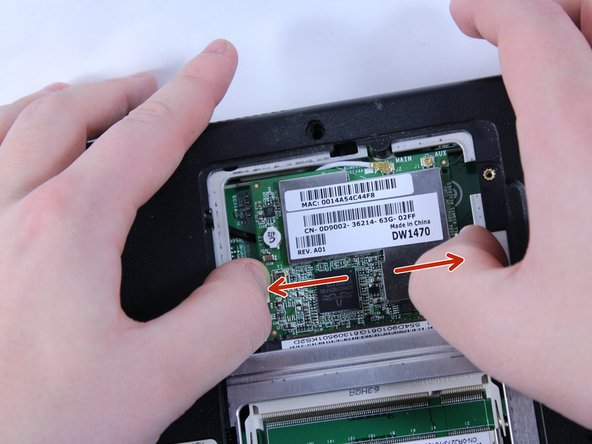
To remove the wire, hold the wireless chip firmly and pull the connection straight up off of the chip.
-
-
-
Turn the computer over and remove the two 4 mm screws that are located just below where the screen should be.
-
Remove the five 6mm screws that remain.
-
-
-
This connection must also be removed.
-
Use tweezers to grab the small black connector and pull it straight back.
-
You can now disconnect this wire.
-
-
-
The whole cover/frame can be pulled off of the top of the motherboard.
-
The motherboard can now be removed by pulling up and sliding out to the right.
-


Team

UMass Dartmouth, Team 1-8, Catania Fall 2016 Member of UMass Dartmouth, Team 1-8, Catania Fall 2016
UMASSD-CATANIA-F16S1G8
3 Members
9 Guides authored