Dell Inspiron 1721 DVD Drive Replacement

What you need

  1. Dell Inspiron 1721 DVD Drive Replacement, Battery: step 1, image 1 of 2 Dell Inspiron 1721 DVD Drive Replacement, Battery: step 1, image 2 of 2
    • Slide tabs outward to undo the locks.

    • Grab and pull the battery away from the device to remove.

  2. Dell Inspiron 1721 DVD Drive Replacement, Hinge Plate Cover: step 2, image 1 of 3 Dell Inspiron 1721 DVD Drive Replacement, Hinge Plate Cover: step 2, image 2 of 3 Dell Inspiron 1721 DVD Drive Replacement, Hinge Plate Cover: step 2, image 3 of 3
    • Pry up on the corner of the hinge cover with an iFixit opening tool.

    • Use the iFixit opening tool along both sides and the front of the hinge cover to release it.

    • Lean the display back as far as it goes and lift up on the hinge cover to remove.

  3. Dell Inspiron 1721 DVD Drive Replacement, Keyboard: step 3, image 1 of 3 Dell Inspiron 1721 DVD Drive Replacement, Keyboard: step 3, image 2 of 3 Dell Inspiron 1721 DVD Drive Replacement, Keyboard: step 3, image 3 of 3
    • Remove four 3mm Phillips #1 screws from the top of the keyboard.

    • Use an iFixit opening tool to slide the keyboard upwards toward the display.

    • Slide the keyboard until it is clear of the lock tab, and lift it up to remove.

  4. Dell Inspiron 1721 DVD Drive Replacement, Back Cover: step 4, image 1 of 1
    • Disconnect the touch pad connector.

  5. Dell Inspiron 1721 DVD Drive Replacement: step 5, image 1 of 3 Dell Inspiron 1721 DVD Drive Replacement: step 5, image 2 of 3 Dell Inspiron 1721 DVD Drive Replacement: step 5, image 3 of 3
    • Lay the device flat and remove the 17 7mm Phillips #0 screws.

    • Use an iFixit opening tool to separate the back cover.

    • Remove the back cover.

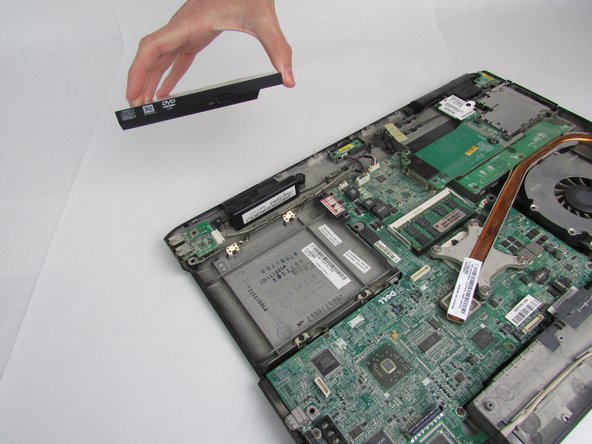
  6. Dell Inspiron 1721 DVD Drive Replacement, DVD Drive: step 6, image 1 of 2 Dell Inspiron 1721 DVD Drive Replacement, DVD Drive: step 6, image 2 of 2
    • Grab the DVD drive and pull straight out from the side of the case to remove.

Conclusion

To reassemble your device, follow these instructions in reverse order.

0 Comments

Add Comment

View Statistics:

Past 24 Hours: 2

Past 7 Days: 5

Past 30 Days: 9

All Time: 170