
Dell Inspiron 15 N5040 Display Assembly Replacement

What you need

  1. Dell Inspiron 15 N5040 Display Assembly Replacement, Remove the Screws: step 1, image 1 of 1
    • WARNING: Before working inside your computer, read the safety information that shipped with your computer. Follow the instructions in "Before You Begin".

    • CAUTION: To avoid electrostatic discharge, ground yourself by using a wrist grounding strap or by periodically touching an unpainted metal surface (such as a connector on your computer).

    • Remove the two screws from the computer base.

  2. Dell Inspiron 15 N5040 Display Assembly Replacement, Disconnect the Display Cable: step 2, image 1 of 1
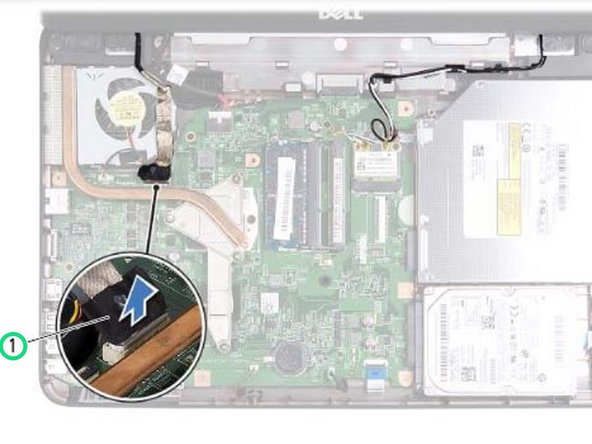
    • Disconnect the display cable from the connector on the system board.

  3. Dell Inspiron 15 N5040 Display Assembly Replacement, Remove the Cables: step 3, image 1 of 1
    • Make a note of the display cable and Mini-Card antenna cables routing and remove the cables from the routing guides.

  4. Dell Inspiron 15 N5040 Display Assembly Replacement, Remove the Screws: step 4, image 1 of 1
    • Remove the four screws (two on each side) that secure the display assembly to the computer base.

  5. Dell Inspiron 15 N5040 Display Assembly Replacement, Remove the Display Assembly: step 5, image 1 of 1
    • Lift and remove the display assembly out of the computer base.

  6. Dell Inspiron 15 N5040 Display Assembly Replacement, Placing the Display Assembly: step 6, image 1 of 1
    • Place the NEW display assembly in position and replace the four screws (two on each side) that secure the display assembly to the computer base.

  7. Dell Inspiron 15 N5040 Display Assembly Replacement, Routing the Display Cable: step 7, image 1 of 1
    • Route the display cable and Mini-Card antenna cables through the routing guides.

  8. Dell Inspiron 15 N5040 Display Assembly Replacement, Connect the Display Cable: step 8, image 1 of 1
    • Connect the display cable to the connector on the system board.

  9. Dell Inspiron 15 N5040 Display Assembly Replacement, Replace the Screws: step 9, image 1 of 1
    • Replace the two screws to the computer base.

Finish Line

One other person completed this guide.

Terrence15

Member since: 12/18/17

79,131 Reputation

441 Guides authored

Team

RampUP America, Inc. Member of RampUP America, Inc.

Community

42 Members

1,986 Guides authored

0 Comments

Add Comment

View Statistics:

Past 24 Hours: 0

Past 7 Days: 2

Past 30 Days: 7

All Time: 308