
Dell Inspiron 1420 Display Replacement

What you need

  1. Dell Inspiron 1420 Display Replacement, Battery: step 1, image 1 of 3 Dell Inspiron 1420 Display Replacement, Battery: step 1, image 2 of 3 Dell Inspiron 1420 Display Replacement, Battery: step 1, image 3 of 3
    • Slide the two tabs to release the battery.

    • Pull the battery out.

  2. Dell Inspiron 1420 Display Replacement, Removing the Outer Frame: step 2, image 1 of 3 Dell Inspiron 1420 Display Replacement, Removing the Outer Frame: step 2, image 2 of 3 Dell Inspiron 1420 Display Replacement, Removing the Outer Frame: step 2, image 3 of 3
    • Use a spudger to pry the 6 rubber bumpers from the display.

    • Using a Phillips #00 screwdriver, remove the six 4mm screws that are beneath the six rubber bumpers.

  3. Dell Inspiron 1420 Display Replacement, Removing the Outer Frame: step 3, image 1 of 3 Dell Inspiron 1420 Display Replacement, Removing the Outer Frame: step 3, image 2 of 3 Dell Inspiron 1420 Display Replacement, Removing the Outer Frame: step 3, image 3 of 3
    • Gently pry the frame using a spudger.

    • Using a Phillips #00 screwdriver, remove the two 5mm screws at the bottom of the screen.

  4. Dell Inspiron 1420 Display Replacement, Separating the Display from the Frame: step 4, image 1 of 3 Dell Inspiron 1420 Display Replacement, Separating the Display from the Frame: step 4, image 2 of 3 Dell Inspiron 1420 Display Replacement, Separating the Display from the Frame: step 4, image 3 of 3
    • Use a spudger to loosen the frame from the top.

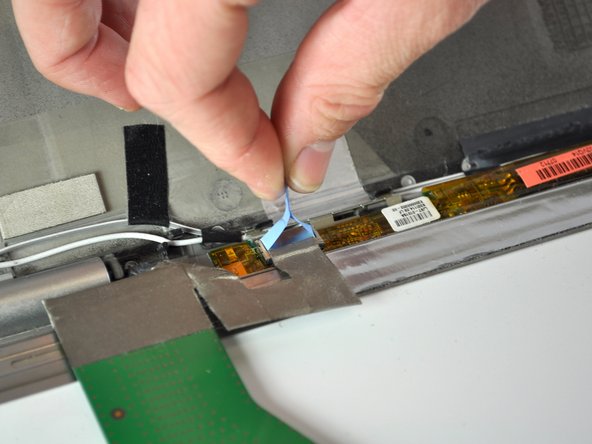
    • Lift up the black connector to detach the gold ribbon.

  5. Dell Inspiron 1420 Display Replacement, Removing the Power Connector Cable: step 5, image 1 of 2 Dell Inspiron 1420 Display Replacement, Removing the Power Connector Cable: step 5, image 2 of 2
    • Pull directly up on the light blue tab.

  6. Dell Inspiron 1420 Display Replacement, VGA cable: step 6, image 1 of 3 Dell Inspiron 1420 Display Replacement, VGA cable: step 6, image 2 of 3 Dell Inspiron 1420 Display Replacement, VGA cable: step 6, image 3 of 3
    • Squeeze the two metal clips located on the VGA cable.

    • Pull while squeezing the clips in order to remove the cable.

  7. Dell Inspiron 1420 Display Replacement, Isolating the Display: step 7, image 1 of 3 Dell Inspiron 1420 Display Replacement, Isolating the Display: step 7, image 2 of 3 Dell Inspiron 1420 Display Replacement, Isolating the Display: step 7, image 3 of 3
    • Using a Phillips #00 screwdriver, remove the three 3mm screws located on both the left and right side of the laptop.

    • Remove the metal brackets, one on each side, by gently pulling.

Conclusion

To reassemble your device, follow these instructions in reverse order.

3 other people completed this guide.

Kris Karanxha

Member since: 09/23/14

298 Reputation

1 Guide authored

Team

USF Tampa, Team 2-4, Blackwell Fall 2014 Member of USF Tampa, Team 2-4, Blackwell Fall 2014

USFT-BLACKWELL-F14S2G4

4 Members

5 Guides authored

0 Comments

Add Comment

View Statistics:

Past 24 Hours: 0

Past 7 Days: 0

Past 30 Days: 2

All Time: 2,446