Introduction
Intro
What you need
-
-
Flip your laptop rearside up. Make sure not to scratch anything while doing so.
-
Remove anything attached to your laptop and start unscrewing.
-
The blue circled screws are "stand-off screws", they shouldn’t come out the rear shell. Keep unscrewing until each of them start to make a "clicking" noise.
-
The red circled screws are normal, they are all the same size and should come out.
-
-
-
All the screws should be off except the "stand-off" screws.
-
Slide a pick or card around the computer lid. Don't dig too deep or you might hit something
-
Be wary that there is a clip near the middle of the rear shell. Lift the shell off with equal pressure. Make sure to take your time to prevent anything going wrong.
-
-
-
-
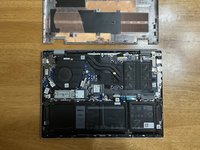
The lid should come back off
-
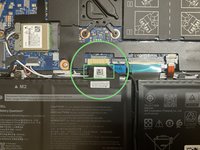
Find the battery cable (near the bottom right)
-
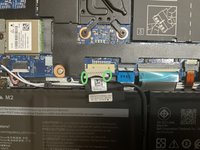
Lift off a bit of the cable cover and use a tool to disconnect the cable
-
Disconnect the cable by pushing the cable out
-
-
-
Unscrew the battery from the laptop. All the screws are the same size
-
Use a card or pick to detach the battery
-
The battery isn’t glued in, it should be free
-


To reassemble your device, follow these instructions in reverse order.
