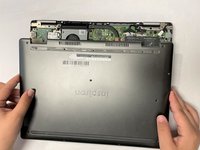
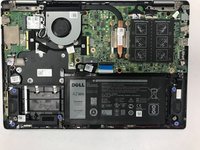
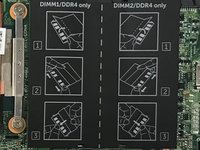
Dell Inspiron 13 7378 RAM Replacement

What you need

  1. Dell Inspiron 13 7378 RAM Replacement, Back Cover: step 1, image 1 of 1
    • Set the laptop with its underside facing up for improved accessibility.

  2. Dell Inspiron 13 7378 RAM Replacement: step 2, image 1 of 2 Dell Inspiron 13 7378 RAM Replacement: step 2, image 2 of 2
    • Using a Phillips #00 screwdriver, extract the nine 3 mm screws located on the back of the laptop.

  3. Dell Inspiron 13 7378 RAM Replacement: step 3, image 1 of 3 Dell Inspiron 13 7378 RAM Replacement: step 3, image 2 of 3 Dell Inspiron 13 7378 RAM Replacement: step 3, image 3 of 3
    • Carefully pry open the back of the back of the laptop using opening picks.

    • Carefully raise and detach the back cover from the laptop.

    • Exercise caution to prevent damaging or cracking the device's back cover.

  4. Dell Inspiron 13 7378 RAM Replacement, RAM: step 4, image 1 of 3 Dell Inspiron 13 7378 RAM Replacement, RAM: step 4, image 2 of 3 Dell Inspiron 13 7378 RAM Replacement, RAM: step 4, image 3 of 3
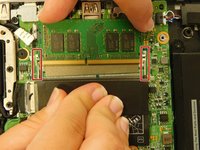
    • To remove a RAM stick, gently pull apart the metal tabs on either side of the stick.

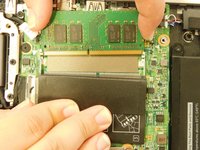
    • Carefully grasp the stick on its side and pull it out.

    • The plastic sheet covering the RAM compartment depicts the process.

  5. Dell Inspiron 13 7378 RAM Replacement: step 5, image 1 of 1
    • When inserting the new stick, make sure that the gap on in the stick aligns with the gap in the slot.

Conclusion

To reassemble your device, follow these instructions in reverse order.

One other person completed this guide.

Emma Simon

Member since: 02/08/22

162 Reputation

1 Guide authored

Team

Gateway, Team 1-3, Saknee Spring 2022 Member of Gateway, Team 1-3, Saknee Spring 2022

GCC-SAKNEE-S22S1G3

5 Members

16 Guides authored

0 Comments

Add Comment

View Statistics:

Past 24 Hours: 1

Past 7 Days: 12

Past 30 Days: 30

All Time: 389