Dell Inspiron 11-3180 RAM Replacement

What you need

  1. Dell Inspiron 11-3180 RAM Replacement, Bottom Case: step 1, image 1 of 1
    • Flip the Chromebook to have the bottom facing you.

    • Make a note of all of the screws present. You may need to uncover some of them hidden beneath plastic tabs. The location of each screw is marked in the accompanying image.

  2. Dell Inspiron 11-3180 RAM Replacement: step 2, image 1 of 1
    • Remove all nine of the 6 mm screws on the bottom with a size #00 Phillips screwdriver.

    • If needed, use a toothpick or the tip of your screwdriver to uncover the plastic that's hiding them.

  3. Dell Inspiron 11-3180 RAM Replacement: step 3, image 1 of 1
    • Flip the Chromebook upright and open it.

  4. Dell Inspiron 11-3180 RAM Replacement: step 4, image 1 of 1
    • Using the iFixit plastic opening tool, wedge it into the seam of the bottom plate. This will create a small gap between the sections that you can gently pry open. Work your way around to each side of the device until the bottom pops free.

    • Caution: DO NOT attempt to fully remove the bottom plate yet, as there are still connected wires. Doing so may result in damage to your device.

  5. Dell Inspiron 11-3180 RAM Replacement: step 5, image 1 of 1
    • Once you have pried enough space between the Chromebook and the bottom plate, flip it back over so the bottom plate is facing you and gently pull it up with your hands.

  6. Dell Inspiron 11-3180 RAM Replacement: step 6, image 1 of 1
    Tool used on this step:
    Tweezers
    $4.99
    Buy
    • Before you completely pull off the back, you must disconnect the MB cord.

    • Using blunt-nosed tweezers, carefully flip the black bar that keeps the MB cord latched in as circled in the image.

    • Once open, grab the flat cord with your tweezers and pull horizontally until it comes free. Your bottom plate is now fully removed.

  7. Dell Inspiron 11-3180 RAM Replacement: step 7, image 1 of 1
    • Finally, pull off the bottom plate carefully and set it to the side to continue with your needed repairs or replacements.

  8. Dell Inspiron 11-3180 RAM Replacement, RAM: step 8, image 1 of 1
    • Use a #00 Phillips screwdriver to remove the copper heat sink by unscrewing the four captive 7 mm screws labeled 1, 2, 3, and 4

    • The screws do not come completely off, only enough to detach the plate, do not attempt to fully remove the screws, doing so could result in damage and wasted time.

  9. Dell Inspiron 11-3180 RAM Replacement: step 9, image 1 of 2 Dell Inspiron 11-3180 RAM Replacement: step 9, image 2 of 2
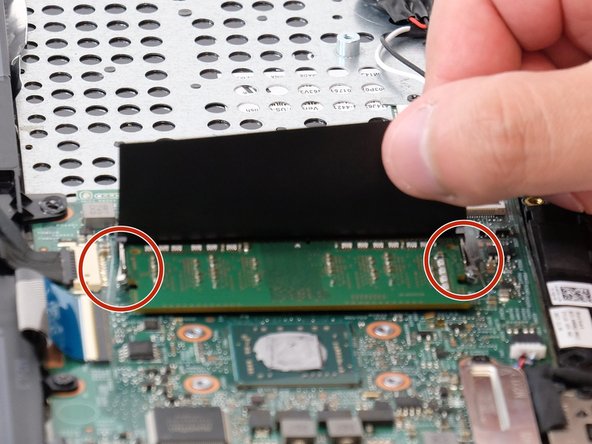
    • Lift the plastic flap to reveal the location of the RAM. Notice the two small clips holding it down on either side.

    • Pull the metal clips away from the RAM, so they no longer clip it in.

  10. Dell Inspiron 11-3180 RAM Replacement: step 10, image 1 of 2 Dell Inspiron 11-3180 RAM Replacement: step 10, image 2 of 2
    • Once the RAM has popped up, it is ready to remove.

  11. Dell Inspiron 11-3180 RAM Replacement: step 11, image 1 of 2 Dell Inspiron 11-3180 RAM Replacement: step 11, image 2 of 2
    • You may now replace the old RAM with a new one

    • When inserting your new RAM, ensure that you are inserting it with the right side up by aligning the notch in the middle with the notch inside the computer.

Conclusion

To reassemble your device, follow these instructions in reverse order.

One other person completed this guide.

0 Comments

Add Comment

View Statistics:

Past 24 Hours: 0

Past 7 Days: 5

Past 30 Days: 27

All Time: 132