Free Shipping on Domestic Orders $75+

Dell Alienware 18 Hard Drive Replacement

What you need

    1. Dell Alienware 18 Hard Drive Replacement, Disconnecting the Hard-Drive Cable: step 1, image 1 of 1
      • WARNING: Before working inside your computer, read the safety information that shipped with your computer and follow the steps in Before You Begin.

      • CAUTION: To avoid data loss, do not remove the hard drive while the computer is in Sleep or On state.

      • CAUTION: Hard drives are extremely fragile. Exercise care when handling the hard drive.

      • Disconnect the hard-drive cable from its connector on the system board.

      Ask FixBot

      Add Comment

    2. Dell Alienware 18 Hard Drive Replacement, Loosen the Screws: step 2, image 1 of 1
      • Loosen the captive screws that secure the hard-drive assembly to the computer base.

      Ask FixBot

      Add Comment

    3. Dell Alienware 18 Hard Drive Replacement, Lifting the Hard-Drive Assembly: step 3, image 1 of 1
      • Using the pull-tab, lift the hard-drive assembly out of the computer base.

      Ask FixBot

      Add Comment

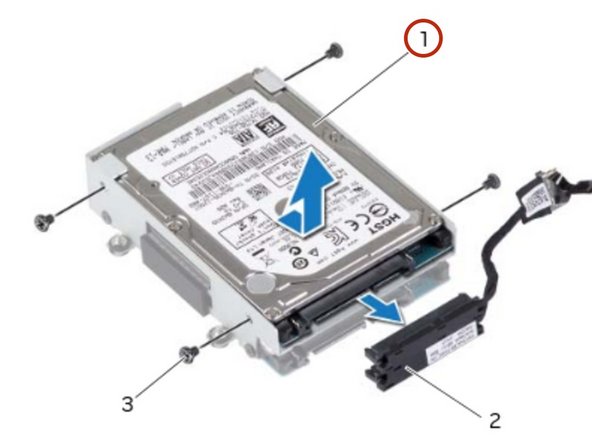
    4. Dell Alienware 18 Hard Drive Replacement, Disconnecting the Interposer: step 4, image 1 of 2 Dell Alienware 18 Hard Drive Replacement, Disconnecting the Interposer: step 4, image 2 of 2
      • Disconnect the interposer from the hard drives.

      • NOTE: Your computer supports up to three drives.

      Ask FixBot

      Add Comment

    5. Dell Alienware 18 Hard Drive Replacement, Remove the Screws: step 5, image 1 of 1
      • Remove the screws that secure the hard drive(s) to the hard-drive bracket and slide the hard drive(s) out of the hard-drive bracket.

      Ask FixBot

      Add Comment

    6. Dell Alienware 18 Hard Drive Replacement, Placing the Hard-Drive: step 6, image 1 of 1
      • Place the NEW primary hard drive in the hard-drive bracket.

      Ask FixBot

      Add Comment

    7. Dell Alienware 18 Hard Drive Replacement, Sliding the Secondary Hard-Drive: step 7, image 1 of 1
      • If applicable, slide the secondary hard drive into the hard-drive bracket.

      Ask FixBot

      Add Comment

    8. Dell Alienware 18 Hard Drive Replacement, Secure the Screws: step 8, image 1 of 1
      • Replace the screws that secure the primary hard drive to the hard-drive bracket.

      Ask FixBot

      Add Comment

    9. Dell Alienware 18 Hard Drive Replacement, Replace the Screws: step 9, image 1 of 1
      • If applicable, replace the screws that secure the secondary hard drive to the hard-drive bracket.

      Ask FixBot

      Add Comment

    10. Dell Alienware 18 Hard Drive Replacement, Connecting the Interposer: step 10, image 1 of 1
      • Connect the interposer to the hard drives.

      Ask FixBot

      Add Comment

    11. Dell Alienware 18 Hard Drive Replacement, Placing the Hard-Drive Assembly: step 11, image 1 of 1
      • Place the hard-drive assembly in the computer base.

      Ask FixBot

      Add Comment

    12. Dell Alienware 18 Hard Drive Replacement, Tightening the Screws: step 12, image 1 of 1
      • Tighten the captive screws that secure the hard-drive assembly to the computer base.

      Ask FixBot

      Add Comment

    13. Dell Alienware 18 Hard Drive Replacement, Connecting the Hard-Drive: step 13, image 1 of 1
      • Connect the hard-drive cable to its connector on the system board.

      Ask FixBot

      Add Comment

Finish Line

Cancel: I did not complete this guide.

2 other people completed this guide.

darrius

Member since: 03/26/18

5,213 Reputation

30 Guides authored

Team

RampUP America, Inc. Member of RampUP America, Inc.

Community

45 Members

12,277 Guides authored

0 Guide Comments

Add Comment

View Statistics:

Past 24 Hours: 2

Past 7 Days: 14

Past 30 Days: 54

All Time: 1,517