Introduction
If the motor of your drill is not operating properly or not operating at all, this guide will show you how to replace the motor of your drill.
What you need
-
-
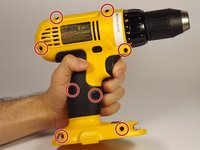
Compress the buttons on either side of the battery and lift the drill away from battery.
 Ask FixBot
-
-
-
-
Lift drill mechanism out of the shell.
-
Desolder the red and black wires from the motor.
-
Learn more about soldering here.
-


To reassemble your device, follow these instructions in reverse order.
Cancel: I did not complete this guide.
3 other people completed this guide.
Team

UMass Dartmouth, Team 4-2, Catania Spring 2016 Member of UMass Dartmouth, Team 4-2, Catania Spring 2016
UMASSD-CATANIA-S16S4G2
3 Members
13 Guides authored
3 Guide Comments
Unplug the wires from the trigger switch....don't unsolder.
New motor comes with wires.
Thanks for the heads up on the wires