Introduction
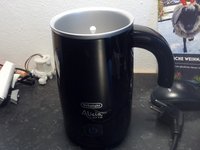
The device does not show any reaction. I will show how the temperature fuses can be checked and where the diode to be replaced is soldered in.
What you need
-
-
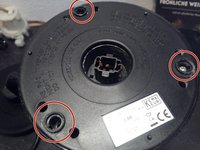
There are three plastic feet on the bottom of the device. There are Phillips screws underneath.
-
Sorry for the blurred picture. The contact plug is fixed by two screws.
-
To access the circuit board, the contact plug must be unscrewed.
-
-
-
-
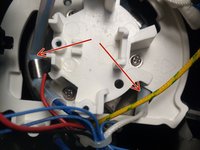
The circuit board is fixed with three screws and plastic parts. Those must not to be overlooked.
-
To make this work easier, the two cable ties around the cables should be unraveled. Caution. Do not cut into the cables.
-
Before replacing the diode, other possibly simple faults, should be eliminated.
-
Check the continuity of the three wires of the connecting cable from the Schuko plug to the back of the contact plug with a multimeter.
-
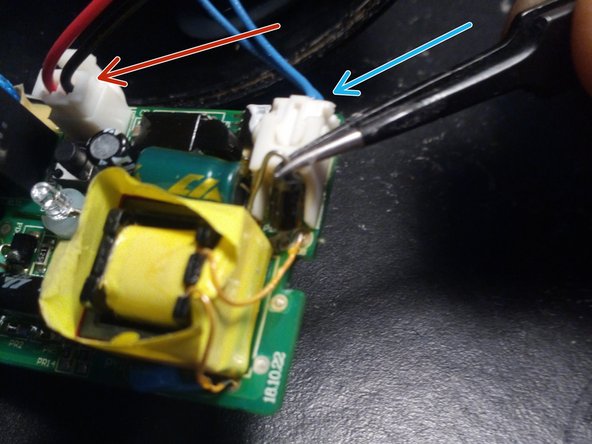
2. Check the two thermal fuses (red arrow) in the transparent silicone tubes (one cable white, one blue) for continuity. To do this, trace the cables from the back of the contact plug to the circuit board.
-
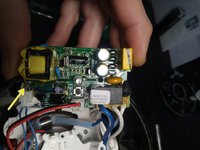
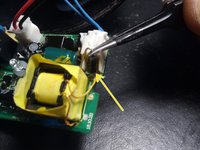
If the previous tests were ok, then measure the diode with the multimeter (set to diode mode). In this case it will work even in soldered condition. The meter should show a voltage drop of approx. 0.6 V in reverse direction OL and against reverse direction.
-
If this does not show,tehn the diode must be replaced. A Schottky diode SR2100 is installed (2 A, 100V). Better would be a SR3200 (3A, 200V). Pay attention to the installation direction. The diodes are available on the Internet in packs of 5 for less than 4 euros.
-
-
-
The two blue thin cables lead to the temperature sensor. They should have about 100k resistance at room temperature.
-
The red and black cable lead to the motor.
-
The complete circuit board is also available on the internet. Search the net with the number on the board. But I found only 2 offers for more than 30 Euro.
-


Work through the steps in reverse order to reassemble your device.
Cancel: I did not complete this guide.
2 other people completed this guide.
Special thanks to these translators:
100%

oldturkey03 is helping us fix the world! Want to contribute?
Start translating ›

6 Guide Comments
Danke Andreas, hab damit meine Alicia reparieren können 🙏😇
Many thanks Andreas! My milk frother is from different brand (Gastroback) but looks exactly the same inside. It had the same failure. I followed your suggestion and tested the diode. And indeed, it was shorted. I further followed your advice and ordered SR3200 version. It turned out to be a larger package with thicker leads that didn’t fit into the holes of the PCB. I had to use 2 pieces of thin insulated wire to make the connection and have the diode now dangling above the PCB. Therefore, I would modify your advice for the diode specifications. Nevertheless, the unit is now working thanks to your post!
Yourii
Hallo Andreas,
tolle Anleitung! Mein Milchaufschäumer hat leider auch den Geist aufgegeben. Nach dem Aufschrauben habe ich auch gleich einen defekten Widerstand entdeckt (im Bild eingekreist: https://ibb.co/ynkJBf13) den Habe ich auch getauscht und nicht hundern, der kondensator der eig. bei dem großen X drin ist, den habe ich auch wieder eingelötet, hatte ihn nur zum prüfen ausgelötet). Soooo, leider hat der Tausch des Widerstands nicht den erwünschten Erfolg gebracht. Dann bin ich auf deine Anleitung gestoßen und dachte mir, mega! Gleich mal ausprobieren. Habe die Diode vermessen und gedacht sie ist hin. Wie sich am Ende nach einlöten der neuen Diode rausgestellt hat, war es nicht die Diode, ich war nur zu blöd das Multimeter richtig zu bedienen :D So oder so funktionert das Teil weiterhin nicht. Auch alle anderen deiner Tipps habe ich durchgeprüft, es scheint soweit alles i.O. zu sein.
Ich würde aber gerne verstehen wo das problem liegt. Hast du vllt noch eine Idee, oder einen Schaltplan?
LG Andi
Hallo Andi,
mir ist auf Deinem Foto eine der vier Gleichrichterdioden aufgefallen. Rechts im Bild die oberste. Die solltest Du im eingebauten Zustand mit dem Diodentester kontrollieren können.
Ansonsten geh mal in ein Repair-Cafe. Vielleicht triffst Du da auf einen guten Elekrotechniker.
Gruß
Andreas
Das ist kein Widerstand sondern eine Induktivität (Spule), ist auch mit L1 bezeichnet.
Andre S. -