Introduction
To repair your cocking lever you will need a Phillips 2 screwdriver. In addition to this, this manual requires you to remove a small screw and washer from the carbine. To avoid losing these, replace your cocking lever on a table or similar workspace.
What you need
-
-
Place the carbine with the saddle ring and leather thong facing upwards.
-
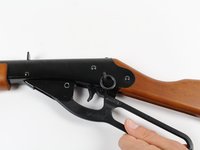
Locate the screw head on the cocking lever.
-
Place a #2 Phillips Screwdriver in the 11/16ths of an inch, matte black screw on the cocking lever assembly. Twist with a counter-clockwise motion.
-
Completely remove the screws.
-
-
-
-
Remove the cocking lever by placing your dominant hand’s fingers through the cocking lever handle.
-
With your fingers in the handle, slide the lever towards the butt of the carbine.
-
Finally, pull the cocking lever and carbine in opposite directions to replace the cocking lever.
-


To reassemble your device, follow these instructions in reverse order.
