Introduction
Is your DJI Mavic Mini experiencing trouble with positioning, stability, or returning home? Many of these problems an be due to weak signals or a faulty GPS. In this set of instructions, we will detail the removal process, inspection, and replacement of the DJI Mavic Mini GPS Module.
Before starting this repair, turn off the device and remove the battery.
What you need
-
-
Orient the DJI Mavic Mini so that the camera faces away.
-
Use your finger to depress the lip on the panel until the lid becomes ajar.
-
Flip the panel up to expose the battery module.
 Ask FixBot
-
-
-
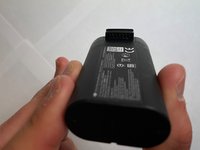
Depress the locking mechanism on the battery module to release the lock.
-
Pull the battery straight out of the casing.
-
-
-
Check the battery pins on the DJI Drone for corrosion or warping. If either of these conditions are present, replacing the battery module may not help resolve the issue at hand.
-
Check the pin receptacles on the battery module for blockages.
-
-
-
-
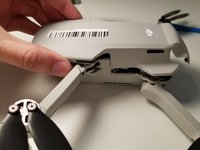
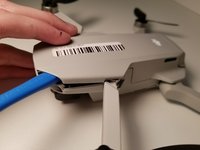
Put your fingers against edge of the top case and begin undoing the connections at the edges first, then proceed to pry it open.
-
Alternatively, you may insert the iFixit opening tool between the top and bottom case first, and work your way around the perimeter to detach the top case.
-
-
-
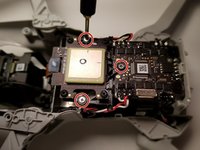
With the internals exposed, locate the GPS board; this is the middle board component with a colored square located near the middle of the drone.
-
-
-
Remove the three 1.0 mm screws that form a triangle around the GPS board using the JIS #000 screwdriver.
-
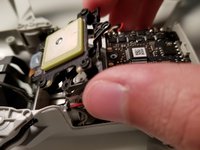
Flip the GPS module over gently. Be mindful that it is attached to the device with a connector still.
-
-
Tool used on this step:Tweezers$4.99
-
Use the ESD Safe Tweezers Blunt Nose tool to break apart the superglue connecting the cable to the GPS.
-
Repeat this for the superglue on the other side.
-
Detach the press-fit connecter from the GPS.
-


To reassemble your device, follow these instructions in reverse order.
Cancel: I did not complete this guide.
2 other people completed this guide.

Team

Clemson, Team 1-2, Hunter Spring 2022 Member of Clemson, Team 1-2, Hunter Spring 2022
CLEM-HUNTER-S22S1G2
5 Members
8 Guides authored