
Compaq Evo N1000v Fan Replacement

What you need

  1. Compaq Evo N1000v Fan Replacement, LED Cover: step 1, image 1 of 1
    • Flip the laptop over with the rear panel facing forward.

  2. Compaq Evo N1000v Fan Replacement: step 2, image 1 of 1
    • Using a TR8 Torx screwdriver, remove the two T8 Torx screws that secure the LED cover to the base enclosure.

  3. Compaq Evo N1000v Fan Replacement: step 3, image 1 of 1
    • Flip the laptop back over with the front facing forward. Open the screen.

  4. Compaq Evo N1000v Fan Replacement: step 4, image 1 of 1
    • Locate the F1 and F2 keys near the top left corner of the keyboard.

  5. Compaq Evo N1000v Fan Replacement: step 5, image 1 of 1
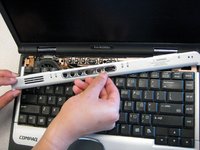
    • While holding the F1 and F2 keys, insert a spudger between the keys into the notch in the LED cover. Lift up.

  6. Compaq Evo N1000v Fan Replacement: step 6, image 1 of 1
    • Locate the Scroll and Pause keys near the top right corner of the keyboard.

  7. Compaq Evo N1000v Fan Replacement: step 7, image 1 of 1
    • While holding the Scroll and Pause keys, insert a spudger between the keys into the notch in the LED cover. Lift up.

  8. Compaq Evo N1000v Fan Replacement: step 8, image 1 of 2 Compaq Evo N1000v Fan Replacement: step 8, image 2 of 2
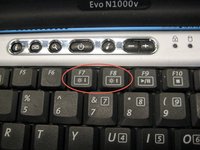
    • Insert a spudger between the F7 and F8 keys. Lift up to remove the LED cover.

  9. Compaq Evo N1000v Fan Replacement, Keyboard: step 9, image 1 of 1
    • Lift the back edge of the keyboard and pull towards the screen.

  10. Compaq Evo N1000v Fan Replacement: step 10, image 1 of 1
    • Pull the cable and lift up to release.

  11. Compaq Evo N1000v Fan Replacement: step 11, image 1 of 1
    • Remove the keyboard.

  12. Compaq Evo N1000v Fan Replacement, Heat Sink: step 12, image 1 of 1
    • Disconnect the cable connecting the fan to the system board.

  13. Compaq Evo N1000v Fan Replacement: step 13, image 1 of 1
    • Remove the four screws from the heat sink.

  14. Compaq Evo N1000v Fan Replacement: step 14, image 1 of 1
    • Pull the the heat sink up and out of the computer.

  15. Compaq Evo N1000v Fan Replacement, Palm Rest: step 15, image 1 of 1
    • Close the laptop and flip it so the rear panel is facing up.

  16. Compaq Evo N1000v Fan Replacement: step 16, image 1 of 1
    • Using the TR8 Torx screwdriver, remove the six screws from the back case.

  17. Compaq Evo N1000v Fan Replacement: step 17, image 1 of 1
    • Remove the battery.

    • Remove the screw from the metal support on the case edge with a Torx T8 screwdriver.

    • Flip the laptop over again so the top is facing up.

    • Open the laptop screen and face it towards you.

  18. Compaq Evo N1000v Fan Replacement: step 18, image 1 of 1
    • Lift the the palm rest up from the front edge of the laptop and swing it towards the screen.

    • Be gentle as it is connected by some cables.

  19. Compaq Evo N1000v Fan Replacement: step 20, image 1 of 1
    • Disconnect the second ribbon cable.

  20. Compaq Evo N1000v Fan Replacement: step 21, image 1 of 1
    • Remove the palm rest.

  21. Compaq Evo N1000v Fan Replacement, Top Cover: step 22, image 1 of 1
    • Turn the laptop bottom side up.

  22. Compaq Evo N1000v Fan Replacement: step 23, image 1 of 1
    • Remove the two TM 2.5mm x 8.0mm screws that secure the top cover to the base.

  23. Compaq Evo N1000v Fan Replacement: step 24, image 1 of 1
    • Turn the base top side up with the front facing forward.

  24. Compaq Evo N1000v Fan Replacement: step 25, image 1 of 1
    • Remove the three TM 2.5 mm x 5.0 mm screws that secure the top cover to the base.

  25. Compaq Evo N1000v Fan Replacement: step 26, image 1 of 1
    • Lift the top cover straight up about one inch, then slide forward until the microphone cable is exposed.

    • Disconnect the microphone cable from the system board.

  26. Compaq Evo N1000v Fan Replacement: step 27, image 1 of 1
    • Remove the top cover from the base.

  27. Compaq Evo N1000v Fan Replacement, Fan: step 28, image 1 of 1
    • Disconnect the fan cable from the system board.

  28. Compaq Evo N1000v Fan Replacement: step 29, image 1 of 1
    • Remove the fan from the base.

Conclusion

To reassemble your device, follow these instructions in reverse order.

One other person completed this guide.

Alex Hernandez

Member since: 04/14/10

46 Reputation

4 Guides authored

Team

Cal Poly, Team 29-74, Johann Spring 2010 Member of Cal Poly, Team 29-74, Johann Spring 2010

CPSU-JOHANN-S10S29G74

3 Members

14 Guides authored

2 Comments

Remove battery FIRST before you do anything. Then remove all the screws on the back of the computer. The you can go to the front and follow all the steps afterward.

iam765 - Reply

Please DO NOT firmly remove any connectors. Most connectors have locks. In step 20 you can see the two different colors of the connector the bottom is black and the top (the lock) is brown. Each side of the lock sticks out further than the connector. One side at a time pull back on the lock. Connection should come out with no force. to reconnect, seat connection and push lock back in place. If any issues try unlocking and re-seat connection.

iam765 - Reply

Add Comment

View Statistics:

Past 24 Hours: 0

Past 7 Days: 1

Past 30 Days: 5

All Time: 5,781