Introduction
The purpose of this guide is to give step-by-step instruction on how to replace the motherboard on a ColecoVision.
What you need
-
-
-
Start by laying the console face down.
-
Remove the eight 15mm Phillips #1 screws from the bottom of the device.
 Ask FixBot
-
-
-
Flip the console back over.
-
Lift the front panel off. I would reccomended using a metal spudger along the rim of the top to safely remove it and set it aside.
-
-
-
-
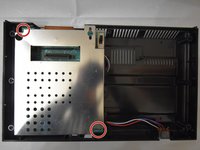
Remove the two 15mm Phillips #1 screws holding the casing in place.
-
Carefully lift the casing from the motherboard.
-
-
-
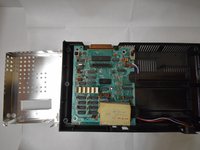
Remove the center Phillips #1 screw near the cartridge slot.
-
Remove the second Phillips #1 screw near the RAM chips.
-
Carefully lift and remove the motherboard.
-
-


To reassemble your device, follow these instructions in reverse order.
Cancel: I did not complete this guide.
One other person completed this guide.
Team

UW Tacoma, Team S1-G2, Rose Fall 2018 Member of UW Tacoma, Team S1-G2, Rose Fall 2018
UWT-ROSE-F18S1G2
4 Members
66 Guides authored