
Chromebook x360 14-da0011dx Motherboard Replacement

What you need

  1. Chromebook x360 14-da0011dx Motherboard Replacement, Lower Case: step 1, image 1 of 1
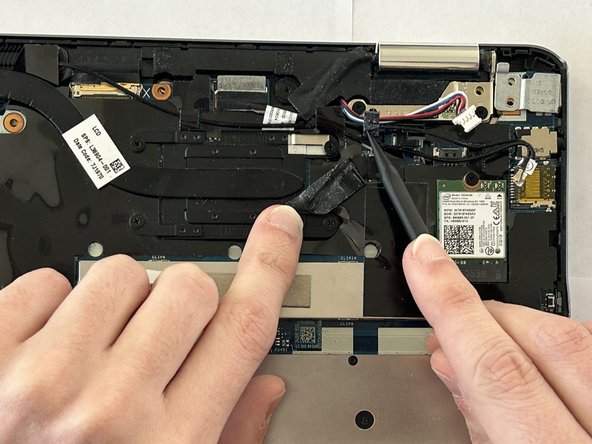
    • Flip the device over with the hinge facing away from you.

    • On the back of the device, remove the two rubber strips on the top and the bottom of the device using a spudger.

  2. Chromebook x360 14-da0011dx Motherboard Replacement: step 2, image 1 of 2 Chromebook x360 14-da0011dx Motherboard Replacement: step 2, image 2 of 2
    • Remove the seven 8.0 mm screws located under the two rubber pads and the screws along the back of the device using a Phillips #1 screwdriver.

  3. Chromebook x360 14-da0011dx Motherboard Replacement: step 3, image 1 of 3 Chromebook x360 14-da0011dx Motherboard Replacement: step 3, image 2 of 3 Chromebook x360 14-da0011dx Motherboard Replacement: step 3, image 3 of 3
    • Use a spudger to gently pry the edges of the back cover off the device. Slowly work all the way around the device until the panel comes loose.

  4. Chromebook x360 14-da0011dx Motherboard Replacement, Battery: step 4, image 1 of 2 Chromebook x360 14-da0011dx Motherboard Replacement, Battery: step 4, image 2 of 2
    • Remove the cable attached to the battery.

  5. Chromebook x360 14-da0011dx Motherboard Replacement: step 5, image 1 of 2 Chromebook x360 14-da0011dx Motherboard Replacement: step 5, image 2 of 2
    • Remove the five 3.0 mm screws holding the battery in place using the Phillips #1 screwdriver.

  6. Chromebook x360 14-da0011dx Motherboard Replacement: step 6, image 1 of 1
    • Lift the battery out of the chassis.

  7. Chromebook x360 14-da0011dx Motherboard Replacement, Fan: step 7, image 1 of 1
    • Remove the two 3.0 mm Phillips #1 screws holding the fan in place.

  8. Chromebook x360 14-da0011dx Motherboard Replacement: step 8, image 1 of 2 Chromebook x360 14-da0011dx Motherboard Replacement: step 8, image 2 of 2
    • Disconnect the fan cable from the motherboard.

    • Carefully remove the fan from the computer.

    • Be careful when removing the fan, as it sits under one of the CPU heat pipes and tucks under the ribbon cable that runs to the I/O board.

  9. Chromebook x360 14-da0011dx Motherboard Replacement, Motherboard: step 9, image 1 of 3 Chromebook x360 14-da0011dx Motherboard Replacement, Motherboard: step 9, image 2 of 3 Chromebook x360 14-da0011dx Motherboard Replacement, Motherboard: step 9, image 3 of 3
    • Lift the ZIF connector locking flaps, then remove the ribbon cables.

    • There are several small connections for the ribbon cables. Exercise extreme caution when disconnecting the cables.

    • One ribbon cable is on the underside of the motherboard and will be removed later.

  10. Chromebook x360 14-da0011dx Motherboard Replacement: step 10, image 1 of 1
    • Remove the three 3.0 mm Phillips #1 screws holding the motherboard in place.

  11. Chromebook x360 14-da0011dx Motherboard Replacement: step 11, image 1 of 3 Chromebook x360 14-da0011dx Motherboard Replacement: step 11, image 2 of 3 Chromebook x360 14-da0011dx Motherboard Replacement: step 11, image 3 of 3
    • Disconnect the cables attached to the Wi-Fi card and motherboard along the top edge.

    • The leftmost connector is a ribbon-style connector with a metal locking bar that must be unlatched.

  12. Chromebook x360 14-da0011dx Motherboard Replacement: step 12, image 1 of 3 Chromebook x360 14-da0011dx Motherboard Replacement: step 12, image 2 of 3 Chromebook x360 14-da0011dx Motherboard Replacement: step 12, image 3 of 3
    • Use a spudger to remove the tape and plastic shielding that secure the wires.

  13. Chromebook x360 14-da0011dx Motherboard Replacement: step 13, image 1 of 1
    • Gently lift the motherboard until it is loose.

    • Disconnect the ribbon cable attached to the underside of the motherboard.

    • The locking flap on this ribbon cable must be flipped down to unlock.

  14. Chromebook x360 14-da0011dx Motherboard Replacement: step 14, image 1 of 1
    • Lift the motherboard from the device.

    • Removal of the heat pipes may be necessary for replacement if your new replacement motherboard doesn't have one installed.

Conclusion

To reassemble your device, follow these instructions in reverse order.

One other person completed this guide.

0 Comments

Add Comment

View Statistics:

Past 24 Hours: 0

Past 7 Days: 1

Past 30 Days: 21

All Time: 203