This translation may not reflect the most recent updates from the source guide. Help update the translation or view the source guide.
Introduction
The trigger of the Dyson v12 vacuum cleaner appears to break easily (it will remain pushed inside). Here is how to replace it by a new one. Some steps may be tricky, Dyson would benefit in creating products more easily maintainable.
You will need a new trigger that can be find here: https://www.thingiverse.com/thing:720166... (and printed yourself).
What you need
-
-
Remove the back filter by unscrewing, as you would for cleaning it (no tool needed).
-
-
-
Remove the dust sucker "vortex" tube by removing the four screws inside the cover with a slender PH1 screwdriver (for example from the "Marlin screwdriver set") and the two screws above the handle on the back (circles). The screwdrivers with amovible bits are too wide for this step.
-
-
-
Unscrew the two Torx screws (T8) that are visible and pop out the cap with a lever.
-
-
-
-
Remove the battery by unscrewing the two screws on the bottom and the one in the centre-back of the handle with a PH1 screwdriver. Pull the battery to slide it out.
-
-
-
Disengage the black plug by pushing on it axial (you'll need to force a bit).
-
Free the small white connector but pulling it out. On some versions, the whole board is covered by a silicon gel that must be peeled beforehand.
-
Remove the two Torx (T8) screws holding the terminals.
-
-
-
Use a flexible extension to unscrew the two T8 screws (circles) from the cable guide. Those screws cannot be accessed with a straight screwdriver.
-
Flatten the terminal with pliers to allow them to slip through the guide.
-
Use a metallic stylus to free the cable guide (rectangle) then remove it.
-
-
-
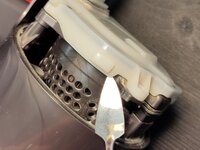
Use a slender T8 screwdriver to remove the screw deep inside the handle. The screwdrivers with interchangeable bits are too wide for this step.
-
Use a plier to pull out the trigger assembly out of the handle.
-
-
-
Unclip the broken trigger and replace it by a new one printer from https://www.thingiverse.com/thing:720166.... I recommend ABS or PETG for their strength. Place the spring around the bottom pin of the new trigger.
-


To reassemble, follow the steps in reverse order.
Special thanks to these translators:
50%
Delan_ is helping us fix the world! Want to contribute?
Start translating ›