Introduction
Key's stuck or broken? No problem. Replace sets of keys in no time with the help of a screwdriver.
What you need
-
-
You will begin by removing 4 screws on each side of the piano, circled in red.
-
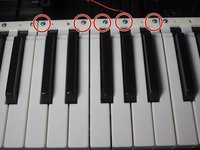
You will then remove the four screws that are a little hidden, circled in orange.
-
Next, remove the two screws in the middle of piano, as well as the three screws on the top of the piano, circled in yellow.
 Ask FixBot
-
-
-
-
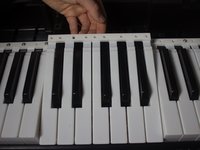
After flipping the keyboard over to the front, carefully remove the the front panel from the back panel of the keyboard using your hands.
-
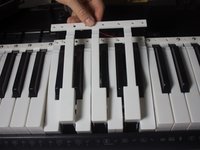
You should now see the screws holding the keys in place.
-
With a JIS-1 bit, unscrew the five screws in the section with the key you want to replace.
-


To reassemble your device, follow these instructions in reverse order.
Cancel: I did not complete this guide.
2 other people completed this guide.
Team

Cal Poly, Team 13-2, Banghart Winter 2017 Member of Cal Poly, Team 13-2, Banghart Winter 2017
CPSU-BANGHART-W17S13G2
3 Members
5 Guides authored
2 Guide Comments
This guide also works for the Casio LK-175.
The keys are in small groups and you will need to purchase the correct ones. Unfortunately, the ones I received from a seller did not match. I think he thought the part was compatible between my keyboard and the one he pulled them from. I very carefully tried super-gluing the key back onto it's section and so far so good (a few hours). Hopefully, the repair will hold.
Thank you for the guide Samantha.
Do you know if this exposes the circuit board(s)? I need to open my Casio LK175 to figure out why it's only working with batteries. I need to test the power adapter with a load...but the easiest way to do that would probably be measuring the voltage on the pins inside the board.
Thanks for posting this BTW. I saw so many screws on the bottom. I figured a lot of em were holding the keys. I was afraid to open it up, because I figured I'd mess it up. This is very helpful!