
Canon Powershot SD880 Flash Replacement

Robert Manno and
Last updated on Mar 28, 2023
Views: 3.3K
View statistics:
- Past 24 Hours:
- 2
- Past 7 Days:
- 16
- Past 30 Days:
- 63
- All Time:
- 3,297
Comments: 0
No one has left comments on this guide. Will you be first?
Go to guide commentsCompleted: 0 1
No one has marked this guide "completed." Will you be the first?
1 person has marked this guide "completed." It's you — great job!
Favorites: 1 2
1 person has favorited (and subscribed to) this guide. Will you be next?
2 people have favorited (and subscribed to) this guide — including you!
Action Shots
Be an action hero! This guide needs images that better demonstrate how to perform specific actions.
Missing Steps
Oops! This guide is currently missing one or more important steps.
Introduction
Go to step 1 ↓This guide will provide you with the necessary direction to disassemble the flash on a Canon Powershot SD880. Before you start, know that the flash device has a few delicate connections and should be handled with care.
What you need
Tools


-
-
-
Remove the two 2.4 mm screws on the side of the camera that are next to the LCD screen using a Phillips #00 screwdriver.
-
Remove the two 4.1 mm screws on the other side using a Phillips #00 screwdriver.
-
Remove the single 2.6 mm screw from the bottom of the camera using a Phillips #00 screwdriver.
-
Slowly pull the back cover off of the camera.
 Ask FixBot
-
-
-
-
-
Remove the 2.6 mm screw from the bottom of the camera using a Phillips #00 screwdriver.
-
Remove the 4.1 mm screw from the menu button side of the camera using a Phillips #00 screwdriver.
-
-
-
-
-
-
Unplug the green and white plugs that connect the top panel to the top of the logic board.
-
Dislodge the tab above the lens.
-
Dislodge the tab at the back.
-
-
-
-
-
Remove the two 2.9 mm screws at the top-right corner and bottom-left corner of the LCD screen using a Phillips #0 screwdriver.
-
Disconnect the ribbons that connect the screen to the camera.
-
Lift the screen off.
-
-
-
-
-
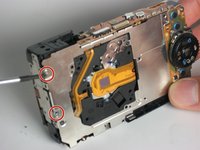
Remove two 1.8 mm screws from the back using a Phillips #0 screwdriver to disconnect the metal guard.
-
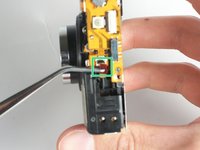
To unplug the ribbon at the top of the camera, gently pull it from the plug-in point.
-
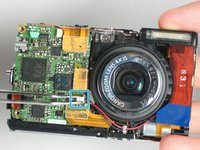
Disconnect the white plug from the red and black wires.
-
-


To reassemble your device, follow these instructions in reverse order.

Team

Cal Poly, Team 13-3, Forte Winter 2011 Member of Cal Poly, Team 13-3, Forte Winter 2011
CPSU-FORTE-W11S13G3
5 Members
96 Guides authored
