
Canon Powershot A70 LCD Screen Replacement

What you need

  1. Canon Powershot A70 LCD Screen Replacement, Shutter/Speaker Panel: step 1, image 1 of 1
    • Open the battery compartment and remove the batteries.

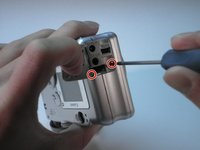
    • Remove the two screws that are deep in the battery compartment with a Phillips #00 screwdriver.

  2. Canon Powershot A70 LCD Screen Replacement: step 2, image 1 of 2 Canon Powershot A70 LCD Screen Replacement: step 2, image 2 of 2
    • Open the CF compartment and remove the top screw with a Phillips #00 screwdriver.

    • The panel that holds the shutter button and zoom will come off.

    • Be careful! There are two small wires connecting the speaker to the body of the camera. These are very delicate so proceed with caution. Do not remove.

  3. Canon Powershot A70 LCD Screen Replacement, Rear Exterior Panel: step 3, image 1 of 1
    • Unscrew the three small screws on the bottom of the camera with a Phillips #00 screwdriver.

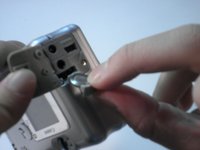
    • Remove the wrist strap.

  4. Canon Powershot A70 LCD Screen Replacement: step 4, image 1 of 1
    • Remove the screw in the CF compartment with a Phillips #00 screwdriver.

  5. Canon Powershot A70 LCD Screen Replacement: step 5, image 1 of 3 Canon Powershot A70 LCD Screen Replacement: step 5, image 2 of 3 Canon Powershot A70 LCD Screen Replacement: step 5, image 3 of 3
    • Open the rubber Digital AV Out compartment flap.

    • Pry the battery with an opening tool.

    • Carefully pull out the battery with two fingers.

    • Remove the two screws that are now visible with a Phillips #00 screwdriver.

  6. Canon Powershot A70 LCD Screen Replacement: step 6, image 1 of 2 Canon Powershot A70 LCD Screen Replacement: step 6, image 2 of 2
    • Starting from the bottom, carefully pull the casing off.

    • The casing will now pivot at the top.

    • There are three catches that hold the back casing to the body.

    • You may have to pull with some force. The rear panel will make a snapping noise when it separates from the body.

  7. Canon Powershot A70 LCD Screen Replacement: step 7, image 1 of 1
    • The interior of the camera should look like this.

  8. Canon Powershot A70 LCD Screen Replacement, Front Exterior Panel: step 8, image 1 of 1
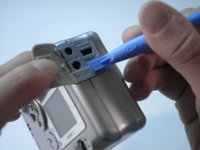
    • Remove the two screws at the top of the battery compartment with a Phillips #00 screwdriver.

  9. Canon Powershot A70 LCD Screen Replacement: step 9, image 1 of 2 Canon Powershot A70 LCD Screen Replacement: step 9, image 2 of 2
    • With your right thumb, pull back on the tab while using your left hand to pull the face of the camera away from the body.

  10. Canon Powershot A70 LCD Screen Replacement, Viewfinder: step 10, image 1 of 1
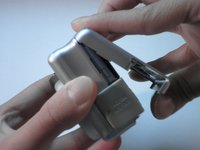
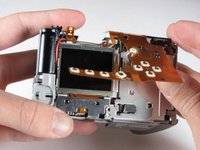
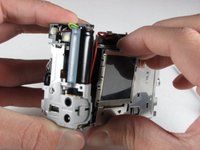
    • After removing the front and rear panels, locate the viewfinder directly above the lens on top of the camera.

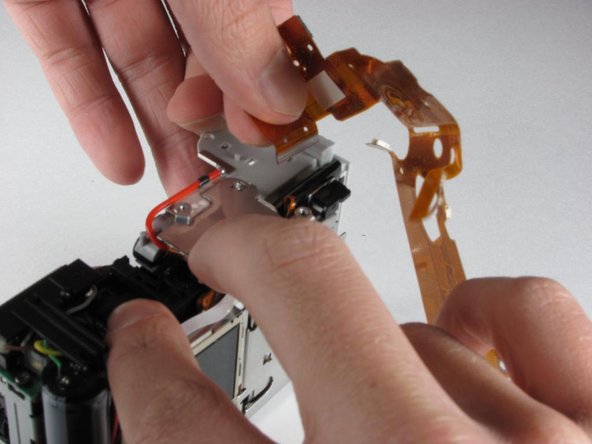
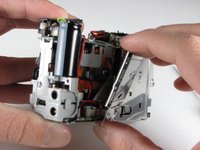
    • Three screws hold the viewfinder in place: two on the top and one on the lens side of the camera.

    • First, remove the screw in the bent corner of the viewfinder with a Phillips #00 screwdriver.

  11. Canon Powershot A70 LCD Screen Replacement: step 11, image 1 of 1
    • Remove the second screw directly across from the bent corner.

    • It may be hidden in the space under the orange circuitry with a Phillips #00 screwdriver.

  12. Canon Powershot A70 LCD Screen Replacement: step 12, image 1 of 1
    • Remove the final screw directly under the left side of the viewfinder (on the lens side) with a Phillips #00 screwdriver.

  13. Canon Powershot A70 LCD Screen Replacement: step 13, image 1 of 1
    • After removing the three screws, the only thing still holding the viewfinder in place is a small plastic peg.

    • Remove the viewfinder with a firm pull directly upwards.

  14. Canon Powershot A70 LCD Screen Replacement, Speakers: step 14, image 1 of 1
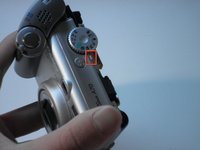
    • Remove the two clearly visible screws from the control dial with a Phillips #00 screwdriver.

    • Remove the dial—it should come off easily.

  15. Canon Powershot A70 LCD Screen Replacement: step 15, image 1 of 2 Canon Powershot A70 LCD Screen Replacement: step 15, image 2 of 2
    • With tweezers, carefully unplug the two small wires from the green plug.

    • Carefully replace the broken speaker/shutter panel with a new one.

  16. Canon Powershot A70 LCD Screen Replacement: step 16, image 1 of 1
    • The removed panel should look like this.

  17. Canon Powershot A70 LCD Screen Replacement, Button Flex Assembly: step 17, image 1 of 1
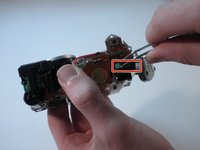
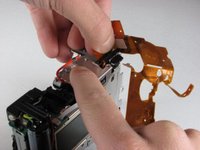
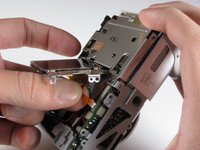
    • Using a Phillips #00 screwdriver, remove the one visible screw that attaches the flex assembly to the back of the camera.

  18. Canon Powershot A70 LCD Screen Replacement: step 18, image 1 of 2 Canon Powershot A70 LCD Screen Replacement: step 18, image 2 of 2
    • Starting with the bottom-left corner (below the screen), lift the flex assembly away from the camera chassis.

  19. Canon Powershot A70 LCD Screen Replacement: step 19, image 1 of 1
    • Use your finger to release the small metal tab that attaches the flex assembly to the upper-right corner of the camera.

    • The tab is very small and may be hard to see.

  20. Canon Powershot A70 LCD Screen Replacement: step 20, image 1 of 1
    • Disconnect the black connector by lifting it up.

    • Potential for device damage: You may damage the flex assembly if you forcibly remove it without disconnecting the connector.

  21. Canon Powershot A70 LCD Screen Replacement: step 21, image 1 of 1
    • Gently pull the rest of the flex assembly away from the camera body until you reach the last connector.

  22. Canon Powershot A70 LCD Screen Replacement: step 22, image 1 of 2 Canon Powershot A70 LCD Screen Replacement: step 22, image 2 of 2
    • Hold the flex assembly gently but firmly, and pull it out of the connection with two fingers.

    • Be sure to pull straight up, not at an angle.

  23. Canon Powershot A70 LCD Screen Replacement, LCD Screen: step 23, image 1 of 1
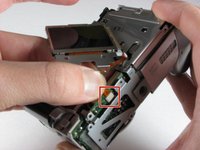
    • Remove the two screws from the bottom of the camera with a Phillips #00 screwdriver.

  24. Canon Powershot A70 LCD Screen Replacement: step 24, image 1 of 1
    • Remove the last screw located on the top of the camera with a Phillips #00 screwdriver.

  25. Canon Powershot A70 LCD Screen Replacement: step 25, image 1 of 2 Canon Powershot A70 LCD Screen Replacement: step 25, image 2 of 2
    • The screen should no longer be screwed to the body.

    • Gently push the screen down and then pull it away from the body of the camera.

    • It will swing away, because it is still plugged into the camera.

  26. Canon Powershot A70 LCD Screen Replacement: step 26, image 1 of 2 Canon Powershot A70 LCD Screen Replacement: step 26, image 2 of 2
    • Unplug the thin orange ribbon cable (located towards the bottom of the camera) by carefully pulling it away from the white connector.

  27. Canon Powershot A70 LCD Screen Replacement: step 27, image 1 of 1
    • Finally, repeat the previous step with the thick orange strip located on the side of the screen.

  28. Canon Powershot A70 LCD Screen Replacement: step 28, image 1 of 1
    • You have successfully removed the LCD screen. The camera is now ready for the replacement screen.

Conclusion

To reassemble your device, follow these instructions in reverse order.

Shalan Ertis

Member since: 01/26/10

68 Reputation

3 Guides authored

Team

Cal Poly, Team 14-40, Regan Winter 2010 Member of Cal Poly, Team 14-40, Regan Winter 2010

CPSU-REGAN-W10S14G40

5 Members

15 Guides authored

0 Comments

Add Comment

View Statistics:

Past 24 Hours: 0

Past 7 Days: 0

Past 30 Days: 7

All Time: 8,513