
Canon PowerShot SD450 LCD Screen Replacement

What you need

  1. Canon PowerShot SD450 LCD Screen Replacement, Casing: step 1, image 1 of 1
    • Remove the battery and SD Card from their slots. Leaving these in could cause the battery to ground and ruin the electronics.

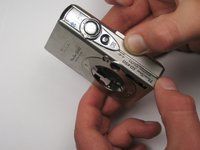
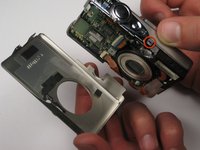
    • Unscrew the six screws on the casing. Two are on the bottom as pictured; two more are on each side of the camera.

  2. Canon PowerShot SD450 LCD Screen Replacement: step 2, image 1 of 1
    • Pull the lanyard mount off of the camera using a spudger or your fingers.

  3. Canon PowerShot SD450 LCD Screen Replacement: step 3, image 1 of 2 Canon PowerShot SD450 LCD Screen Replacement: step 3, image 2 of 2
    • Find the line that separates the casing into its two halves. Hold each half separately, and gently pull apart.

    • Note that there is a small metal clip holding the two halves together. It might help to press down on the back half (indicated) while pulling upward slightly on the front half.

  4. Canon PowerShot SD450 LCD Screen Replacement: step 4, image 1 of 1
    • Take hold of the inside of the camera, and gently pull away from the back casing.

  5. Canon PowerShot SD450 LCD Screen Replacement: step 5, image 1 of 1
    • Remove the square, clear, rubber protector from the front of the logic board. This is not necessary to remove, but can easily fall off and get lost during later steps.

  6. Canon PowerShot SD450 LCD Screen Replacement: step 6, image 1 of 1
    • When you reassemble the camera, make sure the switch on the casing matches the position of the switch on the camera internals.

    • The black viewfinder padding can easily fall off the casing. Make sure you don't lose it when moving around parts.

  7. Canon PowerShot SD450 LCD Screen Replacement, LCD Screen: step 7, image 1 of 2 Canon PowerShot SD450 LCD Screen Replacement, LCD Screen: step 7, image 2 of 2
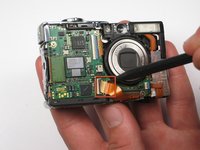
    • Pull the retaining clip up with the spudger or your finger and remove the ribbon from the socket.

  8. Canon PowerShot SD450 LCD Screen Replacement: step 8, image 1 of 1
    • Remove the tripod mount screw.

    • Turn the camera around so that the screen is facing you, and the camera is upright.

  9. Canon PowerShot SD450 LCD Screen Replacement: step 9, image 1 of 1
    • Remove the screw at the top right of the screen.

  10. Canon PowerShot SD450 LCD Screen Replacement: step 10, image 1 of 1
    • Lift up the screen to reveal the tripod mount screw.

  11. Canon PowerShot SD450 LCD Screen Replacement: step 11, image 1 of 1
    • Remove the last screw holding the tripod mount to the case. The LCD ribbon threads under the mount, so upon reinstallation, the ribbon will need to be threaded through before the mount is reattached. Take note of the tripod mount orientation.

  12. Canon PowerShot SD450 LCD Screen Replacement: step 12, image 1 of 1
    • Pull the back light ribbon from it's socket to remove the LCD completely. There is a little hole you can stick the spudger into to help release the ribbon.

Conclusion

To reassemble your device, follow these instructions in reverse order.

3 other people completed this guide.

Pierre Teplitxky

Member since: 04/10/10

134 Reputation

2 Guides authored

Team

Cal Poly, Team 25-85, Amido Spring 2010 Member of Cal Poly, Team 25-85, Amido Spring 2010

CPSU-AMIDO-S10S25G85

4 Members

5 Guides authored

3 Comments

Followed the steps and replaced the broken screen. Now I get only a white screen when turning the camera on. It does take pictures but it won't show anything but a little red dotted arrow on the right hand side over the white screen. Do you have a clue of what is happening?

Roberto - Reply

Salve, dove posso acquistare un display?

Germano Tinari - Reply

Salve, sapreste dirmi dove posso acquistare un display?

Germano Tinari - Reply

Add Comment

View Statistics:

Past 24 Hours: 0

Past 7 Days: 2

Past 30 Days: 12

All Time: 6,548