
Canon PowerShot SD1200 IS Shutter Button Replacement

What you need

  1. Canon PowerShot SD1200 IS Shutter Button Replacement, Front and Rear Covers: step 1, image 1 of 1
    • Remove the battery.

  2. Canon PowerShot SD1200 IS Shutter Button Replacement: step 2, image 1 of 3 Canon PowerShot SD1200 IS Shutter Button Replacement: step 2, image 2 of 3 Canon PowerShot SD1200 IS Shutter Button Replacement: step 2, image 3 of 3
    • Remove the two screws from the side of the camera casing with the strap. (4mm Phillips 00)

    • Remove the two screws from the bottom of the camera. (4mm Phillips 00)

    • Remove the two screws from the right side of the camera opposite the strap. (2mm Phillips 00)

  3. Canon PowerShot SD1200 IS Shutter Button Replacement: step 3, image 1 of 2 Canon PowerShot SD1200 IS Shutter Button Replacement: step 3, image 2 of 2
    • Pull off the front cover.

    • If the top of the cover sticks, use gentle downward pressure on the retention clips above the lens to release.

    • Remove the back cover.

  4. Canon PowerShot SD1200 IS Shutter Button Replacement, LCD: step 4, image 1 of 3 Canon PowerShot SD1200 IS Shutter Button Replacement, LCD: step 4, image 2 of 3 Canon PowerShot SD1200 IS Shutter Button Replacement, LCD: step 4, image 3 of 3
    • Use the spudger to lift the retaining flap on the Zero Insertion Force (ZIF) tab securing the thick ribbon cable.

    • Slide out the ribbon cable using fingers or tweezers.

    • Be sure you are prying up on the hinged retaining flap, not the connector.

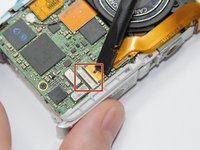
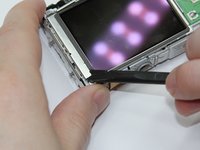
    • Using tweezers, disconnect the small ribbon cable below the flash assembly from the No Fuss Connector by simply pulling the ribbon cable straight out.

  5. Canon PowerShot SD1200 IS Shutter Button Replacement: step 5, image 1 of 3 Canon PowerShot SD1200 IS Shutter Button Replacement: step 5, image 2 of 3 Canon PowerShot SD1200 IS Shutter Button Replacement: step 5, image 3 of 3
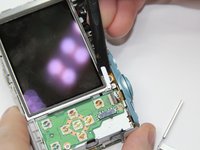
    • Remove the L shaped brackets from the left and right side of the LCD screen with the spudger tool.

    • The Brackets have tabs that need to be pried up.

    • Remove the screw below the shutter button. (2.5mm Phillips 00)

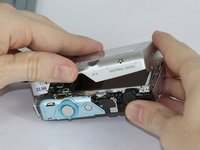
    • Holding the sides of the LCD screen, lift the screen up and away to remove.

  6. Canon PowerShot SD1200 IS Shutter Button Replacement, Shutter Button: step 6, image 1 of 1
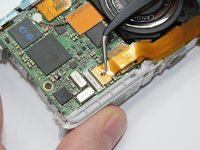
    • Remove the speaker connector by gripping it with the tool and gently, with a wiggling motion, pull it out.

    • Pull the connector straight out by the white connector. Pulling on the wires will damage them.

  7. Canon PowerShot SD1200 IS Shutter Button Replacement: step 7, image 1 of 1
    • Lift off the mechanical shutter button assembly.

  8. Canon PowerShot SD1200 IS Shutter Button Replacement: step 8, image 1 of 1
    • Remove the screw (3.5mm Phillips 00) from the top of camera. It is located under the shutter button mechanical assembly.

    • The motherboard, Lens, and Flash assemblies do not need to be removed to access and remove the shutter button.

  9. Canon PowerShot SD1200 IS Shutter Button Replacement: step 9, image 1 of 1
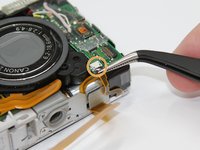
    • Use the spudger to lift the shutter button ribbon up out of the alignment tabs.

  10. Canon PowerShot SD1200 IS Shutter Button Replacement: step 10, image 1 of 1
    • Hinging the top of the shutter button ribbon up out of the way, remove the screw found underneath. (3.5mm Phillips 00)

    • Ribbon cables are delicate - avoid using excessive force or bending.

  11. Canon PowerShot SD1200 IS Shutter Button Replacement: step 11, image 1 of 1
    • On the backside of the camera, remove the screw located at the bottom center of the metal frame beneath the lens assembly. (2.5mm Phillips 00)

  12. Canon PowerShot SD1200 IS Shutter Button Replacement: step 12, image 1 of 1
    • Lift out the battery tray. The button ribbon assembly will come with it.

Conclusion

To reassemble your device, follow these instructions in reverse order.

Jeff Casper

Member since: 09/15/16

848 Reputation

7 Guides authored

Team

USF Tampa, Team 17-5, Blackwell Fall 2016 Member of USF Tampa, Team 17-5, Blackwell Fall 2016

USFT-BLACKWELL-F16S17G5

3 Members

7 Guides authored

0 Comments

Add Comment

View Statistics:

Past 24 Hours: 0

Past 7 Days: 0

Past 30 Days: 1

All Time: 259