
Canon EOS 6D Front and Top Body Panel Replacement

What you need

  1. Canon EOS 6D Front and Top Body Panel Replacement, Rear Body Panel: step 1, image 1 of 1
    • Remove the viewfinder cover by pinching the sides and sliding it upward.

  2. Canon EOS 6D Front and Top Body Panel Replacement: step 2, image 1 of 1
    • Open the battery door on the bottom of the camera.

    • Use your thumb to slide the small black tab on the inside of the battery door up and pull the door off the camera.

  3. Canon EOS 6D Front and Top Body Panel Replacement: step 3, image 1 of 1
    • Slide your fingernail or the flat end of the spudger underneath the rubber covering and gently peel it off all sides of the camera.

  4. Canon EOS 6D Front and Top Body Panel Replacement: step 4, image 1 of 1
    • Open the covers to the HDMI/AV/MIC ports on the side of the camera by gently pulling outward on the bottom of the covers.

    • Rotate the covers to the side so that you can see the connection ports inside.

    • Remove the following screws:

    • Two silver 5mm Phillips #00

    • One black 6mm Phillips #00

  5. Canon EOS 6D Front and Top Body Panel Replacement: step 5, image 1 of 1
    • Remove the cover to the HDMI/AV/MIC ports by gently lifting the tab on the bottom edge of the camera.

  6. Canon EOS 6D Front and Top Body Panel Replacement: step 6, image 1 of 1
    • Rotate your camera so the bottom side is facing you.

    • Remove the following screws:

    • One 6mm Phillips #00

    • Two 3mm Phillips #00

  7. Canon EOS 6D Front and Top Body Panel Replacement: step 7, image 1 of 1
    • Rotate your camera so the back is facing you.

    • Remove the following screws:

    • Three silver 5mm Phillips #00

    • Two black 6mm Phillips #00

    • One black 4mm Phillips #00

  8. Canon EOS 6D Front and Top Body Panel Replacement: step 8, image 1 of 2 Canon EOS 6D Front and Top Body Panel Replacement: step 8, image 2 of 2
    • A black ribbon wire connects the rear panel to the inside of the camera. Breaking this wire would make your rear screen and buttons non-functional.

    • Carefully use your fingers to tilt the back panel downward to about a 90 degree angle.

    • Use the flat end of the spudger to gently pry off the ribbon wire from the inside of the camera.

  9. Canon EOS 6D Front and Top Body Panel Replacement, Front and Top Body Panels: step 9, image 1 of 1
    • Remove the 8mm Phillips #00 screw from the bottom of the front of the camera.

  10. Canon EOS 6D Front and Top Body Panel Replacement: step 10, image 1 of 1
    • Rotate the camera so the side with the SD card slot is facing you.

    • Remove the 4mm Phillips #00 screw from the bottom edge of this side.

  11. Canon EOS 6D Front and Top Body Panel Replacement: step 11, image 1 of 1
    • Rotate the camera so the bottom is facing you.

    • Remove the following screws:

    • Two 8mm Phillips #00

    • One 4mm Phillips #00

  12. Canon EOS 6D Front and Top Body Panel Replacement: step 12, image 1 of 1
    • Remove the bottom panel from the camera by using your fingers to pull outward on the tab inside the battery compartment.

  13. Canon EOS 6D Front and Top Body Panel Replacement: step 13, image 1 of 1
    • Rotate the camera so the front is facing you.

    • Remove the following screws:

    • Three 5mm Phillips #00

    • Two 6mm Phillips #00

    • One 4mm Phillips #00

  14. Canon EOS 6D Front and Top Body Panel Replacement: step 14, image 1 of 1
    • Rotate the camera so the side with the SD card slot is facing you.

    • Remove the following screws:

    • One 4mm fine-thread Phillips #00

    • Two 4mm coarse-thread Phillips #00

  15. Canon EOS 6D Front and Top Body Panel Replacement: step 15, image 1 of 1
    • The red speaker wire is attached to the inside of the front panel. Opening the front panel forcefully may break it.

    • Slowly fold the front panel to the right without pulling it away from the right edge of the camera.

  16. Canon EOS 6D Front and Top Body Panel Replacement: step 16, image 1 of 1
    • Remove the 4mm Phillips #00 screw on the inside of the front panel to separate the panel from the speaker wire.

  17. Canon EOS 6D Front and Top Body Panel Replacement: step 17, image 1 of 1
    • Remove the 4mm Phillips #00 screw from the inside of the top panel, below the strap hook.

  18. Canon EOS 6D Front and Top Body Panel Replacement: step 18, image 1 of 1
    • Remove the 4mm Phillips #00 screw from the inside of the top panel, below the shutter button.

  19. Canon EOS 6D Front and Top Body Panel Replacement: step 19, image 1 of 1
    • Rotate the camera so the top is facing you.

    • Remove the 6mm Phillips #00 screw from next to the analog screen.

  20. Canon EOS 6D Front and Top Body Panel Replacement: step 20, image 1 of 1
    • Rotate the camera so the back is facing you.

    • Remove the Phillips #00 screw from the viewfinder focus.

  21. Canon EOS 6D Front and Top Body Panel Replacement: step 21, image 1 of 1
    • Carefully detach the two light brown ribbon wires on the top panel:

    • The right ribbon by prying it out with the flat end of the spudger.

    • The left ribbon by using tweezers to gently wiggle it out toward the top.

  22. Canon EOS 6D Front and Top Body Panel Replacement: step 22, image 1 of 1
    • A ribbon wire connects the inside of the top panel to the body of the camera.

    • Slowly lift the top panel to about an inch above the body of the camera.

    • Carefully use the flat end of the spudger to detach the ribbon wire from the top of the camera.

  23. Canon EOS 6D Front and Top Body Panel Replacement: step 23, image 1 of 1
    • Grip the remaining side panel with your fingers and gently pop it off the camera.

Conclusion

To reassemble your device, follow these instructions in reverse order.

13 other people completed this guide.

Justin Thomas

Member since: 04/22/14

2,148 Reputation

6 Guides authored

Team

Cal Poly, Team 11-48, Amido Spring 2014 Member of Cal Poly, Team 11-48, Amido Spring 2014

CPSU-AMIDO-S14S11G48

4 Members

18 Guides authored

7 Comments

Actually, it would be perfect to note the color of the screws throughout the manual. This would help to get it right!

But thanks anyway, you saved me!!

mrbakin - Reply

In step 11 one of the red circles marks incorrect screw - should point the one near plate not the one in battery compartment (compare to step 6)

leszekcylupa - Reply

Agreed.

But thanks, apart from this minor error it was a great help and really clear. Cleaned the gunge out of the menu button and it now releases perfectly.

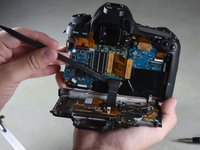
I found getting the ribbon cable back in (step 21) a bit difficult, combo wiggled and pushed it back in. Might recommend doing that one before the right one, and maybe before finally mounting the top cover.

Blakey -

My DSLR don't want to start after remount :(

dlirsoon - Reply

Thanks.  You folks did a great job.  It help me replacing the main dial in 3 hours in just the first attempt.

Jay Wang - Reply

Add Comment

View Statistics:

Past 24 Hours: 3

Past 7 Days: 14

Past 30 Days: 95

All Time: 16,335