Shop the Holiday Gift Guide
Free Shipping on Domestic Orders $75+

Besta Super 5000 Back Cover Replacement

Views: 842

View statistics:

Past 24 Hours:
3
Past 7 Days:
17
Past 30 Days:
79
All Time:
842
Comments: 0

No one has left comments on this guide. Will you be first?

Go to guide comments
Completed: 1

1 person has marked this guide "completed." Will you be next?

Favorites: 0

No one has favorited (and subscribed to) this guide. Will you be the first?

Time Required: 5 minutes
Difficulty: Moderate
Needs Better Images

Better photos will improve this guide. Help out by taking, editing, or uploading new ones!

Better Introduction

Improve this guide by completing or revising its introduction.

Besta Super 5000 Back Cover Replacement

What you need

Tools

    1. Besta Super 5000 Back Cover Replacement, Battery: step 1, image 1 of 1
      • Turn the device over so that the barcode is facing upwards.

      Ask FixBot

      Add Comment

    2. Besta Super 5000 Back Cover Replacement: step 2, image 1 of 2 Besta Super 5000 Back Cover Replacement: step 2, image 2 of 2
      • Place your fingers on the battery cover arrow and pull the cover down and off the device.

      Ask FixBot

      Add Comment

    3. Besta Super 5000 Back Cover Replacement: step 3, image 1 of 1
      • Pull upwards on the battery tab to remove the battery from the device.

      Ask FixBot

      Add Comment

    1. Besta Super 5000 Back Cover Replacement, Back Cover: step 4, image 1 of 1
      • Remove the five screws around the edge of the device using a Phillips #0 screwdriver.

      Ask FixBot

      Add Comment

    2. Besta Super 5000 Back Cover Replacement: step 5, image 1 of 1
      • Remove the two screws behind the battery using a Phillips #0 screwdriver.

      Ask FixBot

      Add Comment

    3. Besta Super 5000 Back Cover Replacement: step 6, image 1 of 2 Besta Super 5000 Back Cover Replacement: step 6, image 2 of 2
      • Potential for device damage: All screws must be removed before you begin this step. Do not forcefully pry apart the device with screws still in it because you may damage it.

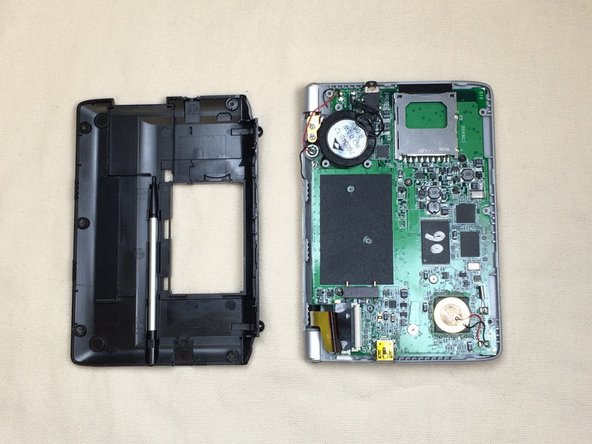
      • Gently pry off the backing using an opening tool.

      Ask FixBot

      Add Comment

Conclusion

To reassemble your device, follow these instructions in reverse order.

Cancel: I did not complete this guide.

One other person completed this guide.

Author

with

Jessie

Member since: 09/30/14

373 Reputation

3 Guides authored

Team

Ohio State, Team 1-5, Buehl Fall 2014 Member of Ohio State, Team 1-5, Buehl Fall 2014

OSU-BUEHL-F14S1G5

4 Members

48 Guides authored

0 Guide Comments

Add Comment

View Statistics:

Past 24 Hours: 3

Past 7 Days: 17

Past 30 Days: 79

All Time: 842