Introduction
This is a charging port replacement guide for the Beats Solo 3 Headphones, Model number A1796. Symptoms that suggest the need for a charging port replacement can be found on our troubleshooting page.
What you need
-
-
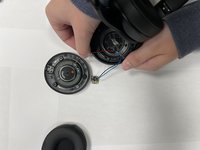
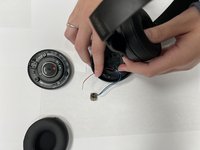
Use a nylon or metal spudger to carefully remove the ear pad from the right ear cup.
-
-


To reassemble your device, follow these instructions in reverse order.
Cancel: I did not complete this guide.
3 other people completed this guide.
Team

University of Alabama, Team 1-2, Bedsole Spring 2022 Member of University of Alabama, Team 1-2, Bedsole Spring 2022
UA-BEDSOLE-S22S1G2
4 Members
11 Guides authored
1 Guide Comment
tengo una duda en este puedo areglar el boton de encendido del bluetooth?