
Battery Disconnect

Prerequisite Only
This guide is only intended to be used as a prerequisite for other guides. It's incomplete by itself.

What you need

  1. Battery Disconnect, Safety precautions: step 1, image 1 of 2 Battery Disconnect, Safety precautions: step 1, image 2 of 2
    • Let your Pixel's battery drain below 25% before starting this repair. A charged lithium‑ion battery may catch fire if damaged.

    • Unplug all cables and completely power down your phone.

  2. Battery Disconnect, Adhesive information: step 2, image 1 of 3 Battery Disconnect, Adhesive information: step 2, image 2 of 3 Battery Disconnect, Adhesive information: step 2, image 3 of 3
    • Adhesive secures the perimeter of the rear cover to the frame.

    • When separating the adhesive, don't insert your tool more than 3 mm under the rear cover to avoid damaging the internal components.

    • Measure 3 mm from the tip and mark your opening pick with a permanent marker. Alternatively, you can tape a coin to a pick 3 mm from the tip.

  3. Battery Disconnect, Apply a suction handle: step 3, image 1 of 2 Battery Disconnect, Apply a suction handle: step 3, image 2 of 2
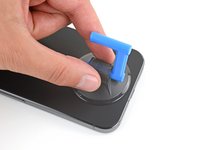
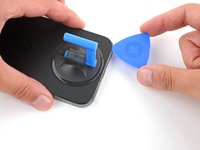
    • Attach a suction handle to the bottom edge of the rear cover, as close to the edge as possible.

  4. Battery Disconnect, Insert an opening pick: step 4, image 1 of 3 Battery Disconnect, Insert an opening pick: step 4, image 2 of 3 Battery Disconnect, Insert an opening pick: step 4, image 3 of 3
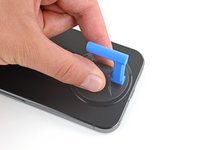
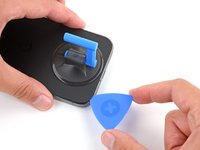
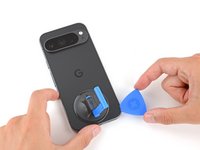
    • Pull up on the suction handle with strong, steady force to create a small gap under the rear cover.

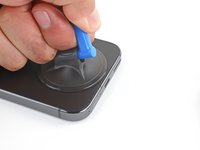
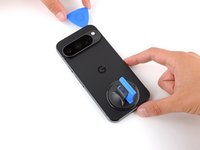
    • Insert the tip of an opening pick in the gap.
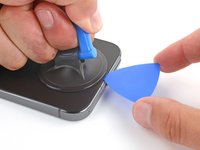
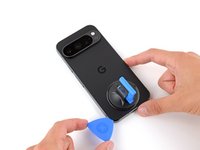
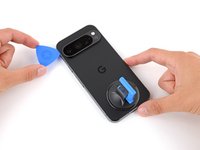
  5. Battery Disconnect, Separate the rear cover adhesive: step 5, image 1 of 3 Battery Disconnect, Separate the rear cover adhesive: step 5, image 2 of 3 Battery Disconnect, Separate the rear cover adhesive: step 5, image 3 of 3
    • Slide your opening along the bottom edge to separate the adhesive securing it.

    • Remember: don't insert the opening pick deeper than 3 mm.

  6. Battery Disconnect: step 6, image 1 of 3 Battery Disconnect: step 6, image 2 of 3 Battery Disconnect: step 6, image 3 of 3
    • Slide your opening pick up the left edge and along the top edge to separate the adhesive.

  7. Battery Disconnect: step 7, image 1 of 3 Battery Disconnect: step 7, image 2 of 3 Battery Disconnect: step 7, image 3 of 3
    • Slide your pick down the right edge to separate the remaining adhesive.

  8. Battery Disconnect, Prop up the rear cover: step 8, image 1 of 3 Battery Disconnect, Prop up the rear cover: step 8, image 2 of 3 Battery Disconnect, Prop up the rear cover: step 8, image 3 of 3
    • Don't try to fully remove the rear cover yet, as a ribbon cable on the right edge connects it to the phone.

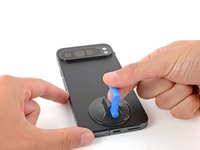
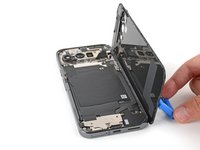
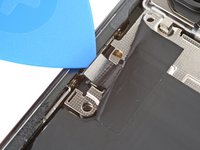
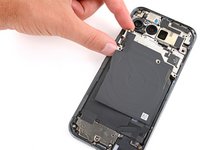
    • Use the suction handle to lift the left edge of the rear cover and swing it over the right edge, like opening the cover of a book.

    • If you're having trouble, check the perimeter for any remaining adhesive and use your opening pick to separate it.

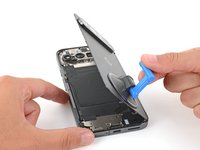
    • Prop up the rear cover with the suction handle so you can access the ribbon cable near the top right corner.

  9. Battery Disconnect, Remove the cable cover: step 9, image 1 of 2 Battery Disconnect, Remove the cable cover: step 9, image 2 of 2
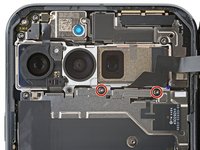
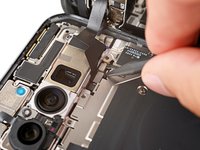
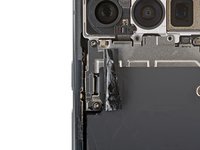
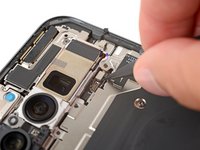
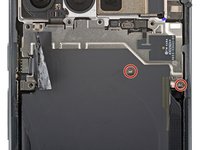
    • Use a Torx Plus 3IP screwdriver to remove the two 5.2 mm‑long screws securing the cable cover.

  10. Battery Disconnect: step 10, image 1 of 2 Battery Disconnect: step 10, image 2 of 2
    • Use tweezers or your fingers to remove the cable cover.

  11. Battery Disconnect, Disconnect the rear cover: step 11, image 1 of 3 Battery Disconnect, Disconnect the rear cover: step 11, image 2 of 3 Battery Disconnect, Disconnect the rear cover: step 11, image 3 of 3
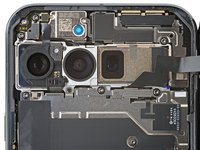
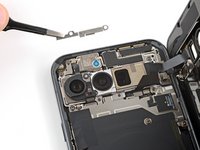
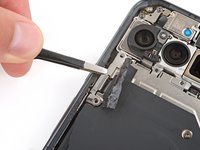
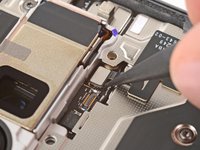
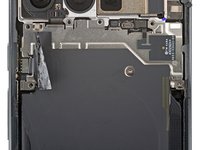
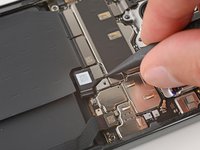
    • Use the point of a spudger to pry up and disconnect the rear cover press connector.

  12. Battery Disconnect, Remove the rear cover: step 12, image 1 of 1
    • Remove the rear cover.

    • During reassembly, follow this guide to apply new adhesive and install your back cover.

  13. Battery Disconnect, Peel up the cable cover tape: step 13, image 1 of 3 Battery Disconnect, Peel up the cable cover tape: step 13, image 2 of 3 Battery Disconnect, Peel up the cable cover tape: step 13, image 3 of 3
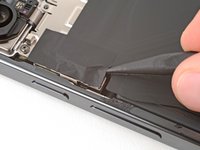
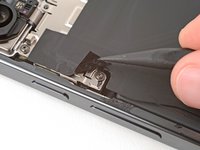
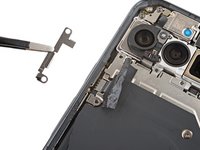
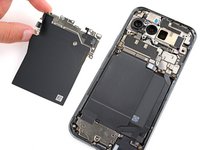
    • Use the tip of a spudger and your fingers to peel up the piece of tape near the left edge of your phone, enough that you can access the bracket and screws underneath.

    • You can completely remove the tape if you want, but be sure to keep it for reassembly.

  14. Battery Disconnect, Remove the cable cover: step 14, image 1 of 2 Battery Disconnect, Remove the cable cover: step 14, image 2 of 2
    • Use a Torx Plus 3IP screwdriver to remove the two 5.2 mm‑long screws securing the wireless charging cable cover.

  15. Battery Disconnect: step 15, image 1 of 2 Battery Disconnect: step 15, image 2 of 2
    • Use tweezers or your fingers to remove the cover.

  16. Battery Disconnect, Disconnect the wireless charging assembly: step 16, image 1 of 2 Battery Disconnect, Disconnect the wireless charging assembly: step 16, image 2 of 2
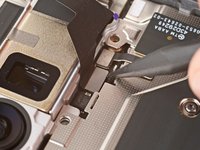
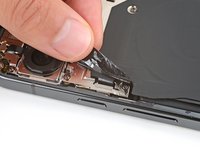
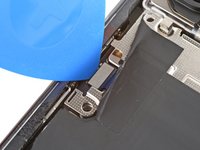
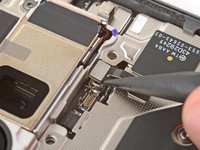
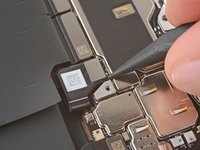
    • Use the tip of an opening pick to pry up and disconnect the wireless charging press‑connector.

  17. Battery Disconnect: step 17, image 1 of 3 Battery Disconnect: step 17, image 2 of 3 Battery Disconnect: step 17, image 3 of 3
    • Use the point of a spudger to pry up and disconnect the ultra‑wideband press connector.

  18. Battery Disconnect, Remove the wireless charging assembly screws: step 18, image 1 of 2 Battery Disconnect, Remove the wireless charging assembly screws: step 18, image 2 of 2
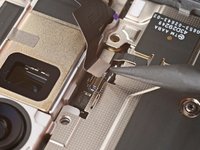
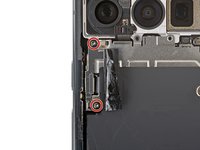
    • Use a Torx Plus 3IP screwdriver to remove the two 2.2 mm‑long screw securing the wireless charging assembly.

  19. Battery Disconnect, Remove the wireless charging assembly: step 19, image 1 of 2 Battery Disconnect, Remove the wireless charging assembly: step 19, image 2 of 2
    • Remove the wireless charging assembly.

  20. Battery Disconnect, Disconnect the battery: step 20, image 1 of 3 Battery Disconnect, Disconnect the battery: step 20, image 2 of 3 Battery Disconnect, Disconnect the battery: step 20, image 3 of 3
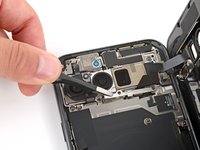
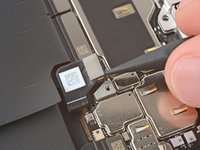
    • Use a spudger to pry up and disconnect the battery press connector.

Finish Line

Spencer Day

Member since: 09/14/22

119,310 Reputation

838 Guides authored

Team

iFixit Member of iFixit

Staff

119 Members

21,895 Guides authored

0 Guide Comments

Add Comment

View Statistics:

Past 24 Hours: 0

Past 7 Days: 0

Past 30 Days: 6

All Time: 31