Free Shipping on Domestic Orders $75+

Battery Disconnect

Prerequisite Only
This is a prerequisite-only guide! This guide is part of another procedure and isn’t meant to be used alone.

What you need

    1. Battery Disconnect, Unfasten the HDD hatch: step 1, image 1 of 2 Battery Disconnect, Unfasten the HDD hatch: step 1, image 2 of 2
      • Use a Phillips screwdriver to remove the screw securing the HDD hatch on the bottom left of the lower case.

      Ask FixBot

      Add Comment

    2. Battery Disconnect, Remove the HDD hatch: step 2, image 1 of 3 Battery Disconnect, Remove the HDD hatch: step 2, image 2 of 3 Battery Disconnect, Remove the HDD hatch: step 2, image 3 of 3
      • Insert the flat end of a spudger under the cutout on the top right corner of the HDD hatch and pry it up.

      • Remove the HDD hatch.

      Ask FixBot

      Add Comment

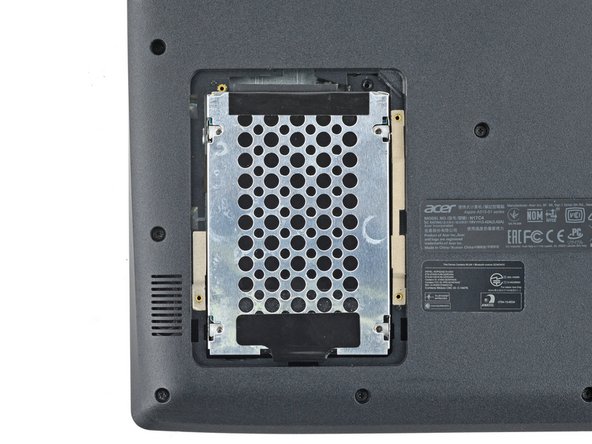
    3. Battery Disconnect, Unfasten the HDD assembly: step 3, image 1 of 2 Battery Disconnect, Unfasten the HDD assembly: step 3, image 2 of 2
      • Your HDD assembly may be secured to the lower case with screws. If it's not, skip this step.

      • Use a Phillips screwdriver to remove the four screws securing the HDD assembly.

      Ask FixBot

      Add Comment

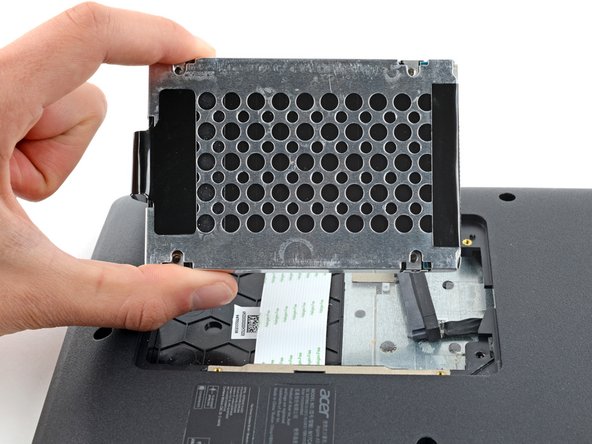
    4. Battery Disconnect: step 4, image 1 of 3 Battery Disconnect: step 4, image 2 of 3 Battery Disconnect: step 4, image 3 of 3
      • Firmly grip the HDD assembly and HDD cable connector head.

      • Pull the HDD cable connector out of its socket.

      • Remove the HDD assembly.

      Ask FixBot

      Add Comment

    1. Battery Disconnect, Unfasten the lower case: step 5, image 1 of 2 Battery Disconnect, Unfasten the lower case: step 5, image 2 of 2
      • Use a Phillips screwdriver to remove the eighteen 6.6 mm screws securing the case.

      Ask FixBot

      Add Comment

    2. Battery Disconnect, Insert an opening pick: step 6, image 1 of 2 Battery Disconnect, Insert an opening pick: step 6, image 2 of 2
      • Insert an opening pick between the lower case and the chassis on the front right edge.

      Ask FixBot

      Add Comment

    3. Battery Disconnect, Release the case's front clips: step 7, image 1 of 3 Battery Disconnect, Release the case's front clips: step 7, image 2 of 3 Battery Disconnect, Release the case's front clips: step 7, image 3 of 3
      • Slide the pick along the front edge to release the clips securing the lower case.

      Ask FixBot

      Add Comment

    4. Battery Disconnect, Release the remaining clips: step 8, image 1 of 2 Battery Disconnect, Release the remaining clips: step 8, image 2 of 2
      • Continue sliding the opening pick along the perimeter of the lower case to release the remaining clips.

      Ask FixBot

      Add Comment

    5. Battery Disconnect: step 9, image 1 of 3 Battery Disconnect: step 9, image 2 of 3 Battery Disconnect: step 9, image 3 of 3
      • Lift the lower case from the chassis and remove it.

      • During reassembly, this is a good point to power on your laptop and test all functions before sealing it up. Be sure to power your laptop back down before you continue working.

      Ask FixBot

      Add Comment

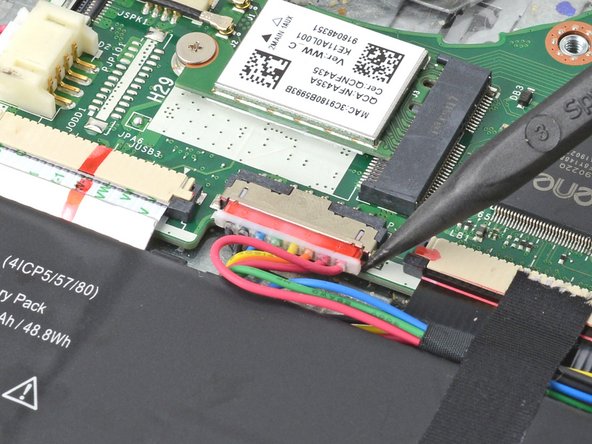
    1. Battery Disconnect, Disconnect the battery: step 10, image 1 of 3 Battery Disconnect, Disconnect the battery: step 10, image 2 of 3 Battery Disconnect, Disconnect the battery: step 10, image 3 of 3
      • Use the pointed end of a spudger to push each side of the battery connector until it comes out of the socket.

      Ask FixBot

      Add Comment

Conclusion

To reassemble your device, follow these instructions in reverse order.

Cancel: I did not complete this guide.

Spencer Day

Member since: 09/14/22

206,063 Reputation

1,267 Guides authored

Team

iFixit Member of iFixit

Staff

122 Members

72,401 Guides authored

0 Guide Comments

Add Comment

View Statistics:

Past 24 Hours: 0

Past 7 Days: 2

Past 30 Days: 10

All Time: 161