Introduction
If the lamp only flashes, USB no longer loads or other malfunctions occur, the backup battery is probably defective. The original is not easy to come by, so this guide will include a readily available replacement with twice the capacity.
What you need
-
-
The lamp can be opened very easily by removing the two screws on the cover. Be careful with the ribbon connector for the LEDs
-
-
-
Unplug the original battery. This consists of two cells and has a three-pin connector.
-
Unsolder the three cables with plugs from the battery or cut them off as long as possible
-
Mask off the poles of the old battery and dispose of it properly. The old battery is probably bloated and potentially "fire hazard"!
-
The replacement battery consists of two IFR10440 LiFePo4 cells with 200mAh each. Do not use a normal LiIon battery as these are not fully charged due to the higher voltage level!
-
Slightly roughen the poles of the new batteries with sandpaper, then it will be easier to solder. When soldering, be sure to use your powerful soldering iron and solder as briefly as possible with lots of flux, otherwise the batteries can be damaged.
-
The batteries are connected in series and soldered to the connector. Black: minus, yellow: center tap, red: plus
-
You also need a short cable to connect the batteries (blue in the picture)
-
Finished. You should now be able to measure approx. 3.3V between black and yellow, and approx. 6.6V between black and red.
-
-
-
-
Use side cutters to remove some plastic on the housing so that the new, larger battery has more space
-
-
-
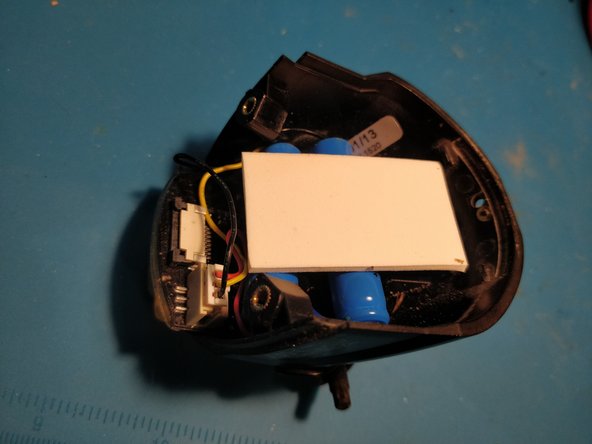
Place the battery in the housing as shown in the picture and plug it in. Test whether the housing can be closed again, otherwise remove some plastic as in the previous step
-
plug in the battery. The LEDs in the buttons should now light up.
-
Place some foam rubber on top of the battery to protect against movement. Alternatively, you could fix it with hot glue.
-
Reconnect the ribbon cable and replace the cover. Make sure that the battery cannot move and that the housing closes properly. Ideally, apply some silicone grease to the sealing surfaces - done
-


Cancel: I did not complete this guide.
4 other people completed this guide.
Special thanks to these translators:
100%

oldturkey03 is helping us fix the world! Want to contribute?
Start translating ›
6 Comments
Vielen Dank! Mein Umbau war erfolgreich. Ich habe sogar Akkus mit Lötfahnen verwendet und mit Stecker und Schrumpfschlauch angeschlossen.
Bei mir bringen die Akkus die Lampe zum Leuchten. Das Laden der Akkus durch den Dynamo funktioniert jedoch nicht. Auch wird kein Strom zum Rücklicht geleitet. Weiss jemand, was ich falsch gemacht haben könnte?
Das klingt als gäbe es noch ein Problem mit der Elektronik der Lampe oder falscher Verkabelung (Dynamo - Rücklicht vertauscht?). Die Lampe kann nicht erkennen, was für ein Akku verbaut ist, daran kann es also nicht liegen.
jenkie -