Introduction
The speaker is responsible for all non-headphone sounds from your tablet. If these sounds are not audible when they should be you may need to replace the speaker. Speaker replacement is a relatively easy task and this guide will help you through it.
What you need
-
-
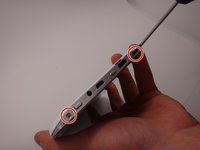
Use a Phillips #00 screwdriver to remove the two 4mm screws found on the top edge of the tablet near the power button.
 Ask FixBot
-
-
-
Use the plastic opening tool to pry the white back from the silver frame. Start near the micro SD slot.
-
-
-
-
The speaker is a black oval located in the corner next to the battery.
-
-
-
Use a soldering iron to desolder the connections between the black and red speaker wires and the motherboard.
-


To reassemble your device, follow these instructions in reverse order.
Team

Michigan Tech, Team 1-3, Lauer Spring 2015 Member of Michigan Tech, Team 1-3, Lauer Spring 2015
MTU-LAUER-S15S1G3
2 Members
5 Guides authored