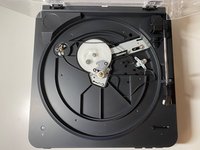
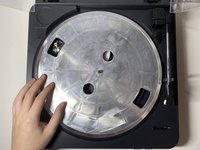
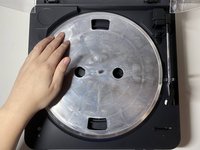
Audio-Technica AT-LP60BK-BT Belt Drive Replacement

What you need

  1. Audio-Technica AT-LP60BK-BT Belt Drive Replacement, Belt Drive: step 1, image 1 of 2 Audio-Technica AT-LP60BK-BT Belt Drive Replacement, Belt Drive: step 1, image 2 of 2
    • Open the top plastic cover and remove the record and rubber mat.

  2. Audio-Technica AT-LP60BK-BT Belt Drive Replacement: step 2, image 1 of 2 Audio-Technica AT-LP60BK-BT Belt Drive Replacement: step 2, image 2 of 2
    • Find the belt underneath the platter by rotating the platter to the correct place.

    • Remove the belt from the motor pulley.

  3. Audio-Technica AT-LP60BK-BT Belt Drive Replacement: step 3, image 1 of 1
    • Take the platter off by pulling it straight up.

  4. Audio-Technica AT-LP60BK-BT Belt Drive Replacement: step 4, image 1 of 2 Audio-Technica AT-LP60BK-BT Belt Drive Replacement: step 4, image 2 of 2
    • Remove the old belt.

  5. Audio-Technica AT-LP60BK-BT Belt Drive Replacement: step 5, image 1 of 1
    • Turn platter upside down.

  6. Audio-Technica AT-LP60BK-BT Belt Drive Replacement: step 6, image 1 of 3 Audio-Technica AT-LP60BK-BT Belt Drive Replacement: step 6, image 2 of 3 Audio-Technica AT-LP60BK-BT Belt Drive Replacement: step 6, image 3 of 3
    • Place the new belt around the inner lap on the upside-down platter.

    • Make sure the rubber band is flat on the platter, with no flipping.

  7. Audio-Technica AT-LP60BK-BT Belt Drive Replacement: step 7, image 1 of 1
    • Turn the platter around.

    • Grab the belt around with a finger through one of the holes in the platter.

  8. Audio-Technica AT-LP60BK-BT Belt Drive Replacement: step 8, image 1 of 1
    • Put the platter straight down.

  9. Audio-Technica AT-LP60BK-BT Belt Drive Replacement: step 9, image 1 of 1
    • Put the belt around the motor pulley.

  10. Audio-Technica AT-LP60BK-BT Belt Drive Replacement: step 10, image 1 of 3 Audio-Technica AT-LP60BK-BT Belt Drive Replacement: step 10, image 2 of 3 Audio-Technica AT-LP60BK-BT Belt Drive Replacement: step 10, image 3 of 3
    • Test the function by spinning the platter and put the rubber mat into place.

Conclusion

To reassemble your device, follow these instructions in reverse order.

4 other people completed this guide.

Zonghao Li

Member since: 01/20/21

289 Reputation

1 Guide authored

5 Guide Comments

Thank you so much!

Joe - Reply

Ditto that! Thanks for the clear directions.

Steph - Reply

Super easy to follow, thank you!!

Lejla Bejtovic - Reply

Po ergo no se donde comprar la correa de repuesto

Fina - Reply

Thanks for the great help. Impressed my wife!

daveberke - Reply

Add Comment

View Statistics:

Past 24 Hours: 28

Past 7 Days: 327

Past 30 Days: 1,236

All Time: 30,219