
Asus Zenbook UX32VD RAM Replacement

What you need

  1. Asus Zenbook UX32VD RAM Replacement, Bottom Panel: step 1, image 1 of 3 Asus Zenbook UX32VD RAM Replacement, Bottom Panel: step 1, image 2 of 3 Asus Zenbook UX32VD RAM Replacement, Bottom Panel: step 1, image 3 of 3
    Tool used on this step:
    T5 Torx Screwdriver
    $9.99
    Buy
  2. Asus Zenbook UX32VD RAM Replacement: step 2, image 1 of 3 Asus Zenbook UX32VD RAM Replacement: step 2, image 2 of 3 Asus Zenbook UX32VD RAM Replacement: step 2, image 3 of 3
    • Use a plastic opening tool to pry along the perimeter of the bottom panel until it can be easily removed.

    • Remove the bottom panel from the body of the laptop.

    • Set aside the bottom panel.

  3. Asus Zenbook UX32VD RAM Replacement, RAM: step 3, image 1 of 3 Asus Zenbook UX32VD RAM Replacement, RAM: step 3, image 2 of 3 Asus Zenbook UX32VD RAM Replacement, RAM: step 3, image 3 of 3
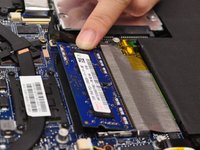
    • Push away the RAM retaining arms from the RAM chip.

    • The RAM chip will spring up once the retaining arms are pushed away from the chip.

    • Remove the RAM chip completely.

Conclusion

To reassemble your device, follow these instructions in reverse order.

4 other people completed this guide.

Paola

Member since: 09/17/15

252 Reputation

1 Guide authored

Team

CSU Fullerton, Team 2-2, Bruce Fall 2015 Member of CSU Fullerton, Team 2-2, Bruce Fall 2015

CSUF-BRUCE-F15S2G2

4 Members

6 Guides authored

One Comment

Replaced the 4 GB RAM module in my UX32VD with an 8 GB Timetec Hynix IC DDR3 1600MHz PC3-12800 Non ECC Unbuffered 1.35V CL11 2Rx8 Dual Rank 204 Pin SODIMM Laptop Notebook Computer Memory Ram Module using this guide. It worked like a charm. Thank you for posting the guide!

Le Zap - Reply

Add Comment

View Statistics:

Past 24 Hours: 4

Past 7 Days: 7

Past 30 Days: 27

All Time: 4,525