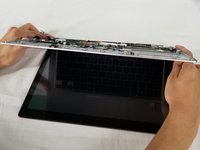
Asus ZenBook UX303U Screen Assembly Replacement

What you need

  1. Asus ZenBook UX303U Screen Assembly Replacement, Back Panel: step 1, image 1 of 1
    • Remove the two round rubber feet at the hinge-edge of the laptop.

  2. Asus ZenBook UX303U Screen Assembly Replacement: step 2, image 1 of 1
    • Remove the eleven 4 mm Phillips #00 screws from the back panel.

  3. Asus ZenBook UX303U Screen Assembly Replacement: step 3, image 1 of 2 Asus ZenBook UX303U Screen Assembly Replacement: step 3, image 2 of 2
    • Using a plastic opening tool pry the back panel off of the laptop.

  4. Asus ZenBook UX303U Screen Assembly Replacement, Screen Assembly: step 4, image 1 of 2 Asus ZenBook UX303U Screen Assembly Replacement, Screen Assembly: step 4, image 2 of 2
    • Remove cable connecting the screen assembly to the the motherboard.

  5. Asus ZenBook UX303U Screen Assembly Replacement: step 5, image 1 of 3 Asus ZenBook UX303U Screen Assembly Replacement: step 5, image 2 of 3 Asus ZenBook UX303U Screen Assembly Replacement: step 5, image 3 of 3
    • Remove the three 4mm Phillips #00 screws in the hinge to loosen the motherboard fan.

    • Lift the hinge up.

    • It is not necessary to remove the motherboard fan to replace the screen assembly.

  6. Asus ZenBook UX303U Screen Assembly Replacement: step 6, image 1 of 1
    • Remove the three Phillips #00 screws securing the hinge to the IO board.

  7. Asus ZenBook UX303U Screen Assembly Replacement: step 7, image 1 of 2 Asus ZenBook UX303U Screen Assembly Replacement: step 7, image 2 of 2
    • Remove the Wi-Fi card by pulling it straight out of its connector.

  8. Asus ZenBook UX303U Screen Assembly Replacement: step 8, image 1 of 2 Asus ZenBook UX303U Screen Assembly Replacement: step 8, image 2 of 2
    • Lift the entire lower assembly up and off of the hinges securing it into place.

Conclusion

To reassemble your device, follow these instructions in reverse order.

7 other people completed this guide.

Dean Anderson

Member since: 02/14/18

621 Reputation

3 Guides authored

Team

USF Tampa, Team S3-G5, Nance Spring 2018 Member of USF Tampa, Team S3-G5, Nance Spring 2018

USFT-NANCE-S18S3G5

3 Members

9 Guides authored

5 Comments

If anyone knows of a good, reliable source to buy a replacement screen assembly let me know, please. I have a 303U with the 1800 screen and I accidentally sat something heavy enough on top of the laptop to crack the screen on the right-third of the screen. I can’t use half of the touch screen and it’s fairly obvious depending on the color/brightness of the content I’m looking at. Would like to be able to replace this and these steps are pretty easy for me to follow so I’m confident I can have a newish looking laptop again if I can find a replacement screen.

chris.schroeder86 - Reply

Hi ! Did you manage to find one? I’m trying to do the same thing :)

Adrien Rousseau -

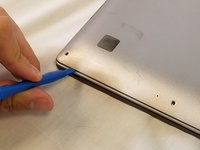
The bottom of the pictured device may feature Phillips #00 screws, but I also have this laptop and the screws around the edge of the bottom panel are Torx T5s on my device.

Nick Brennan - Reply

It seems that the hinge assembly on one side is broken on my UX303U, on the screen side of the hinge. Do I need to replace the whole screen assembly? The laptop works perfectly otherwise.

Kobus - Reply

Same here, asus ux303u screen side hinge is stuffed. But I think it may actually be the plastic screen cover itself where the hinge attaches, not just the hinge.

Dash OShea - Reply

Add Comment

View Statistics:

Past 24 Hours: 1

Past 7 Days: 6

Past 30 Days: 31

All Time: 7,991